On This Page
Supporting Merchants Who Use the eCheck Service
As a partner who manages merchant portfolios, you can now support merchants who use eCheck
payments. When you board a merchant who uses the eCheck service, or if you have a
merchant who would like to use the service, you can give them the option to self-enable
it. In order to adopt the eCheck service, the merchant must complete an application for
the eCheck service.
To obtain a complete boarding guide, contact your Visa Acceptance Solutions representative.
This content includes references to offerings from Cybersource which is a part of the Visa Acceptance Solutions family of brands.
Enabling the eCheck Service During Boarding
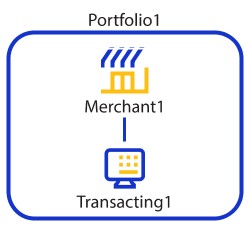
A merchant account includes at least two organizations: a merchant organization (parent) and a
transacting organization (child). When boarding a merchant who will use eCheck, you must
configure the transacting organization to self-enable eCheck.
Figure:
Merchant Account
Adding eCheck Self-Enablement During Boarding
Follow these steps to add eCheck self-enablement during boarding:
- Log in to theBusiness Center:
ADDITIONAL INFORMATION
- In the left-navigation menu, choosePortfolio Management > Manage Merchants.
- In the Transacting Organization and Products section, clickStart. The Transacting Organization and Products page opens.
- To enable the eCheck service in the Product Enablement section, click theEnablementdrop-down menu and selectSelf-Enablement.
- To confirm the configuration, clickApply.
- To save all product configurations, clickSave. You are returned to the Add Merchant page.
- To finish and return to Merchant Management or to add another merchant, clickReturn to merchant management.
Adding eCheck Self-Enablement to an Existing Merchant
Follow these steps to add eCheck self-enablement to an existing merchant:
- Log in to theBusiness Center:
ADDITIONAL INFORMATION
- In the left-navigation menu, choosePortfolio Management > Manage Merchants.
- Search for the organization on the Manage Merchants page.
- Find the organization in the Search Results table and click the eye icon. The Merchant Details page opens.
- In the Products section, click+ Add Products. The Add a Product page opens.
- SelecteCheck.
- SelectSelf-Enablement.
- ClickAdd.
- ClickSave.
Boarding a Merchant Account for Sandbox Testing
This topic describes how to begin to board a merchant account (MID) that the merchant user
plans to use for testing eCheck transactions in the sandbox environment.
In order to perform this task, your partner portfolio must have
eCheck enabled. If you do not know whether eCheck is enabled, contact your
Visa Acceptance Solutions
sales team.For the final step of the task, you notify the MID user that they can complete the final steps
to board their MID for use in the
Business Center
sandbox.- Follow these steps to begin boarding a merchant account for sandbox testing:
- Log in to the Business Center sandbox as the portfolio user with administrative permissions:
ADDITIONAL INFORMATION
- Using the Add Products section of the Merchant Management screen, enable eCheck for the merchant account (MID) asAllow Self-enablement.
- Notify the MID user that they can complete the steps to board their MID for sandbox testing:
ADDITIONAL INFORMATION
- The MID user logs in to their MID user account on the sandbox Business Center.
- In the Available Products module, the MID user fills out the eCheck Application with test data for use in the sandbox testing environment.
- The MID user submits the application.When the application is submitted, the MID is automatically enabled for eCheck. The application does not go through underwriting because this merchant account is only used for test transactions.
ADDITIONAL INFORMATION
Merchants can find more information in theeCheck Merchant User Guide, under "Boarding Your Merchant Account for Sandbox Testing."
Submitting the eCheck Application
To submit the eCheck application, a merchant must follow these steps:
- Log in to theBusiness Center:
ADDITIONAL INFORMATION
- In the left-navigation menu, clickAvailable Products. The Available Products page opens.
- In the eCheck section, clickEnable. The Product Enablement: eCheck page opens.
- Complete the text fields. All information is required. For an explanation of the application fields, see The eCheck Application.
- Read the eCheck Services Agreement. Check the box to agree.
- ClickSaveto submit the application. You will receive an email confirming that it has been received. An underwriter will review the application and respond within two business days.
The eCheck Application
To apply for the eCheck service, merchants must submit an application containing information
about their business. After they submit the application, it is reviewed and either
approved or denied.
Each section of the application is described below.
Primary Owner Identifying Details
Enter the identifying and contact information about the primary owner.
To prevent fraud, the federal government requires us to collect the Social Security number
of the business owner. Non-U.S. persons who do not have a Social Security number may provide
their passport number, an alien identification card number, or number and country of
issuance of any other government-issued document evidencing nationality or residence and
bearing a photograph or similar safeguard.
Primary Owner Address Information
Enter the address of the primary owner.
Primary Owner Ownership Details
Enter the job title and ownership percentage of the primary owner.
Additional Owners
You can add additional owners of the business to the eCheck application. Enter the percentage
of each individual who owns, directly or indirectly, equity interests of the legal
entity. Only individuals with 25 percent or more should be listed. For example, each
natural person that owns 25 percent or more of the shares of a corporation can be
added.
Ownership Details
Enter the ownership details of the business.
The Doing Business As name is the business’s assumed, trade, or fictitious name. This name
might be the legal business name.
Federal Tax ID is the nine-digit tax identification that is issued to the business by the U.S.
government that is used for tax reporting. For sole proprietors, this number can be
your Social Security number.
Business Address Information
Enter the address of the business. If this address is the same as the primary owner’s address,
click
Import from Owner Address
.Industry Information
Use the drop-down menu to select the Merchant Category Code that fits your business.
Business Process Information
Enter information about your business’s process.
Timeframe to Product Delivery is how long it takes for the customer to receive their
product after paying for the order. If you are providing a product or service that is paid
for at the time of or after delivery, enter
0
.Estimated Total Monthly Sales is the total dollar amount of eCheck sales that you expect to
process each month through this account. Do not include payment volume from other methods,
such credit cards or wire transfers.
Average Order Amount is the average dollar amount of each individual order or sale. If your business is new and you
are unsure of the amount, you may list the average price of your
products and services for sale.
Largest Expected Order Amount is the dollar amount of the largest order you expect to have. If
your business is new and you are unsure of the amount, you may list the dollar
amount of your most expensive product or service for sale.
Deposit Account Information
Enter information about the account in which you want funds deposited. Note that this account
might also be debited for any accrued fees, chargebacks, refunds, returns, or other
amounts owed related to the eCheck account.
Routing Number is the nine-digit routing number for your bank. It is printed on the bottom of
your checks. If you do not have checks, contact your bank for the number.
Account Number is the number of the bank account in which funds from your sales are
deposited.
eCheck Settings
Enter the eCheck Descriptor.
The eCheck Descriptor is the name appears on the charge in your customer’s bank statement.
This should be the name they are most familiar with for your company. Most often
this will be your business name or website URL, and you might have to abbreviate it
to fit the 10-character limit.
Service Agreement
Read the text in this section. Read the eCheck Service Agreement. Check the box to agree.
Click
Save
to submit the application. You will receive an email confirming that it has
been received. An underwriter will review the application and respond within two
business days.eCheck Transaction Search and Details
You can search for transactions using search filters in the
Business Center
or by using
the REST API. On the
Business Center
's Transactions page, use the Application search filter to find
one of these options from the Application drop-down menu:- Electronic Check Credit
- Electronic Check Debit
These eCheck API fields are supported for transaction search and details:
- paymentInformation.bank.account.suffix
- paymentInformation.bank.account.checkNumber