On This Page
Recent Revisions to This Document
25.07.01
- Initial release.
Partner Getting Started
As a
Visa Acceptance Solutions
partner, you have access to a range of solutions that
can help grow your business and offer your customers more ways to pay. You can use
Visa's global network, innovative products, and trusted brand to enhance your value
proposition and drive revenue.Visa solutions are designed to meet the diverse needs of different partners and their
customers. You can choose options that match your business model, target market, and
integration preferences.
The benefits of partnering with Visa:
- Access to the world's largest payment network, reaching over 200 countries and territories
- Ability to offer your customers multiple payment methods, including contactless, mobile, online, and in-app payments
- Opportunity to use Visa's expertise, resources, and tools to support your business growth and innovation
- Exposure to Visa's extensive network of merchants, acquirers, issuers, and other partners
Visa offers three brands to deliver payment solutions to your merchants and customers,
each with a unique integration process:
- Visa Acceptance Platform
- Cybersource
- Authorize.Net

Partnership Models
The
Visa Acceptance Solutions
partnership program offers flexible commercial models
that adapt to your business needs and growth. The available partnership models
are:- Referral Partners:Diversify your revenue streams with low commitment by referring merchants to Visa Acceptance Solutions where they can build great payment experiences. For more information, see Referral |Visa Acceptance Solutions.
- Enablement Partners:Integrate our offerings into your platform and build innovative, custom payment solutions for your merchants. For more information, see Enablement |Visa Acceptance Solutions.
- Reseller Partners:Sell our solutions directly to your merchants with the option to deliver them under your brand. For more information, see Reseller |Visa Acceptance Solutions.
- Authorize.Net Partners:Complement your own merchant account offering with the Authorize.Net payment gateway. Partner with Authorize.Net as a reseller, enablement or referral partner. For more information, see Become a partner | Authorize.Net.
Becoming a Partner
To become a
Visa Acceptance Solutions
technology partner, complete these steps:- Register for a Tech Partner Sandbox.
- Explore available products and services to integrate.
- Activate yourBusiness Centeraccount and log in to manage your solutions.
- Develop and test your integration.
- Validate your integration withVisa Acceptance Solutions.
- Access your production account information.
The following sections guide you through each of these steps in detail:
Creating a Tech Partner Sandbox
To create a technology partner sandbox, go to Become a Technology Partner for
Visa Acceptance Solutions
.Onboarding a New Solution
After you create your tech partner sandbox, you must onboard a solution to receive a
Partner Solution ID for testing purposes.
Follow these steps to onboard a solution in your partner sandbox account:
- In the left navigation panel, go toPartner Management.
- ClickManage Solutionsand then clickAdd Solution.
- Follow the guided process to enter the required information for onboarding your solution.
Define the
Visa Acceptance Solutions
products that are part of your integration
during solution onboarding. You can find the products and services available for
integration on the Developer Center API
Reference. The solution onboarding flow presents the product scopes that
align with the available products and services.After you successfully onboard, you receive a test Partner Solution ID. Your Partner
Solution ID is effectively an organization ID. This is the unique identifier for your
integration with the platform. Use this Partner Solution ID for testing purposes only.
Test your integration and provide details to the
Visa Acceptance Solutions
solutions
team. The team will validate your integration and provide production access with a live
Partner Solution ID.The Partner Solution ID may also be referenced as the Partner Solution Org ID,
Solution ID, or PSID. These terms are interchangeable and represent the same unique
ID associated with the integration. If you have access to an existing Partner
Solution ID, certain functionalities within this guide may not be available.
Visa Acceptance Solutions
recommends you complete the registration process on
the Become a Technology Partner for Visa Acceptance Solutions
page to ensure proper agreements and updated partner details for
future integration and to get access to the latest functionality.Develop Your Integration
Learn about integration models, best practices, and authentication options for developing your integration with
Visa Acceptance Solutions
.This section provides an overview of the available integration models and supporting resources to help you develop your integration.
Develop your integration according to the product specifications for the APIs you are
integrating. For guidance on the products to include in your integration, see the
integration guides in the Developer Center.
Best Practices
Visa Acceptance Solutions
recommends using the Visa Acceptance Solutions
REST
APIs and the hosted payment fields. These integration methods capture sensitive
payment data securely. Use Microform, Unified Checkout, and tokenization methods to
ensure the safety of the cardholder data and reduce PCI requirements for your
customers. For more information, see Secure Integration Methods.Legacy APIs, such as Simple Order API, are supported but may not include the full feature set.
Many regions require the use of the 3-D Secure feature, which facilitates Strong Customer Authentication (SCA).
Visa Acceptance Solutions
recommends using the Payer Authentication service to ensure your software is available in those regions.Consider your customers' needs when deciding which products and services to include in your integration.
SDKs and GitHub
You can access various APIs with the REST API SDKs to begin development of your
solution. For more information about the
Visa Acceptance Solutions
API SDKs, see
REST API SDKs.Authentication Options
Determine the authentication method for your integration. The options include:
- Merchant API Key Credentials:Supports both HTTP signature and JWT authentication methods. Merchants generate the necessary key type within theBusiness Centerand are responsible for the full lifecycle management of these credentials. These credentials are used to authenticate API requests to our acceptance platform.
- Partner Solution API Key Credentials (Pilot):Supports JWT authentication mechanisms with REST API integrations. This delegate authentication method allows you (the Tech Partner) to generate and manage the complete key lifecycle, providing streamlined credential management. Currently available as a pilot program.
- OAuth 2.0 (Pilot):OAuth 2.0 is offered as a pilot for tech partners exploring secure, token-based, permission-scoped API integrations. This industry-standard authorization protocol allows applications securely access APIs on behalf of merchants, without exposing sensitive credentials. It enables safer, more controlled interactions by issuing short-lived access tokens with specific scopes. For more information, see the OAuth 2.0 Developer Guide.
To become an early adopter for Partner Solution Key or OAuth 2.0, contact your
Visa Acceptance Solutions
representative.Including your Partner Solution ID in your Integration
Include your Partner Solution ID with transaction requests to identify all requests going
through your integration. Including your Partner Solution ID in your integration enables
Visa Acceptance Solutions
to accurately track your transaction volumes, and
provide monitoring, servicing and troubleshooting.Currently, this functionality and reporting is only available from within
Visa Acceptance Solutions
Payments APIs by including your Partner Solution ID within the
body of the payloads.To integrate with
Visa Acceptance Solutions
payments APIs, include your assigned
Partner Solution ID with every payments API request you make in your integration, both
in the test and production environments.Validate that your Partner Solution ID has been passed and captured properly.
This example show you how to include the Partner Solution ID value in the
clientReferenceInformation.partner.solutionId
when you send a
request:{ "clientReferenceInformation": { "code": "TC50171_3", "partner": { "solutionId": "6hah804t" } } }
Example: Including a Partner Solution ID in a Request
This example shows how to include a Partner Solution ID in a payment request. The Partner
Solution ID is included in the
clientReferenceInformation.partner.solutionId
field.Request with a Partner Solution ID
{
  "clientReferenceInformation": {
    "code": "TC50171_3",
    "partner": {
      "solutionId": "6hah804t"
    }
  },
  "paymentInformation": {
    "card": {
      "number": "4111111111111111",
      "expirationMonth": "12",
      "expirationYear": "2031"
    }
  },
  "orderInformation": {
    "amountDetails": {
      "totalAmount": "102.21",
      "currency": "USD"
    },
    "billTo": {
      "firstName": "John",
      "lastName": "Doe",
      "address1": "1 Market St",
      "locality": "san francisco",
      "administrativeArea": "CA",
      "postalCode": "94105",
      "country": "US",
      "email": "[email protected]",
      "phoneNumber": "4158880000"
    }
  }
}
Test Your Solution
To test your solution, you must have access to a merchant sandbox account to simulate a
real transaction.
Create an account on the
Visa Acceptance Solutions
Sandbox page in the
Developer Center.After you develop your integration, send a test transaction using the sandbox merchant
org ID you created during the sandbox sign up. Ensure you include the merchant org ID in
the headers as required and outlined in the product integration guides.
You must also include your Partner Solution ID in the
clientReferenceInformation.partner.solutionId
field in the request
body.Validating your Partner Solution ID in the Business Center
Business Center
Validate the receipt of your Partner Solution ID within the
Business Center
from
your test merchant account, when you view a transaction:- Log in to the testBusiness Centerusing your merchant sandbox account.
- Go to theTransaction Details Searchpage.
- Filter search results for transactions with your Partner Solution ID.
Your search finds your assigned Partner Solution ID, confirming successful partner
integration.
The Transaction Details Page
The following image shows an example of
the Transaction Details page:

Get Listed on the Partner Directory
The Partner Directory is a public platform that showcases your solutions as a
Visa Acceptance Solutions
integrated partner. It highlights your offerings, helps you stand
out, and demonstrates how your solutions integrates with the Visa Acceptance Solutions
. This directory increases your visibility to merchants and acquirers seeking
technology partners for new projects.The primary function of the Partner Directory is to facilitate connections between
Acceptance Solutions ISVs, technology partners, and
Visa Platform Connect
-connected
acquirers.After developing a full integration, you can list your offering in the Partner Directory.
For more information, see Partner Directory.
Prerequisites to Getting Listed in the Directory
Before submitting information for your partner listing, ensure you have:
- An active partner agreement withVisa Acceptance Solutions.
- Agreed to be listed under Visa Acceptance Solutions branding (signed our legal addendum).
- Registered for the Acceptance Solutions Marketing Partner portal.
- Designated two directory editors from your team to create and edit your listing information.
Requesting Directory Access
Follow these steps to request directory access:
- Enter a partnership agreement. For more information, see Becoming a Partner.
- Complete integration withVisa Acceptance Solutions.
- Submit transactions in production using your assigned Partner Solution ID.
- Register for an account on the Acceptance Solutions Partner Marketing portal.
- Fill out the directory profile on the Acceptance Solutions Marketing Partner portal.
Completing the Directory Profile
Create and update your listing on the Acceptance Solutions Partner Marketing portal. Managing
your content is seamless. Add, remove, and update information about your company and
products.
Visa Acceptance Solutions
approves your content before you publish it.Follow the framework and best practices outlined in this section of the guide.
Accessing your Company Profile in the Partner Portal
From the
Company Profile
page, make these changes and updates:- Add your company logo.
- Indicate whichVisa Acceptance Solutionsproducts your offering is compatible with.
- Indicate which countries your offering is available in.
- Indicate which industries your offering serves.
To access the Company Profile page:
- Log in to the Partner Portal.
- Click your user profile at the top right of the page.
- ClickCompany Profile.
Accessing the Company Information
Review the information under the
Company Information
section
on the Company Profile page. Add or make changes, including your company's logo.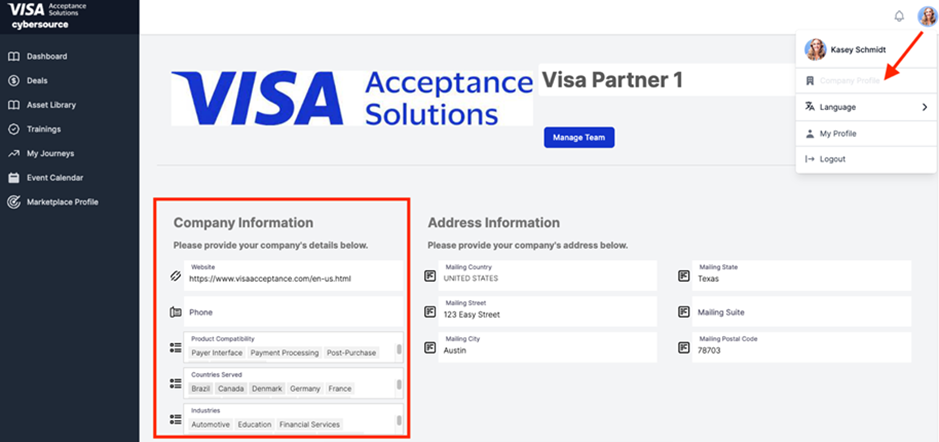
Accessing the Marketplace Profile
Click
Marketplace Profile
on the left panel of the Partner
Portal. Add information for your partner listing on this page.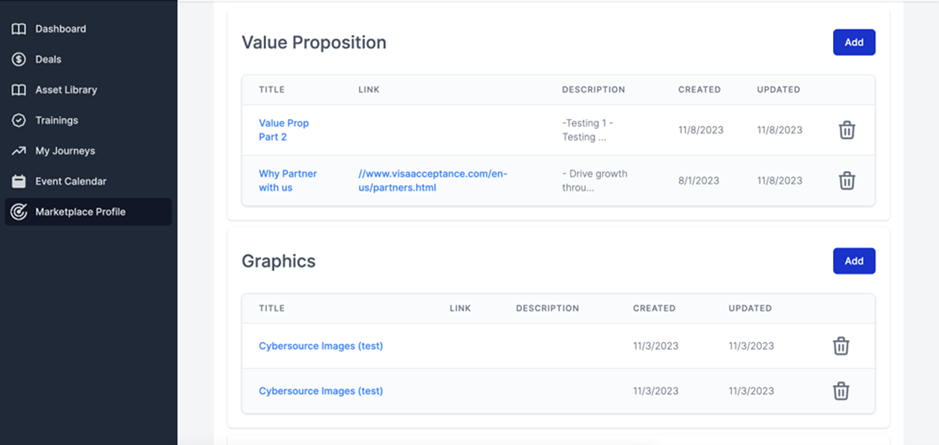
Entering your Directory Profile Information
Enter information in each section to complete the Directory Profile Information:
- In theHeadlinesection, enter a short headline for your business.
- In theCompany Descriptionsection, enter two to three sentences summarizing your company and product offerings.
- In theValue Propositionsection, enter two to three sentences summarizing the value of your company and offering.
- In theGraphicssection, enter an image at least 575px. Include any images you want to display on your listing (jpeg or png files).
- In the optionalVideosection, enter a video you would like to display on your listing (link or mp4 files).
- In theProduct Overviewsection, enter this information:
- Available version number
- System requirements
- Product compatibility
- Under theIntegration Informationsection, provide instructions for merchants on how to integrate and configure their merchant accounts withVisa Acceptance Solutions's offerings. Enter instructions in each text box on how to complete these tasks:
- Create a sandbox account: Describe how to create a sandbox account. Merchants must set up their integration to register for a sandbox account. From this account, they create their security certificates and test their implementation. Link detailed instructions in Step 8.
- Create your Credentials: Describe how to create credentials. Merchants must create REST keys to connectVisa Acceptance Solutionsto your company's accounts. Link detailed instructions in Step 8.
- Configure the Plug-in: Describe how to configure the plug-in. Enter the link to yourVisa Acceptance Solutions's offerings page. The page must allow merchants to view and checkout your offerings. After checkout, explain how your company grants them access keys to download your company's instance. Link detailed instructions in Step 8.
- In theResourcesfield, add any relevant links to content you want to share. These links can include documentation, listing information, GitHub sites, and other links.
- In theDownloadable Assetsfield, add any relevant files you want to share. These files will be available for download on your listing (pdf files).
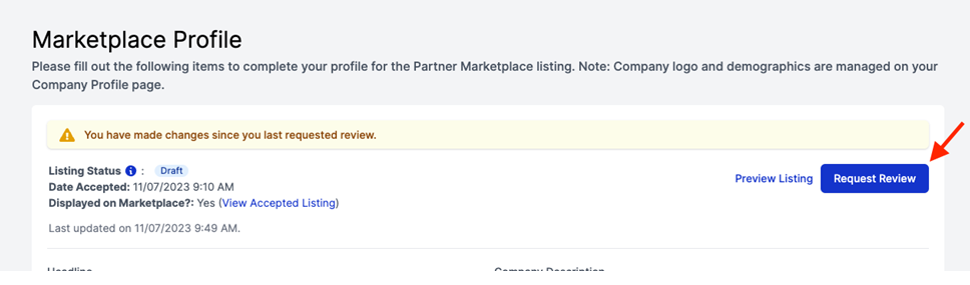
- ClickRequest Reviewto send a draft of your listing for review to theVisa Acceptance Solutionsteam.
Requesting a Review of the Company Profile
Submit the listing to the
Visa Acceptance Solutions
team for review. After the
review, the team approves and publishes your listing to the Partner Directory or
requests changes.If changes are required, you can repeat the steps above to access your Marketplace
profile, make changes, and request another review. You will receive an email
notification when the status of your listing changes.
Contact your account executive if you have any questions or concerns.
Support Resources and Forums
Access these resources to learn about Card Not Present (e-commerce) and Card Present
(in-person) integrations:
- Review the comprehensive API Reference for details on other transaction types and available APIs: In-Person Accept
Developer Center Forum
Visit the Cybersource Developer Community to ask questions or engage
with the developer community.
Partner Blog and Newsletter
To subscribe to the Partner blog and newsletter, see the Subscription Management Center.
Frequently Asked Questions
- How do I sign up for the Partner Marketing portal?
- Sign up at this link: Partner Marketing portal. You receive portal approval and login details through email within 2-5 business days.
- What does the partner marketing portal contain?
- The Visa Acceptance Solutions partner portal is a self-service resource to help partners succeed in maximizing mutual partnership value. Through the portal, you access helpful product and leadership content, product trainings, register referral leads (only for referral partners), view theVisa Acceptance Solutionsevent calendar, and edit your directory listing.
- How many users can we have in the marketing partner portal?
- You can have as many users as you need! However, designate only two users as directory editors.
- What if I have future edits to my listing?
- If you want to make changes to your partner listing, follow the same process as when you first created it. Log back in to the partner portal, make edits to your Profile page, and request a review by the Visa team.