On This Page
Recent Revisions to This Document
26.02.02
- New Adobe Commerce Open Source Plug-in
- A new Adobe Commerce Open Source plug-in was added to augment the existing Adobe Commerce Cloud plug-in. See Adobe Commerce REST API.
- Github link
- Added a link to ISV Toolkits available at GitHub. See About the Integrated Solutions.
- Adobe Commerce Cloud
- Updated the section on configuring web services to refer to a change in the procedure where SOAP p12 certificates are uploaded to a section now called Simple Order P12 Key File. See Configuring WebService.
- Updated the section on creating a SOAP security key to refer to the SOAP P12 certificate. See Configuring Security Credentials.
- PrestaShop
- Revised the PrestaShop section. See PrestaShop.
- Shopify
- Added note to the configuring section to ensure that the Test mode is used when testing. See Configuring Shopify.
- The testing section was revised to describe how to install and use a new test app. For more information, see Reference Information.
- WooCommerce
- Updated the WooCommerce plug-in. For more information, see WooCommerce.
25.12.01
- Oracle Netsuite
- Removed Oracle Netsuite module from guide.
25.10.01
- Shopify
- Added note that when using the test server, ensure that the Test Mode option is enabled. See Configuring Shopify on page 122.
- WooCommerce
- Added note to the troubleshooting section to check with support services for configuration guidance when your account is managed by a merchant services provider. See Support and Troubleshooting on page 129.
25.09.02
- PrestaShop
- This revision contains only editorial changes and no technical updates.
- Shopify
- The app now supports Shopify subscriptions.
- Clarified that during installation, you use the transacting merchant ID as your credentials. See Installing the Live App.
25.09.01
This revision contains only editorial changes and no technical updates.
25.08.01
- WooCommerce
- Updated all information in this section. See WooCommerce.
VISA Platform Connect: Specifications and Conditions for
Resellers/Partners
The following are specifications and conditions that apply to a Reseller/Partner enabling
its merchants through
Visa Acceptance platform
. Failure to meet any of the specifications and conditions below is
subject to the liability provisions and indemnification obligations under
Reseller/Partner’s contract with Visa/Cybersource.- Before boarding merchants for payment processing on a VPC acquirer’s connection, Reseller/Partner and the VPC acquirer must have a contract or other legal agreement that permits Reseller/Partner to enable its merchants to process payments with the acquirer through the dedicated VPC connection and/or traditional connection with such VPC acquirer.
- Reseller/Partner is responsible for boarding and enabling its merchants in accordance with the terms of the contract or other legal agreement with the relevant VPC acquirer.
- Reseller/Partner acknowledges and agrees that all considerations and fees associated with chargebacks, interchange downgrades, settlement issues, funding delays, and other processing related activities are strictly between Reseller and the relevant VPC acquirer.
- Reseller/Partner acknowledges and agrees that the relevant VPC acquirer is responsible for payment processing issues, including but not limited to, transaction declines by network/issuer, decline rates, and interchange qualification, as may be agreed to or outlined in the contract or other legal agreement between Reseller/Partner and such VPC acquirer.
DISCLAIMER: NEITHER VISA NOR CYBERSOURCE WILL BE RESPONSIBLE OR LIABLE FOR ANY ERRORS OR
OMISSIONS BY THE
Visa Platform Connect
ACQUIRER IN PROCESSING TRANSACTIONS. NEITHER VISA
NOR CYBERSOURCE WILL BE RESPONSIBLE OR LIABLE FOR RESELLER/PARTNER BOARDING MERCHANTS OR
ENABLING MERCHANT PROCESSING IN VIOLATION OF THE TERMS AND CONDITIONS IMPOSED BY THE
RELEVANT Visa Platform Connect
ACQUIRER. About the Integrated Solutions
Visa Acceptance Solutions
offers integrated solutions to enhance payment acceptance,
fraud management, recurring billing, reconciliation, and reporting processes. Our
integrated solutions provide significant and vast use cases for product managers to
developers and business professionals. Reduce your operational costs through streamlined
payment integrations and improve customer satisfaction through flexible and secure
payment options. Our solutions can easily scale to your growing business needs, help
increase sales and conversion rates, and provide a clear value proposition to
distinguish your business from competitors.The solutions detailed in this document are:
For information on how to become a partner, see the
Partner Getting Started
guide. See
these additional resources for more information about the ISV Plugins documented in this
guide:
Built by Us
Welcome to
Visa Acceptance Solutions
's suite of solutions built by Visa Acceptance Solutions
for you. These solutions offer potential use cases that improve
operational efficiency, enhance security, and provide comprehensive reporting and
invoicing. Reduce the risk of errors, protect against fraudulent transactions, and
ensure accurate financial records through streamlined reconciliation processes. Our
solutions are ideal for various industries including financial services, healthcare,
manufacturing, and distribution. For example, in healthcare, our solutions can manage
payment operations efficiently, ensuring secure and accurate processing of payments for
services rendered, and support timely invoicing actions.These guides are created by
Visa Acceptance Solutions
:Adobe Commerce REST API
The Visa Acceptance Solutions extension for
Adobe Commerce
/Magento
Open Source enables merchants to connect their Adobe Commerce
/Magento Open Source store to the Visa Acceptance Platform to directly take credit and
debit cards, Apple Pay, Google Pay, and Click to Pay payments.For simplicity in this document, any reference to
Adobe Commerce
will
apply for Magento Open Source also, unless otherwise stated.Supported Features
The Visa Acceptance Solutions extension supports various payment methods and security features.
Payment Methods
- Credit/debit cards
- Apple Pay
- Google Pay
- Click to Pay
Security Features
- Payer Authentication/3-D Secure
- Tokenization
Supported Versions
The
Adobe Commerce
extension has these system requirements:- Adobe Commerce2.4.5+
- PHP 8.1+
Unsupported Adobe Commerce Features
Adobe Commerce
FeaturesThese features are not supported by this extension:
- Order void
- Multi-shipping
- Multiple node implementation
- Google reCAPTCHA
Visa Acceptance Solutions Prerequisites
Mandatory Prerequisites
This Visa Acceptance Solutions product must be configured for your Merchant ID:
- Unified Checkout
You also must have a REST Shared Secret Key. See the Getting Started with REST Developer guide
for information on how to get a REST Shared Secret Key.
Optional Prerequisites
These Visa Acceptance Solutions products are optional. If you want these products you
must enable and configure your Merchant ID with them.
- Payer Authenticationfor3-D Secure
- Tokenization
- Apple Pay
- Google Pay
- Click to Pay
You can also enable Message-Level Encryption (MLE) for additional security. A REST Certificate is required for MLE.
Release Notes
Version history and changes for the Visa Acceptance Solutions extension for
Adobe Commerce
.Version 25.2.0 January 2026
These enhancements were added with this release:
- Request Message Level Encryption
- API endpoint updates
- Support for Jaywan card
- Implemented Sub Resource Integrity (SRI)
- UpdatedUnified Checkoutto version 0.33
These bugs were addressed in this release:
- Corrected the country field source in theUnified Checkoutcapture context.
- CSP violation
This release is compatible with:
- Adobe Commerce2.4.5+
- PHP 8.1+
Version 25.1.0 May 2025
Initial release that supports:
- Unified Checkout
- Apple Pay
- Google Pay
- Click to Pay
- TMS
- Payer Authentication
This release is compatible with:
- Adobe Commerce2.4.5+
- PHP 8.1+
Installation
Follow these steps to install the Visa Acceptance Solutions extension for
Adobe Commerce
. Before starting the installation, ensure you have
Adobe Commerce
authentication keys and that they are set
correctly in your environment. See Authentication Keys for details.Go to the
Adobe Commerce
Marketplace and get the free extension.Choose the appropriate installation method based on your environment:
- Adobe Commerce Cloud: For cloud-based installations, go to the Adobe Commerce Cloud.
- Adobe CommerceOn-Premise / Magento Open Source: For self-hosted installations, go to Adobe Commerce On-Premise.
Adobe Commerce Cloud
Adobe Commerce Cloud
Follow these steps to install in
Adobe Commerce Cloud
environments.- Run this command in your local Cloud project directory:composer require Cybersource/module-payment:25.2.0
- After Composer finishes, commit the updated files using these commands:git add composer.json composer.lock git commit -m "Add Cybersource Payment module" git push
- Enable the module with this command:php bin/magento app:config:dump
- After enabling the module, commit the updated configuration file with these commands:git add app/etc/config.php git commit -m "Enable Cybersource> Payment module" git push
Adobe Commerce On-Premise / Magento Open Source
Adobe Commerce
On-Premise / Magento Open SourceTo install the module using Composer, run these commands in your
Adobe Commerce
On-Premise and Magento Open Source environments.php bin/magento module:enable Cybersource_Payment php bin/magento setup:di:compile php bin/magento indexer:reindex php bin/magento setup:upgrade php bin/magento setup:static-content:deploy -f php bin/magento cache:clean php bin/magento cache:flush php bin/magento module:status
Configuration
To configure the Visa Acceptance Solutions extension, go to . Configure these fields:
Configure General settings
: - Environment:
- Test: Choose for testing of yourVisa Acceptance Solutionstest account.
- Production: Choose for live transactions.
- Merchant ID: Enter the transacting Merchant ID (MID) assigned to you by Visa Acceptance Solutions.
- API Key: Enter the Key from your REST API Shared Secret Key.
- API Shared Secret Key: Enter the Shared Secret from your REST API Shared Secret Key.
- Accepted Card Types: Choose the card brands you want to accept.
Configure Debug Mode
: - Yes: Compiles detailed logs for every transaction. This option is only recommended for the Test Environment or when troubleshooting issues in Production.
- No: Only basic logging occurs.
Configure Message Level Encryption
:
Enabled
- Yes: Encrypts the full request message using JSON Web Tokens before being transmitted to the Visa Acceptance Platform.
- No: Uses the HTTP Signature.
JSON Web Tokens use a digital certificate to prove who you are, while HTTP
Signature uses a shared secret key to confirm the message is genuine. Both methods
are PCI compliant.
- Certificate File: Upload the p12 certificate for yourVisa Acceptance SolutionsMerchant ID.
- Key Password: Enter the password that was used when you created your p12 certificate.
Configure Secure Payment Methods
: - Enable: ChooseYesto enable the extension.
- Title: Enter the label your customers see on the checkout page.
- Payment Action: Choose one of these options:
- Authorize and Capture: Captures the transaction automatically when the authorization is approved.
- Authorize only: Sends an authorization request and if approved, you must manually request a capture.
- Payment Card Types: Choose the card brands you want to offer to your customers.
- Allowed Payment Methods: Choose the payment methods you want to offer to your customers. These payment card types must be enabled for your MID in theBusiness Center. See here for details.
- Select Layout:
- Embedded: The payment widget appears inline on the checkout page.
- Sidebar: The payment widget appears on the right side on the checkout page.
- Payment from Applicable Countries:
- All Allowed: Uses theAdobe Commerceglobal settings to determine which countries are available.
- Specific Countries: Specify which countries you want to accept payments from.
- : ChoosePayer Authentication/3-D SecureYesto enable3-D Secure.
- Tokenization: ChooseYesto enable your customers to save their payment cards for future purchases.
- Tokenization Title: Enter the label you want your customers to see when they pay with a saved card.
- Saved Card Verification: ChooseYesto request that your customer enter their card security code when paying with a saved card.
- Enforce Strong Customer Authentication: ChooseYesto enforce a3-D Securechallenge when a customer saves their card for the first time.
Order Management
The Visa Acceptance Solutions extension provides comprehensive order management
capabilities for handling transactions after they are processed. This includes capturing
authorized payments and processing refunds when necessary.
The order management features enable you to:
- Capture authorized transactions to collect funds.
- Process full or partial refunds for completed transactions.
- Manage the payment lifecycle from authorization to settlement.
Capture
When you have the
Payment Action
set to
Authorization
, you must capture the transaction to collect the
funds.- Enter an order from the list of orders.
- ClickInvoice.
- Check the item(s) that require capturing.
- Ensure the drop-down capture option is set toCapture Online.
- ClickSubmit Invoice.
Refund
To refund an order:
- From the list of orders, choose the order you want.
- Click onInvoices.
- Select the appropriate invoice.
- Click theCredit Memobutton.
- Check the item(s) to be refunded.
- Verify and if necessary update theRefund Totals.
- ClickRefund.
Support & Troubleshooting
Get support for the Visa Acceptance Solutions extension by providing detailed information about your issue.
If you require support with this extension, sign into the Support Center to raise a case,
providing these details:
- Summary of the issue
- Steps needed to reproduce the issue
- Platform version
- Extension version
- Visa Acceptance SolutionsMerchant ID
- Configuration screenshots
- List of themes/additional extensions installed
- Log file and any other data or screenshots related to the issue
Upgrade
To upgrade from an earlier version of our
Adobe Commerce
extension, run these composer commands- Update the extension to the latest version:composer requireVisa Acceptance Solutions/module-payment:25.2.0
- Run the setup upgrade command:bin/magento setup:upgrade --keep-generated
- Deploy static content:bin/magento setup:static-content:deploy
- Clean the cache:bin/magento cache:clean
Adobe Commerce
Adobe Commerce
You can integrate
Visa Acceptance Solutions
with the Adobe Commerce
platform to process payments using Magento checkout. The Adobe Commerce
extension supports popular payment methods, safeguards
payment data, minimizes fraud, and mitigates risks. This section describes the payment
management capabilities offered by Visa Acceptance Solutions
through the Adobe Commerce
integration.This guide also applies to installing this extension in a Magento Open Source
environment.
Fraud Management
Fraud Management prevents fraud losses and gives you the flexibility to control
business practices and policies in real time. Fraud Management can help you
accurately identify and review potentially risky transactions while minimizing the
rejection of valid orders. Fraud Management comprises these capabilities:
- Real-time fraud screening performed only during authorization
- Device fingerprinting
- On-demand Conversion Detail Report for changes in order status
Account Takeover Protection
Account Takeover Protection defends customers and merchants from fraudulent use of
online accounts. It monitors suspicious account changes and helps identify high risk
users at account creation and login. These capabilities comprise Account Takeover
Protection:
- Real-time event screening of account creation, login, and changes
- Device fingerprinting
Payer Authentication
Payer Authentication enables you to add support to your web store for card
authentication services offered by Visa
, Mastercard,
and other card brands. These
programs verify the cardholder’s identity directly with the card-issuing bank in
real time to increase payment security and reduce the risk of fraud. However, Payer
Authentication is not a fraud management service, and Visa Acceptance Solutions
recommends that you configure a comprehensive fraud management program such as
Decision Manager
in addition to Payer Authentication services. These services
comprise Payer Authentication:- Verified by Visa
- Mastercard Identity Check
- American Express SafeKey
- Discover ProtectBuy
- JCB
- Diners
- Maestro International
To comply with the recent mandates for French local processors that support Payer
Authentication, CMCIC, Atos and BNP processors no longer support these
combinations.
PayPal
The
Adobe Commerce Cloud
integration includes the PayPal payment
method. Processing your PayPal transactions through Visa Acceptance Solutions
enables you to consolidate all payment types under a single gateway account,
simplify integration efforts, screen PayPal transactions for fraud with Decision
Manager, and streamline reporting. These services comprise PayPal:- Sessions
- Check Status
- Order
- Authorization
- Authorization Reversal
- Capture
- Sale
- Refund
- PayPal Credit
- Billing Agreements
PayPal Credit
PayPal Credit is a payment method that allows merchants to accept a PayPal
transaction when the customer chooses to finance their purchase through PayPal.
Electronic Check (eCheck Service)
eCheck
Service)The
eCheck
Service a form of digital payment that serves the same
function as a physical check. When a merchant accepts an electronic check payment,
the funds are pulled directly from the customer’s checking or savings account. These
are the eCheck
s include both debit and credit services.eCheck
Service process refunds with the credit payment
service.Online Bank Transfers
Online banking services enable customers to pay for goods by sending money from their
bank account to the merchant.
The
Adobe Commerce Cloud
extension supports the following payment
methods and corresponding online bank transfer services:- Bancontact
- Sale
- Check Status
- Refund
- Country: Belgium
- iDEAL
- Options
- Sale
- Check Status
- Refund
- Country: Netherlands
Tax Calculation
The Tax Calculation service provides real-time tax calculation during order checkout
for orders placed worldwide with your business.
Delivery Address Verification
The Delivery Address Verification service verifies the entered address and suggests
the recommended address for city, state, and zip code combinations in real time.
If this feature is enabled in the
Adobe Commerce Cloud
console, the
Adobe Commerce Cloud
extension verifies the delivery address on
shipping information updated by the user.Klarna
Klarna credit provides a seamless user experience for online customer financing to
merchants of all sizes, which helps in increasing customer choice, loyalty and
growth in sales.
Google Pay
Google Pay is a digital wallet that enables customers to pay with any payment method
saved to their Google account.
Release Notes
This section provides information about functionality, bug fixes, and enhancements for
the
Adobe Commerce Cloud
Visa Acceptance Solutions
integration.January 2026
- Adobe Commerce CloudVisa Acceptance SolutionsVersion 3.5.11 is compatible withAdobe Commerce Cloud: 2.4.8-p3, 2.4.8-p2, 2.4.8-p1, 2.4.8, 2.4.7-p8, 2.4.6-p13 and PHP 8.4, 8.3, 8.2
- Implemented Request Message Level Encryption
- Implemented Google Pay Payer Authentication
- Fixed Anonymous Script Load Error (Integrity and Cross Origin)
- UpdatedauthenticationStatusflag for Payer Authentication in Google Pay
August 2025
- Adobe Commerce CloudVisa Acceptance SolutionsVersion 3.5.10 is compatible withAdobe Commerce Cloud: 2.4.8-p1, 2.4.8, 2.4.7-p6, 2.4.6-p11,2.4.5-p13 and PHP 8.4, 8.3, 8.2, 8.1
- Extended support forAdobe Commerce Cloudv2.4.8.
- Changed path for certificate folder from root to var directory.
- Updated the certificate folder name to certificates.
April 2025
- Adobe Commerce CloudVisa Acceptance SolutionsVersion 3.5.9 is compatible withAdobe Commerce Cloud: 2.4.7-p4, 2.4.7-p3, 2.4.7-p2, 2.4.7-p1, 2.4.7, 2.4.6-p9, 2.4.5-p11 and PHP 8.3, 8.2, 8.1
- Upgraded Microform to v2.
- Implemented SOAP p12 Authentication.
- Remove legacy Click to Pay payment module.
- Fixed issue of declined cases and SCA transactions on Firefox browser.
June 2024
- Adobe Commerce CloudVisa Acceptance SolutionsVersion 3.5.8 is compatible withAdobe Commerce Cloud: 2.4.6 p3, 2.4.6 p2, 2.4.6 p1, 2.4.6, 2.4.5 p5, 2.4.4 p6 and PHP 8.2, 8.1
- Fixed Logger and CSP issue for Magento v2.4.7.
- PHP support added for v8.3.
- Removed unused class in Apple Pay.
- Added required field for Merchant ID in Back Store.
- Fixed issue for admin order redirecting to blank page.
- Made Payer Authentication common for both Secure Acceptance (Stored Card) and Soap Toolkit API.
- Fixed Visa Checkout error "No such cart entity id with cartid".
March 2024
- Adobe Commerce CloudVisa Acceptance SolutionsVersion 3.5.7 is compatible withAdobe Commerce Cloud: 2.4.6 p3, 2.4.6 p2, 2.4.6 p1, 2.4.6, 2.4.5 p5, 2.4.4 p6 and PHP 8.2, 8.1
- Removed zend dependency and replaced with laminas.
- Removed Payer Authentication Cardinal key dependency from Back Store Configuration.
- Google Pay and Apple Pay refund issue fixed for multiple websites.
- Apple Pay customer billing address fixes for downloadable and virtual products.
- The issue has been fixed for JSON error message in the 3-D Secure pop-up.
- Fixed invalid card type message that appeared in credit card Flex Microform.
- Added error message for Apple Pay session failure.
- Fixed Device Fingerprint raw parameter for Secure Acceptance.
- Fixed Payer Authentication failure scenario.
October 2023
- Adobe Commerce CloudVisa Acceptance SolutionsVersion 3.5.6 is compatible withAdobe Commerce Cloud: 2.4.6 p2, 2.4.6 p1, 2.4.6, 2.4.5 p4, 2.4.4 p5, and PHP 8.2, 8.1
- Implemented Direct Connection API Payer Authentication.
- Removed dependency onsales_order_gridtable for Google Pay and Secure Acceptance.
- Apple Pay order cancel fixes.
- PayPal billing address line 2 issue fixes.
- Removed parenthesis for http signature request-target in coreand.eCheckmodule
- Upgraded version for the lcobucci/jwt from 3.4.2 to 3.4.6.
May 2023
- Adobe Commerce CloudVisa Acceptance Solutions3.5.5 is compatible withAdobe Commerce Cloud: 2.4.6, 2.4.5 p2, 2.4.5p1, 2.4.4 and PHP 8.2, 8.1
- PHP support added for v 8.2.
- Compatibility withAdobe Commerce Cloudv2.4.6 – Changed few components of zend framework to laminas as per the latestAdobe Commerce Cloudchanges.
- Fixed bugs related to supported card types and sandbox/production issue in Apple Pay.
- Fixed jQuery deprecated functions.
February 2023
- Adobe Commerce CloudVisa Acceptance Solutions3.5.4 is compatible withAdobe Commerce Cloud: 2.4.5 p2, 2.4.5 p1, 2.4.x, 2.3.x
- New implementation foreCheckcron –EventStatus.
- Fixed bug related to Strong Customer Authentication.
- Removed required validation from reCAPTCHA fields.
- Updated Klarna library from credit to payments.
- AddedPaymentFlowModeas inline andPaymentMethodNameaspay_nowin Klarna app session request.
- Updated WSDL version to latest V1.206.
- Add new payment reject status asAUTHORIZED_RISK_DECLINEDfor Decision Manager reject.
Updating Adobe Commerce
Adobe Commerce
Follow these steps to update the
Visa Acceptance Solutions
bundle to the latest
version:- In your directory, navigate to theAdobe Commerceroot directory and find thecomposer.jsonfile.
- Open thecomposer.jsonfile and in theRequirefield, change the version to the latest version of the plugin.
- After you change the version in theRequirefield of thecomposer.jsonfile, run the composer update command.
Configuring Adobe Commerce
Adobe Commerce
Customer payments can be managed through the
Adobe Commerce
or the
Visa Acceptance Solutions Business Center
. This section describes the settings
you must configure in the Business Center
as well as some general use cases that
are typical in the day-to-day management of your Adobe Commerce
store. Contact Visa Acceptance Solutions for information about product availability and
enablment.You must complete all of the configuration tasks in order to use the features offered in
the
Adobe Commerce
Cybersource integration.Configuring Security Credentials
The module uses connection methods to access services that require their own security
credentials for authentication.
You must create and configure the SOAP toolkit key and REST API key for the
Adobe Commerce
to function properly.If you do not have a
Business Center
account, go to the
website to create an account. To activate your merchant account, follow the instructions
that are emailed to you. Then log in to the Business Center
to complete the
registration process. Be sure to store your merchant key ID for later use.Creating a SOAP P12 Certificate
The
Adobe Commerce
integration uses the SOAP Toolkit API to
access several services.Generate a SOAP P12 certificate from your
Business Center
account. For information on how
to create a SOAP P12 certificate, see Creating a SOAP p12 Certificate. Creating a REST API Key
The
Adobe Commerce
integration requires REST API key
creation to use some services like Flex Microform and the Fraud Management
report.From your
Business Center
account, you also need your merchant key ID
and shared secret key to enable the integration with Adobe Commerce
. For information on how to generate a shared secret
key, see . Be sure
to store your key ID and shared secret key for later use.Configuring Additional Backend Settings
Some services supported on
Adobe Commerce
require additional backend
setup on your Business Center
account. Contact your Visa Acceptance Solutions
account representative
to enable any of these services:- Payment Tokenization: Required by the module for credit card processing
- Decision Manager
- Payer Authentication
- PayPal Express Checkout
- eCheckService
- Online Bank Transfers
- Tax Calculation
- Klarna
- Click to Pay: Enabled in theBusiness Center
- Apple Pay: Enabled in theBusiness Center
Configuring Backend Settings
Follow these steps to access the configuration settings in the administration section
of your
Adobe Commerce
console:- Go to theAdobe Commerceadministration console.
- On the left navigation panel, clickStores.
- Under Settings, clickConfiguration.
- On the Configuration page, clickSalesto expand the menu.
- ClickPayment Methods.
- ChooseOTHER PAYMENT METHODS >.Visa Acceptance Solutions
ADDITIONAL INFORMATION
Complete all of the required fields in the sections and subsections of the settings to configure theVisa Acceptance Solutionspayment module and other payment methods. Expand each section to complete the fields.
Configuring General Settings
The settings under the General section apply to all payment methods. Follow these steps to complete this section:
- From the Cybersource setting, click the arrow to expand the General section.
- From theDebug Modedrop-down list, chooseYesto troubleshoot using theAdobe Commercelogs (cybs.log). Diagnostic information is stored in log files on theAdobe Commerceweb server.
- From theSort Orderdrop-down list, change the default module sort order.
- In theShow Exact Rejection or Error Message to Usersoption set to:
- Noto display general error messages according toAdobe Commerce Cloudin all rejection and error cases.
- Yesto display general error message according to the responses fromVisa Acceptance Solutionsin all rejection and error cases.
- In theOverride Payment Error Route Pathfield, enter the error page route path. When you leave the defaultUse system valuebox checked, the checkout or cart route is used if no path is entered.
Configuring WebService
The WebService configuration includes the default
Adobe Commerce
merchant ID (applies to all the payment methods), the REST shared key, and the
SOAP key detail. Follow these steps to complete the configuration:- ClickWebService Configurationto expand the section.
- In theMerchant IDfield, enter yourVisa Acceptance Solutionsmerchant ID.
- From theTest Modedrop-down list, choose:
- Yesto use theBusiness Centertesting environment.
- Noto use the productionBusiness Center. Optionally, in theDeveloper IDfield, you can enter the developer ID. The ID cannot exceed eight characters. You can also request thatVisa Acceptance Solutionsassign you a developer ID.
- In the Simple Order P12 Key File section, upload the SOAP p12 certificate and then enter the Key Password. If you did not generate a key, see Creating a SOAP p12 Certificate for instructions.
- In theREST API Key Detailfield, enter the REST key you generated from theBusiness Center. If you do not have a REST Shared Secret Key Pair, see Creating a Shared Secret Key Pair for instructions.
ADDITIONAL INFORMATION
Proper configuration of the SOAP WebService is required for the functioning of other services includingTax Calculation, Secure Acceptance, PayPal, Account Takeover Protection, andApple Pay. If you experience issues with these modules, verify that the SOAP WebService options are configured correctly. The SOAP p12 Certificate must have the correct password and the Test Mode option must match the correct environment for theVisa Acceptance SolutionsBusiness Center(test). - In theREST API Shared Secret Keyfield, enter the Shared Secret key you generated from theBusiness Center. If you do not have a REST Shared Secret Key Pair, see Creating a Shared Secret Key Pair for instructions.
ADDITIONAL INFORMATION
Proper configuration of the REST Web Service is required for other services including Flex Microform,, Google Pay, and the Account Updater. If you experience issues with these modules, verify that the REST Web Service options are configured properly. The API Key Detail and API Shared Secret Key must have the correct value, and theDecision Manager,Test Modeoption must match the environment for theVisa Acceptance SolutionsBusiness Center.
Configuring Device Fingerprinting
Device Fingerprinting is used with
Decision Manager
for all relevant payment
methods. If you are not using Decision Manager
, you must disable this
module. Follow these steps to configure device fingerprinting:- ClickDevice Fingerprintto expand the section.
- In theActivefield, chooseYesto activate it orNoto deactivate it if you are not usingDecision Manager.
- In theOrg IDfield, enter the value provided to you. To obtain this value either for test or production, contact yourVisa Acceptance Solutionsrepresentative.
Configuring the Delivery Address Verification Service
The Delivery Address Verification Service acts as an additional layer of address
verification and normalization on the shipping page. Follow these steps to configure
this section:
- ClickDelivery Address Verification Serviceto expand the section.
- From theAddress verificationdrop-down list, chooseYesto enable this service orNoto disable this service.
- From theAddress Force Normalizationdrop-down list, chooseYesto require the use of suggested address alternatives orNoto make suggested address alternatives optional.
Configuring Credit Card Payments
Follow these steps to configure
Visa Acceptance Solutions
credit card
payments:- From theEnableddrop-down list, chooseYesto activate orNoto deactivate the credit card payment method.
- In theTitlefield, enter the text you want to display as the name for credit card payment method. This name will be used for Web Mobile, Flex Microform, and Silent Order Post.
- In thePayment APIdrop-down list, choosePayment APIto have an authorization performed and post card data toVisa Acceptance Solutions. ChooseSOAP Toolkit APIto have the card information tokenized. The SOAP service separately requests authorizations.
- In theCheckout Flow Typedrop-down list, choose a desired checkout type.
ADDITIONAL INFORMATION
Visa Acceptance Solutionsrecommends that you chooseFlex Microform. Flex Microform is a REST-based Microform Integration to access new enhancements, easier configuration, and updated technology.You will use all of the benefits from the Hosted Checkout and Checkout API.The customer never leaves your checkout page and is a potential SAQ A qualification. For more information about Microform Integration, see Microform Integration. - In theCSRF Token Expiration Time (Seconds)field, enter the expiration time in seconds. This is the lifetime of the SOP security token used to prevent card testing attacks. For the default of 600 seconds, leave this field blank.
Configuring Strong Customer Authentication
When payer authentication is enabled and a transaction is declined with reason code
478
(Strong Customer Authentication required), another request is sent
from the Adobe Commerce
module for the same order. The customer must
complete a 3-D Secure
challenge. To configure this setting, click
Strong Customer Authentication
to
expand the section. In the Enforce Strong Customer Authentication when saving a
card
drop-down list, choose Yes
to have the cardholder
complete a 3-D Secure
challenge while saving a card.Configuring Credit Card Settings
Follow these steps to complete the Credit Card Settings section:
- ClickCredit Card Settingsto expand the section.
- From thePayment Actiondrop-down list, chooseAuthorize OnlyorAuthorize and Capture. Authorize Only reserves funds during checkout and captures when making an invoice. The Authorize and Capture payment action authorizes and captures funds during the customer checkout.
- From theAuth Indicatordrop-down list, choose the purpose of the authorization.
- From theNew Order Statusfield drop-down list, choose the order status assigned to the order when successfully paid, or leave the defaultUse system valuebox checked forProcessingorder status.
- From theIgnore AVSdrop-down list, chooseYesto have the results of AVS verification ignored.
- In theIgnore CVNfield, chooseYesto have the results of CVN verification ignored.
- In theSkip Fraud Management for Tokenizationfield, chooseNoto haveSkip Decision Managerfield set tofalsefor Secure Acceptance tokenization requests and set totrueotherwise.
- In theSkip Pre-Authorization Check for Tokenizationfield, choose toNoto have theskip preauthorizationfield set tofalsefor Secure Acceptance tokenization requests and set totrueotherwise.
- In thePass expiration date for tokenized card via SOAPfield, specify the card expiration date with SOAP Toolkit Authorization Calls for card tokenization.
- In theCredit Card Typesbox, choose which card types you want to accept. This only applies toCheckout API andFlex Microform configuration.This option is not used for Hosted Checkout.
- In thePayment from Applicable Countriesfield, leave the defaultUse system valuebox checked to accept credit card payments from the countries choose, or clear theUse system valuebox to specify countries in the next field.
- To specify the countries from which to accept credit card payments, inPayment from Specific Countriesbox choose the countries.
- From theOverride secure acceptance localedrop-down list, leave the defaultUse system valuebox checked to use the store locale language.
Configuring Payer Authentication
The Payer Authentication (
3-D Secure
) protocol reduces fraud and security to online
payments. 3-D Secure
adds frictionless authentication and improves the user
experience. You must have the SOAP Toolkit configured to use this service. Follow these steps to configure the Payer Authentication section:
- ClickPayer Authenticationto expand the section.
- From theEnableddrop-down list, chooseYesto activate the Payer Authentication Module orNoto deactivate it.
- From theCredit Card Typesfield box, choose the card types to be enabled for Payer Authentication.
Configuring Save Card for Later Service
Follow these steps to configure Save Card for Later Service settings:
- ClickSave Card for Later Serviceto expand the section.
- From theEnableddrop-down list, chooseYesto enable the customer to save their credit card information securely for later use.
- In theSaved Card Section Titlefield, enter the name of the saved cards payment method.
- From theSave Card for Later for Admin ordersdrop-down list, chooseYesto enable storing card details for orders placed in the admin area.
- From theUse CVV for Saved Credit Cardsdrop-down list, chooseYesto enable the customer to enter the Card Security Code when paying with a stored card.
- From theUse CVV for Saved Credit Cards in Admindrop-down list, chooseYesto allow the merchant to enter the customer’s Card Security Code when the customer is paying with a stored card.
- ClickSave Config.
Configuring reCAPTCHA
The
Adobe Commerce
SOAP Toolkit API provides an option to use
reCAPTCHA. This feature is essential in protecting the merchant's store from brute force
attacks. Most of the time, the reCAPTCHA is invisible to normal users, but it will
provide a visible challenge when necessary. The module providing reCAPTCHA is an
optional package.Installing reCAPTCHA
To install reCAPTCHA, run the
following command for composer installation:
composer require
Visa Acceptance Solutions
/module-recaptcha Creating reCAPTCHA
Follow these steps to
generate Google reCAPTCHA Site Key and Secret Key:
Configuring reCAPTCHA in Adobe Commerce
Adobe Commerce
- Go theAdobe Commerceconsole.
- On the Payment Methods page, under theVisa Acceptance Solutionssettings, clickreCaptchato expand the section.
- From theEnableddrop-down list, chooseYesto activate, orNoto deactivate reCAPTCHA.
- In theWebsite API Keyfield, enter your site key obtained from reCAPTCHA Admin Console.
- In theSecret API Keyfield, enter your secret key obtained from reCAPTCHA Admin Console.
- From thereCAPTCHA typedrop-down list, choose the reCAPTCHA type that you choose for your API keys.
- In theBadge positionfield, choose the reCAPTCHA badge position.
- In thereCAPTCHA languagefield, choose a language code for reCAPTCHA or leave theAutooption selected.
- ClickSave Config.
- Clear theAdobe Commercecache.
Configuring the eCheck Payment Module
eCheck
Payment ModuleThe
Visa Acceptance Solutions
eCheck
module enables customers to make purchases using a routing
number and an account number. During checkout, an eCheck
transaction
request is sent to Visa Acceptance Solutions
. If successful, the transaction is sent
to the Automated Clearing House (ACH).The
Adobe Commerce
queries Visa Acceptance Solutions
periodically
to check on the status of each pending eCheck
transaction. In
response, Visa Acceptance Solutions
provides an updated transaction status, known as a
Payment Event Type
. Various outcomes can occur during ACH processing. For
each pending transaction included in the Visa Acceptance Solutions
response, the
Adobe Commerce
determines whether a transaction remains
pending, settles, or is rejected.You can configure these
eCheck
payment event types :- Pending Event Type: No change is made to the transaction or order status. The order remains in Payment Pending state.
- Reject Event Type: The order is cancelled.
- Accept Event Type: An invoice is prepared for that order, and the order status changes to processing.
Testing eCheck Payment Settings
eCheck
Payment Settings You can test the
eCheck
Payment Event Types using two Adobe Commerce
settings that simulate possible event types during
the processing of the requested report. While the status request goes to Visa Acceptance Solutions
, the Adobe Commerce
ignores the
returned Payment Event Type in the response and uses the Test Event Type
instead.Follow these steps to test the
eCheck
Payment Event
Types:- Clickto expand the section.eCheck
- From theEnableddrop-down list, chooseYesto enable theeCheckpayment method.
- In theTitlefield, enter the text that is displayed to customers as the name of this payment method.
- Configure the payment statuses for these event types:
ADDITIONAL INFORMATION
- In theAccept Event Typebox, choose which payment statuses will mean accept, and signify the receipt of funds and move the order status to processing.
- In thePending Event Typebox, choose which payment statuses will mean pending.
- In theReject Event Typebox, choose which payment statuses will mean reject because they were rejected after processing by ACH despite being initially accepted during checkout.
- Configure how to accept theeCheckpayment method:
ADDITIONAL INFORMATION
- To accept the default country configuration, in thePayment From Applicable Countriesfield, ensure theUse system valuebox is checked.
- To specify any other countries you will accept theeCheckpayment method from, clear theUse system valuebox and in thePayment From Specific Countriesbox, choose the countries.
- To require customers to enter a drivers license number, from theEnabled Drivers License Numberdrop-down list, chooseYes. ForTeleCheck, contact a representative to see if this field is required.
- To require the customer to enter the check number, from theEnabled Check Numberdrop-down list, chooseYes. These processors have specified whether it is required or optional:
ADDITIONAL INFORMATION
- Chase Paymentech Solutions: Optional.
- Cybersource ACH Service: Not used.
- : Optional on debits, and required on credits.
- TeleCheck: Strongly recommended on debit requests, and optional on credits.
- To require an agreement at the checkout page, from theAgreement Requireddrop-down list, chooseYes.
- From theSEC codedrop-down menu, choose a code that specifies the authorization method for the transaction.
- In theSort Orderfield, enter the number of entries to be sorted on a page.
- ClickSave Config.
Configuring Fraud Management
You must configure the
Adobe Commerce
to work with Fraud Management
to use all of the features. Follow these steps to configure Fraud Management in
Adobe Commerce
:- ClickFraud Managementto expand the section.
- From theEnable Fraud Management CRON Jobdrop-down list, chooseYes.
- In theFraud Management fail email senderoption, leave theUse system valuebox checked.
- In theFraud Management fail email templateoption, leave theUse system valuebox checked.
- From theSettle Fraud Management accepted order automaticallydrop-down list, chooseYes.
- Expand theOn-Demand Jobsection to see theReport Datefield.
- Enter a date to download an accepted or rejected transactions report, and clickRun.
- ClickSave Config.
Fraud Management Orders
The
Decision Manager
rule setting and the response received for
authorizations and sales service determine whether the Adobe Commerce Cloud
marks the orders as Pending Review. On the
Decision Manager
Case Management page, when you change an order from
REVIEW
to REJECT
or
ACCEPT
, the Adobe Commerce Cloud
updates
payment transaction states periodically (by cron every two minutes) by contacting
Cybersource and querying for changes.In the settings, find the
Adobe Commerce Cloud
Cron settings and
configure them to trigger an Adobe Commerce Cloud
task. The task
looks for Decision Manager
changes in the Business Center
and
updates the Adobe Commerce Cloud
Orders accordingly.
If the module detects a change in state, it updates the order status in the
Adobe Commerce Cloud
from Pending Review to one of these states:- Processing
- Pending
- Closed
If an order is Pending Review in
Decision Manager
, you
cannot prepare an invoice in the Adobe Commerce Cloud
until
Decision Manager
accepts it.
Fraud Management Refunds
Decision Manager
must either accept or reject an order before issuing a
refund. If you reject an order in Decision Manager
, an Authorization
Reversal for the order automatically occurs as part of the Cron process that queries
for updates in Decision Manager
.Configuring Custom Fields
Decision Manager
supports custom fields known as merchant-defined data
fields. You must configure the fields inside Decision Manager
in the
Business Center
to use them. The Module for the Adobe Commerce Cloud
sends 10 of these fields. Follow these steps to add
custom fields provided by the
Adobe Commerce Cloud
:
- Log in to theBusiness Centerand go toDecision Manager> Shared Configuration > Custom Fields.
- ChooseMerchant Custom Fields.
- To add a field, clickADD CUSTOM FIELD, enter a name, and choose anorder element. Use the list below to map the correct names and elements for each field:
- Logged-in customer:Merchant_defined_data1
- Account creation date:Merchant_defined_data2
- Purchase History Count:Merchant_defined_data3
- Last Order Date:Merchant_defined_data4
- Member account age:Merchant_defined_data5
- Repeat customer:Merchant_defined_data6
- Coupon Code Used:Merchant_defined_data20
- Discount Amount:Merchant_defined_data21
- Gift Message:Merchant_defined_data22
- Order Source:Merchant_defined_data23
- Shipping Method Code:Merchant_defined_data31
- Shipping Method Description:Merchant_defined_data32
- ClickSave.For detailed instructions on how to add custom fields, see theDecision ManagerGuide. In theBusiness Center, go to the left navigation panel, and chooseDecision Manager > Documentation > Guides.
Configuring Apple Pay
To use Apple Pay, you must meet these prerequisites:
- Have a valid Apple Developer Account.
- All pages that incorporate Apple Pay must be served over HTTPS.
- Your website must comply with the Apple Pay guidelines. For more information, see Apple Pay on the Web Acceptable Use Guidelines.
- Your website must have HTTPS mode enabled and used at checkout. For more information, see Setting Up Your Server.
To configure Apple Pay with the
Adobe Commerce
module, you must
complete these tasks:- Register an Apple Pay merchant ID. For more information, see Create Your Apple Pay Merchant ID.
- Create a Payment Processing certificate in theBusiness Center. For more information, see Part 2: Create an Apple Pay Payment Processing Certificate.
- Validate your store domain in Apple Pay. For more information, see Register a Merchant Domain.
- Create a Merchant Identity certificate. For more information, see Create a Merchant Identity Certificate.
Configuring the Apple Pay Extension
Follow these steps to configure the Apple Pay extension:
- Go theAdobe Commerceconsole, and open the Payment Methods page.
- Under theVisa Acceptance Solutionssettings, clickApple Payto expand the section.
- From theEnabledrop-down list, chooseYesto activate Apple Pay. (orNoto deactivate it.)
- InTitlebox, enter the text to display to customers on the checkout page.
- From thePayment Actiondrop-down list, chooseAuthorize Onlyto reserve funds during checkout and capture during invoice creation. ChooseAuthorize and Captureto authorize and capture during customer checkout.
- From theNew Order Statusdrop-down list, choose the order status assigned to an order that was successfully paid withVisa Acceptance Solutions.
- In theApple Merchant IDbox, enter your Apple Pay Merchant ID.
- In theApple Display Namebox, enter the business name that appears on a bank or credit card statement. For example, COMPANY, INC.
- In theCertified Domainbox, enter the validated site domain on which the service is meant to be used. Do not enter ahttps://prefix.
- In thePath to Certificatebox, enter the full path to the Merchant ID Certificate file.
- In thePath to Keybox, enter the full path to the Merchant ID Certificate Private key file.
- In theCredit Card Typesbox, choose the types of credit cards to accept for payment.
- In theSort Orderbox, enter a number for the sort order.
Configuring Apple Pay
You must configure Apple Pay on your storefront that is displayed to the customer.
Follow these steps to configure Apple Pay on your storefront:
- While the customer is making a payment, in the Reviewing the order page, the customer chooses.Adobe CommerceApple Pay
- An Apple Pay window appears, requesting fingerprint (Touch ID) authentication but you can also choose a saved card.
- After authentication is complete, an order success page appears. Verify the transaction details inBusiness Center.
Configuring Google Pay
To use Google Pay on the
Adobe Commerce
, your site must be running
through HTTPS. Follow these steps to configure Google Pay in the Adobe Commerce
:- ClickGoogle Payto expand the section.
- From theEnabledrop-down list, chooseYesto activate Google Pay. (orNoto deactivate Google Pay.)
- In theTitlebox, enter text to display to customers on the checkout page.
- From thePayment Actiondrop-down list, chooseAuthorize Onlyto reserve funds during checkout and capture during invoice creation. ChooseAuthorize and Captureto authorize and capture funds during customer checkout.
- In theGoogle Pay Merchant IDbox, enter your Google Pay merchant ID.
- In theMerchant Display Namebox, define your business name that appears on a customer's bank or credit card statement. For example, “COMPANY, INC.”
- Configure which countries you will accept Google Pay from:
ADDITIONAL INFORMATION
- To accept payment from the default countries, in thePayment From Applicable Countriesfield, leave theUse system valuebox checked.
- To specify other countries, clear theUse system valuebox and in thePayment From Specific Countriesbox, choose the countries from where you want to accept Google Pay.
- In theCredit Card Typesfield box, choose which card types to accept.
- To show the Google Pay button on the product page, in theGoogle Pay button on Product Pagefield, chooseYes.
- To show the mini cart widget, in theGoogle Pay button in mini cartfield, chooseYes.
- In theSort Orderbox, enter a number to change the default module sort order.
- ClickSave Config.
Configuring Alternate Payments
The
Adobe Commerce
has four types of Alternate Payments modules: - PayPal. For more information, see Configuring PayPal.
- Klarna. For more information, see Configuring Klarna.
- Bank Transfer. For more information, see Configuring Bank Transfers.
- WeChat Pay. For more information, see Configuring WeChat Pay.
Click
Alt Payments
to expand the section.Configuring Klarna
Follow these steps to configure Klarna payments.You can use the default merchant ID
or you can manually configure a new merchant ID:
- ClickKlarnato expand the section.
- From theEnabledrop-down list, chooseYesorNoto activate or deactivate Klarna.
- FromTitlebox, enter the text to display to customers on the checkout page.
- From theUse Default Merchant IDdrop-down list, leaveYesselected to use the Merchant ID given in Web Service Configuration under General Settings. ChooseNoto enter another merchant ID and transaction key in the next two fields.
- If you choose not to use the default merchant ID, in theMerchant IDfield, enter a different merchant ID.
- In theTransaction Keyfield, enter the transaction key for the merchant ID you entered.
- From theNew Order Statusdrop-down list, choose the order status assigned to the order successfully paid withVisa Acceptance Solutions.
- Configure which countries you will accept Klarna from:
ADDITIONAL INFORMATION
- To accept payment from the default countries, in thePayment From Applicable Countriesfield, leave theUse system valuebox checked.
- To specify other countries, clear theUse system valuebox and in thePayment From Specific Countriesbox, choose the countries from where you want to accept Google Pay.
Configuring PayPal
Follow these steps to configure the PayPal Express Checkout, PayPal Credit, and
PayPal Billing Agreement:
- ClickPayPalto expand the section.
- From theEnabledrop-down list, chooseYesorNoto activate or deactivate PayPal.
- InTitlebox, enter the text to display to customers on the checkout page.
- From theNew Order Statusdrop-down list, choose the order status assigned to the order successfully paid with Cybersource.
- In theMerchant IDfield, enter yourAdobe Commerce Cloudmerchant ID.
- From thePayPal Redirection Typedrop-down list, chooseTraditional Express Checkoutto redirect the customer PayPal Payment Page, or chooseIn-Context Express Checkout for a PayPalpop-up to appear for customers to complete payment.
- From thePayment Actiondrop-down list, chooseAuthorize Onlyto check the account for validity, but not charge until the order is approved and invoiced. ChooseAuthorize and Captureto charge the PayPal account at the time the order is submitted.
- Configure which countries you will accept PayPal from:
ADDITIONAL INFORMATION
- To accept payment from the default countries, in thePayment From Applicable Countriesfield, leave theUse system valuebox checked.
- To specify other countries, clear theUse system valuebox and in thePayment From Specific Countriesbox, choose the countries from where you want to accept PayPa.
- From theEnable PayPal Creditdrop-down list, chooseYesto enable financing through PayPal Credit.
- In thePayPal Credit Titlebox, enter the text customers will see as the title of PayPal Credit payment option.
- From theEnable PayPal Billing Agreementsdrop-down list, chooseYesto allow registered customers to create a billing agreement for faster purchases.
- In theSort Orderbox, enter a numeric value to place this payment method amongst all the otherAdobe Commercepayment methods.
Configuring Bank Transfers
Online banking services enable customers to pay for goods using direct online bank
transfers from their bank account to your
Adobe Commerce
merchant
account.Click
Bank Transfer
to expand the section. In the
Store Name
field, enter the name you want customers to
see on their bank transfer invoices.Configuring iDEAL
Follow these steps to configure an iDEAL payment:
- ClickiDEALto expand the section.
- In theEnabledrop-down list, chooseYesto activate the iDEAL bank transfer (orNoto deactivate iDEAL bank transfer.)
- InTitlebox, enter the text to display to customers on the checkout page.
- In theUse Default Merchant IDfield, leaveYesselected to use the merchant ID given in the Web Service Configuration under General Settings page. ChooseNoto enter another merchant ID and transaction key in the next two fields.
- If you choose not to use the default merchant ID, enter yourVisa Acceptance SolutionsMerchant IDin theMerchant IDfield.
- In theTransaction Keyfield, enter the transaction key for the merchant ID you entered.
- In theAllowed Currenciesbox, choose which currencies you will accept payment.
- In theSort Orderbox, change the default module sort order.
- Configure which countries you will accept Klarna from:
ADDITIONAL INFORMATION
- To accept payment from the default countries, in thePayment From Applicable Countriesfield, leave theUse system valuebox checked.
- To specify other countries, clear theUse system valuebox and in thePayment From Specific Countriesbox, choose the countries from where you want to accept iDEAL.
Configuring Bancontact
Follow these steps to configure Bancontact bank transfer payments:
- ClickBancontactto expand the section.
- In theEnabledrop-down list, chooseYesorNoto activate or deactivate Bancontact Bank Transfer.
- InTitlebox, enter the text to display to customers on the checkout page.
- In theUse Default Merchant IDfield, leaveYesselected to use the Merchant ID given in Web Service Configuration under General Settings. SelectNoto enter another merchant ID and transaction key in the next two fields.
- If you choose not to use the default merchant ID, enter yourVisa Acceptance Solutionsmerchant ID in theMerchant IDfield.
- In theTransaction Keyfield, enter the transaction key for the merchant ID you entered.
- In theAllowed Currenciesbox, choose the currencies with which to accept payment.
- In theSort Orderbox, change the default module sort order.
- Configure which countries you will accept Klarna from:
ADDITIONAL INFORMATION
- To accept payment from the default countries, in thePayment From Applicable Countriesfield, leave theUse system valuebox checked.
- To specify other countries, clear theUse system valuebox and in thePayment From Specific Countriesbox, choose the countries from where you want to accept Bancontact.
Configuring WeChat Pay
WeChat Pay is a digital wallet that enable customers to make mobile payments and
online transactions. Customers who have provided bank account information can use
the app to pay bills, order goods and services, transfer money to other users, and
pay in stores if the stores have a WeChat payment option.
Follow these steps to configure WeChat Pay:
- ClickWeChat Payto expand the section.
- From theEnabledrop-down list, chooseYesto activate or deactivate WeChat Pay (orNoto deactivate WeChat Pay.)
- In theSort Orderbox, change the default module sort order.
- InTitlebox, enter the text to display to customers on the checkout page.
- In theUse Default Merchant IDfield, leaveYesselected to use the merchant ID from the Web Service Configuration section under General Settings. ChooseNoto enter another merchant ID and transaction key in the next two fields.
- If you choose not to use the default merchant ID, enter yourVisa Acceptance Solutionsmerchant ID in theMerchant IDfield.
- In theTransaction Keyfield, enter the transaction key for the merchant ID you entered.
- In theQR Code Expiration Timefield, enter an expiration time in seconds for the WeChat pay QR code.
- In theCheck Status Frequencyfield, enter an interval in seconds between transaction status checks.
- In theMax Status Requestsfield, enter a limit for transaction status checks.
- Configure which countries you will accept WeChat Pay from:
ADDITIONAL INFORMATION
- To accept payment from the default countries, in thePayment From Applicable Countriesfield, leave theUse system valuebox checked.
- To specify other countries, clear theUse system valuebox and in thePayment From Specific Countriesbox, choose the countries from where you want to accept WeChat Pay.
- In theSuccess/Failure Message Delayfield, enter a delay in seconds between the transaction check and redirection to the result page.
- In theCheck Status query Simulated Responsefield, choose a simulated status check response code for testing.
- ClickSave Config.
Configuring Taxes
Visa Acceptance Solutions
offers a service that calculates taxes to be charged on
orders. You must configure your settings in order to receive accurate resultsContact your
Visa Acceptance Solutions
representative to have this feature enabled.
This feature includes activation of sandbox capabilities as well.Before configuring the Tax Calculation service, you must have the SOAP Web Service
configured. For more information, see Configuring Security Credentials.
To use the Tax Calculation Service, you must have the Product Tax Class codes and
Visa Acceptance Solutions
Tax Services settings configured. For more
information, see Configuring Product Tax Classes and Configuring Visa Acceptance Solutions Tax Services Settings.Configuring Product Tax Classes
Each product in the
Adobe Commerce
has a setting for Tax Class.
This setting defines the product and how it should be taxed. Contact your Visa Acceptance Solutions
representative for a list of available product tax class IDs
and your tax consultant for advice on which IDs you should use for products you
sell.Follow these steps to set the product tax class IDs in
Adobe Commerce
:- Go theAdobe CommerceAdmin console.
- On the left panel, clickStores, and then clickTax Classes.
- On the Tax Classes page, clickAdd Newto create a new tax class entry for each tax class ID that your representative provides.
- In theTax Class Codefield, enter the code provided to you.
- From theTax Class Typedrop-down list, chooseProduct.
- ClickSave.
- Complete these steps for each tax class ID.
Configuring Visa Acceptance Solutions Tax Services Settings
Visa Acceptance Solutions
Tax Services SettingsFollow these steps to configure
Visa Acceptance Solutions
Tax Services in the
Adobe Commerce Cloud
:- Go to theAdobe Commerce Cloudadmin console, and in the left panel, clickStores, and then clickConfiguration.
- On the Configuration page, go toSales > Tax > Cybersource Tax Services.
- From theTax Calculationdrop-down list, chooseYesto activate theVisa Acceptance SolutionsTax Services per your business requirements.
- In theNexus regionsbox, select the regions where your business has a physical presence in the U.S. or Canada.
- In theCustomer countries to calculate Tax forbox, choose the countries for which you will calculate tax.
- In theCustomer Tax classes to exclude from Tax calculationbox, choose the customer tax classes to exclude from tax calculation.
- In theShip Fromfields, enter the city, postcode, country, and region from which the orders are shipped.
- In theAcceptancefields, enter the city, postcode, country, and region in which you will accept or approve customers' orders.
- In theOriginfields, enter the city, postcode, country, and region of the point of origin from which the order is picked up.
- In theMerchant VATfields, enter the merchant VAT seller registration number.
- ClickSave Config.
Calculating Taxes for Shipping Rates
You might have taxes calculated for shipping rates if your site offers dynamic
shipping rates from a carrier that is presented to the customer at checkout.
However, if you offer a flat-rate shipping charge, you might want to add taxes
to that flat rate.
Follow these steps to add taxes to flat shipping rates:
- On the Configuration page, go toSales > Tax > Tax Classes.
- From theTax Class for Shippingdrop-down list, select the product tax code that references the taxes applied to shipping services.
- ClickCalculation Settings.
- In theShipping Pricesfield, chooseExcluding Taxwhen the shipping rates need to be taxed. SelectIncluding Taxwhen the shipping rates already include taxes , and no taxes are applied through theVisa Acceptance Solutionstax service.
- ClickSave Config.
Configuring Transactional Emails
When an order is flagged for
Decision Manager
review, the customer is not
informed that their transaction was not fully accepted. If a manual review leads to
a rejection of the transaction, the customer is then informed that their order is no
longer active. You can configure the email sent to the customer.Follow these steps to configure the transactional emails sent to the customers:
- Go to theAdobe Commerceconsole.
- On the left panel, chooseMarketing.
- ClickEmail Templates.
- In the table, find the Template column, and click theDM Fail Transactiontemplate row. The Template Information page opens.
- On the Template Information page, complete the required information in the template name, subject, and content text boxes.
- ClickSave Template.
Configuring Cron Settings
Follow these steps to configure Cron settings for
Decision Manager
:- In theAdobe Commerceconsole.
- On the left panel, clickStores.
- Go toConfiguration > Advanced > System > Cron (Scheduled Tasks).
- Scroll down and clickCron configuration options for group:dm.
- Complete the required fields.
- ClickSave Config. For further instructions on how to configure Cron settings, see Cron (scheduled tasks).
Configuring Tokens
When a customer is logged in and is checking out, their card data can be stored in a
secured
Visa Acceptance Solutions
data center. After the card data is saved, a token
is provided to you through this module. This token represents the customer record. When
a returning customer uses your checkout, they can opt to use a previously stored card so
they don't have to enter their card data again.When a token is used, the customer is still redirected to the
Visa Acceptance Solutions
Hosted Payment page for payment confirmation. If a customer chooses to checkout as a
guest, the token system is not used.Saving a Card for Later Use
To save the card, log in or register a new customer account. During the checkout
process, check the
Save for later use
box. After the order is
placed, the card information is securely saved with Visa Acceptance Solutions
.Managing the Adobe Commerce Tokens
Adobe Commerce
TokensCustomers who are logged in can delete their tokens at any time. To do so, they must
visit the My Account section of the
Adobe Commerce
and choose
the Stored Payment Methods
menu item. Customers can use the
delete links beside any stored tokens to remove a stored token.Paying with Tokens
To pay the order with a stored card, the customer chooses it from the list at the top
of the Billing and review checkout page.
Multi-Shipping Feature
The plugin supports the multi-shipping feature only for the
Adobe Commerce
registered users when they place orders with stored credit
cards.Node Implementation
The plugin does not support multiple-node implementation.
Support
If you require support with this software, create a support ticket at support and
provide this information:
- Summary of the issue
- Steps to reproduce the issue
- Magento platform versionVisa Acceptance Solutionsplug-in version
- Visa Acceptance Solutions merchant ID
- Configuration screenshots
- All the themes/additional extensions that are installed
- Log files
To retrieve log files, navigate to this path in the root directory of Magneto:
Magento Folder Name\var\log
.These log files are needed:
- system.log
- debug.log
- cybs.log
- exception.log
OpenCart
The plugin for OpenCart provides a payment solution for
merchants using OpenCart to manage their orders. This section describes the payment
methods and services the Plugin provides.
Supported payment methods
These are the supported payment methods for OpenCart:
- Credit and debit cards
- eCheck
- Click to Pay
Supported payment services
These are the supported payment services available for OpenCart:
- Payment acceptance services
- Authorization only
- Sale (bundled authorization and capture)
- Electronic check debit (sale) foreCheckpayment method
- Order management services
- Capture an authorization(not foreCheck)
- Multiple partial captures (not foreCheck)
- Standard and partial refunds
- Standard and partial void captures(not foreCheck)
- Standard and partial void refunds
- Full authorization reversal(not foreCheck)
- :Token Management Service(TMS) for credit and debit cards payments
- Create payment token along with authorization
- Update an existing token along with authorization
- Update an existing token from My Account section
- Delete an existing token from My Account section
- Create payment token for new payment methods during checkout
- Make a payment with a stored token during checkout
- Reporting services that allow you to import theses:Business Centerreports into OpenCart
- Transaction Request Report
- Payment Batch Detail Report
- Conversion Detail Report
Release Information
This section provides information about the releases for the plugin.
Release Version | Release Date | Support End Date |
|---|---|---|
Version 22.1.0 | October 25, 2022 | October 14, 2025 |
Version 23.1.0 | December 8, 2023 | December 7, 2026 |
Version 23.1.0 includes the following enhancements:
- Updated authentication signature
- Added DAV enable/disable button for admin configuration
- Updated reCAPTCHA key generation tooltip URL
- Fix for target origin issue for different domain in the flex form capture context
- Compatible with OpenCart versions 3.0.3.7 and 3.0.3.8
Version 22.1.0
- Initial release.
Installation
Before you install the plugin, make sure that these requirements are met:
- You are usingOpenCartversion 23.1.0.
- You have aBusiness Centeraccount and have generatedBusiness CenterREST API keys:
- To create an account, go to the website.
- To generate REST API keys, see .
Follow these steps to install the plugin:
- Download the plugin from theOpenCartwebsite to your local system.
- OpenOpenCartBack Office and from the Dashboard, chooseExtensions>Installer.
- ClickUploadand browse to the file you downloaded to your local system.The pane displays the status of the installation. After the Plugin is installed, the pane indicates that the module is installed. You can close it or clickConfigureto configure the Plugin.
Configuration Overview
This section describes how to set up the plugin.
The following table shows where to access the plugin configuration settings.
From the left navigation panel in
OpenCart
Back Office, select
Extensions
and follow the path indicated in the table for the configuration
settings you want to configure. Settings | Path |
|---|---|
| Extensions > Extensions > Modules > Visa Acceptance Solutions
Configuration |
Unified Checkout
| Extensions > Extensions > Payments > Visa Acceptance Solutions
Unified Checkout |
eCheck
| Extensions > Extensions > Payments > Visa Acceptance Solutions
eCheck |
Enable Basic Configuration
This section describes the required and optional basic configuration settings for the
plugin.
To enable Basic Configuration, follow these steps:
- InOpenCartBack office, navigate toExtensions>Extensions>Modules>.Visa Acceptance SolutionsConfiguration
- Click theEditicon.
- In the General Configuration tab of the EditVisa Acceptance SolutionsConfiguration Module pane, from the drop down list or text box, select or enter a setting.
- Click theSaveicon.
- Repeat for each required setting and each optional setting you want to enable.
Required Settings
These settings are required for using the plugin:
- Sandbox Mode
- Set toEnableto operate in Sandbox (T) mode. You can test new changes in this mode and no funds are affected.
- Set toDisableto operate in Production (Live) mode.
- Merchant ID
- Enter theBusiness CenterMerchant ID or Organization ID, which is a unique identifier for the merchant.
- Merchant Key ID
- Enter your REST Shared Secret Key generated from within theBusiness Center. This specific key authenticates and authorizes the merchant's integration with the gateway.
- Merchant Secret Key
- Enter the complimentary Secret key that is generated at the same time as the Merchant Key ID. It is used for secure communication between the merchant's online store and a payment gateway.
- reCAPTCHA Site key
- For each request, this key returns a score based on the user interactions with your site. Based on these scores, you can take appropriate actions for your site, such as allowing or blocking users.
- reCAPTCHA Secret key
- This key authorizes communication between the plugin's backend and the reCAPTCHA server to verify the user's response. The secret key should be kept safe for security purposes.
Optional Settings
These settings are optional for using the plugin.
- Fraud Management
- ClickEnableto enable merchants to identify and prevent fraudulent activities.
- Delivery Address Verification
- ClickEnableto enable merchants to verify the delivery address.
- Device Fingerprint
- ClickEnableto enable merchants to identify and track devices accessing an online store.
- Developer ID
- Identifier for the developer that helps integrate a partner solution withVisa Acceptance Solutions. This settings is only required forVisa Acceptance SolutionsSystem Integrators.
- Status
- ClickEnablefor theVisa Acceptance Solutionsintegration to be active and visible at checkout.
- Payment Action
- ClickEnableto enable card payments for Authorize Only or Sale (Authorization and Capture) for front office transactions.
- Enhanced Logs
- ClickEnableto generate logs that can be accessed by selectingConfigure>Advanced Parameters>Logs.
Visa Acceptance Solutions
strongly recommends that you map your Order Status
responses to your preferred order status under the Order Status Configuration
section. Enable Unified Checkout
Unified Checkout
This section describes the required and optional configuration settings for
Unified Checkout
for the plugin. To enable Card Payment follow these steps:
- InOpenCartBack office, navigate toExtensions > Extensions > Payments >.Visa Acceptance SolutionsUnified Checkout
- Click theEditicon.
- In the EditVisa Acceptance SolutionsUnified Checkoutpane, from the drop down list or text box, select or enter the setting you want.
- Click theSaveicon.
- Repeat for each required setting and each optional setting you want to set.
Required Settings
The following settings are required:
Unified Checkout
for the plugin:- Payment Option Label
- Enter the text you want displayed to the customer at checkout.
- Allow Card Types
- Select the card types that you want to accept.
Optional Settings
The following settings are optional for enabling
Unified Checkout
for
the plugin:- Status
- ClickEnablefor theVisa Acceptance Solutionsintegration to be active and visible at checkout.
- Sort Order
- Specify an order in which a payment method displays at checkout.
Enable Tokenization
This section describes the required and optional configuration settings for Tokenization
for the plugin.
To enable Tokenization follow these steps:
- In OpenCart Back office, navigate toExtensions > Extensions > Payments >.Visa Acceptance SolutionsUnified Checkout
- Click theEditicon.
- In the EditVisa Acceptance Solutionspane, from the drop down list or text box, select or enter the setting you want.
- Click theSaveicon.
- Repeat for each required setting and each optional setting you want to set.
Required Settings
The following settings are required:
- Tokenization
- Setting enables customers to save cards for future use while making a card payment.
Optional Settings
The following settings are optional for enabling Tokenization for the plugin:
- Network Token Updates
- Enable this setting to subscribe to Network Token life cycle updates.
- Limit Saved Card Rate
- With this setting enabled, a limit is set to save only a specified number of cards in the My Account section in Front Office. There are two settings:
- Saved Card Limit Count: Number of cards that can be saved in a certain period of time.
- Saved Card Limit Time Frame: Number of hours that saved card attempts are counted.
- Enforce SCA for Saving Card
- If enabled, card holders are3-D Securechallenged when saving a card.
Enable Fraud Management
This section describes the required and optional configuration settings for Fraud
Management for the plugin.
To enable Fraud Management follow these steps:
- InOpenCartBack office, navigate toExtensions > Extensions > Modules >.Visa Acceptance SolutionsConfiguration
- Click theEditicon.
- In the General Configuration tab of the EditVisa Acceptance SolutionsConfiguration Module pane, from the drop down list or text box, select or enter the setting you want.
- Click theSaveicon.
- Repeat for each required setting and each optional setting you want to enable.
Required Settings
The following settings are required:
- Fraud Management
- Device Fingerprint (not technically required, but highly recommended)
Optional Settings
The following setting is optional for enabling Fraud Management for the plugin:
- Conversion Detailed Report
- This report (enabled in the Report Configuration tab) pulls Case Management changes fromVisa Acceptance Solutionsat regular intervals to ensure orders are kept updated withinOpenCart.
Enable 3-D Secure (Payer Auth)
3-D Secure
(Payer Auth)This section describes the required and optional configuration settings for
3-D Secure
(Payer Authentication) for the plugin.To enable
3-D Secure
follow these steps:- InOpenCartBack office, navigate toExtensions > Extensions > Payments >.Visa Acceptance SolutionsUnified Checkout
- Click theEditicon.
- In the EditVisa Acceptance Solutionspane, select from the dropdown or specify in the text box the configuration setting option you want to set.
- Click theSaveicon.
- Repeat for each required setting and each optional setting you want to enable.
Required Settings
The following settings are required:
3-D Secure
for the plugin:- Payer Authentication
- When this setting is enabled, an extra layer of security is added at checkout.
Optional Settings
The following setting is optional but recommended for regions enforcing
3-D Secure
for the plugin:- Enforce SCA for Saving Card
- When this setting is enabled, card holders are3-D Securechallenged when saving a card.
Enable eCheck
eCheck
This section describes the required and optional configuration settings for
eCheck
for
the plugin. To enable
eCheck
follow these steps: - InOpenCartBack office, navigate toExtensions > Extensions > Payments >.Visa Acceptance SolutionseCheck
- Click theEditicon.
- In the EditeCheckpane, from the drop down list or text box, select or enter the setting you want.
- Click theSaveicon.
- Repeat for each required setting and each optional setting you want to enable.
Required Settings
The following settings are required:
eCheck
for the plugin:- Status
- With this setting enabled,eCheckis active.
Optional Settings
The following setting is optional but recommended for enabling
eCheck
for the
plugin:- Sort Order
- Order in which a payment method displays at checkout.
Enable Reporting
This section describes the required and optional configuration settings for Reporting for
the plugin.
To enable Reporting follow these steps:
- InOpenCartBack office, navigate toExtensions > Extensions > Modules >.Visa Acceptance SolutionsConfiguration
- Click theEditicon.
- In the Report Configuration tab of the EditVisa Acceptance SolutionsConfiguration Module pane, from the drop down list or text box, select or enter the configuration setting you want.
- Click theSaveicon.
- Repeat for each required setting and each optional setting you want to enable.
Required Settings
The following settings are required:
- Payment Batch Detail Report
- This report includes transactions that are processed with the applications. This report is available shortly after captured transactions are batched.
- When set toEnable, this report is downloaded from theBusiness CentertoOpenCart. The report is downloaded by default to different locations, depending on the mode in whichOpenCartis operating:
- In Sandbox (Test) mode, the report downloads to{OpenCartModuleInstallationDirectory}/cybersourceofficial/Reports/Sandbox
- In Production (Live) mode, the report downloads to{OpenCartModuleInstallationDirectory}/cybersourceofficial/Reports/Production.
- IMPORTANTVisa Acceptance Solutionsstrongly recommends thatOpenCartand theBusiness Centeroperate in the same time zone so that the Transaction Request Report and Payment Batch Detail Report work properly.
- Transaction Request Report
- This report includes details for individual transactions that are processed each day.
- When set toEnable, this report is downloaded from theBusiness CentertoOpenCart. The report is downloaded to different locations, depending on the mode in whichOpenCartis operating:
- In Sandbox (Test) mode, the report downloads to{OpenCartShopModuleInstallationDirectory}/cybersourceofficial/Reports/Sandbox
- In Production (Live) mode, the report downloads to{OpenCartModuleInstallationDirectory}/cybersourceofficial/Reports/Production.
- IMPORTANTVisa Acceptance Solutionsstrongly recommends thatOpenCartand theBusiness Centeroperate in the same time zone so that the Transaction Request Report and Payment Batch Detail Report work properly.
Optional Settings
The following settings are optional but recommended for enabling Reporting for the
plugin:
- Download path
- If you want to download the report to a path other than the default, specify that path here.
- Conversion Detail Report
- When set toEnable, this report pulls Case Management changes from theBusiness Centerat regular intervals to ensure orders are updated inOpenCart.
Enforcing Strong Customer Authentication
Select the
Enforce Strong Customer Authentication
setting to prompt a
3-D Secure
challenge when a customer saves their credit card
information. The customer is 3-D Secure
challenged when a transaction
is declined as reported by response code 478
(Strong Customer
Authentication required). After the transaction is declined, another request is sent
for the same order. IMPORTANT
The Enforce Strong Customer Authentication setting is only
available when the Payer Authentication/
3-D Secure
(General Plugin
setting) and Tokenization (Fraud Management Plugin setting) are enabled. See
Enable 3-D Secure (Payer Auth) and Enable Tokenization for information about enabling these
settings.Follow these steps to enable Enforce Strong Customer Authentication:
- OpenOpenCartBack Office and selectExtensions>Extensions>Payments>.Visa Acceptance SolutionsUnified Checkout
- Select theEditicon.
- From the drop down menu next to Enforce SCA for Saving Card, selectEnable.
- Click theSaveicon.
Scheduling Report Generation
Schedulers on a Linux, Mac, or Windows system are used to set up how often a specified
report is generated. Schedulers for Linux and Mac systems are set up using a Cron Tab.
The scheduler for a Windows system is set up using the Windows Task Scheduler app.
When setting up a schedule for generating a specific report, use this format:
- Format:<shop domain name>/module/cybersourceofficial/paymentReport
- Example:http://www.opencart_1.7.8.6.com/module/cybersourceofficial/paymentReport
Cron Tab Syntax for Mac and Linux Systems
When setting up the reporting schedule on a Linux or Mac system, you use
crontab
commands that determine how often and when the report
is generated. The syntax is:
* * * * * [command]
The asterisk (*) represents each of these timing parameters:
- Minute (0-59)
- Hour (0-23)
- Day of Month (1-31)
- Month (1-12)
- Day of week (0-6), (0-Sunday)
For example, these timing parameters indicate how often a specified report is
generated:
- * * * * * [command]: Runs every minute of every day of every week of every month.
- 0 * * * * [command]: Runs every hour of every day of every week of every month.
- 30 2 * * * [command]: Runs at 2:30 a.m. every day of every week of every month.
- 0 0 2 * * [command]: Runs once a month every month on the second day of the month.
- 0 * * * 1 [command]: Runs every Monday at every hour.
- 0,10,20 * * * * [command]: Runs on 0, 10, 20 minute of every hour of every day of every week of every month.
- 0 5-10 * * * *[command]: Runs every hour between 5 a.m. and 10 a.m.
- @reboot [command]: Runs every time after the server reboots.
- */5 * * * * [command]: Runs every five minutes of every day.
Setting Up Cron Scheduler for Linux
- Open a Linux terminal.
- Entercrontab-eto enter editor mode. For example:root@OpencartQA4:/etc# crontab -e
- Enter the command to set the timing for the cron job. For example, this command sets the cron job to run every 15th minute of every hour, every day, every week, and every month:15 * * * * curl https://www.dev.opencart.cybsplugin.com/mps1760/module/mybank/paymentReport
- EnterCtrl + Xto close the editor.
- Enter thecrontab -lcommand to check the scheduled cron job. For example:
The scheduled cron job should appear on the screen. For example:root@OpencartQA4:/etc# crontab -l15 * * * * curl https://www.dev.opencart.cybsplugin.com/mps1760/module/mybank/paymentReport
Setting Up Cron Scheduler for Mac
- Open a Mac terminal.
- Entercrontab-eto enter editor mode.C02X63PRJG5J:~ $crontab -e
- Enter the command to set the timing for the cron job. For example, this command sets the cron job to run every 45th minute of every hour, every day, every week, and every month:45 * * * * curl https://www.qa.opencart.cybsplugin.com/mps1786/module/cybersourceofficial/paymentReport
- EnterEsc + : + w + qto close the editor. The editor closes and displays this message:crontab: installing new crontab
- Enter thecrontab -lcommand to check the scheduled cron job.C02X63PRJG5J:~ $crontab -lThe scheduled cron job should display on the screen. For example:45 * * * * curl https://www.qa.opencart.cybsplugin.com/mps1786/module/cybersourceofficial/paymentReport
Setting Up Task Scheduler for Windows
- Open the Task Scheduler app and clickCreate Task. The Create Task pane displays.
- Select the General tab and enter a name for the task in theNamefield.
- Select the Triggers tab and clickNew. The New Trigger pane displays.
- Make the desired timing selections for the task in the New Trigger pane and clickOK.
- Select the Actions tab in the Create Task pane and clickNew. The New Action pane displays.
- Select and enter this information in the New Action pane and clickOK.
- Action drop-down menu:chooseStart a program.
- Program/script field:enter thecurlcommand.
- Add arguments (optional):enter the reporting URL.
- ClickOKin the Create Task pane to create the task. The new task displays in the Task Scheduler Summary.
Using the Plugin
The plugin provides merchants a frictionless way to process
payments, prevent fraud, and generate
reports within the
Business Center
while making it easy for customers to place and cancel orders, and save or update stored credit or
debit card information.Order Management
This section describes the order management process that occurs after a customer places
an order.
The order management process is handled using these
OpenCart
office
interfaces: - : Customers use this interface to place and cancel orders, and save or update stored credit or debit card information.
- : Merchants use this interface to configure the Plugin and manage orders, which includes these tasks:
- Capture an authorization(multiple partial captures are also supported).
- Reverse an authorization (full authorization is supported).
- Void a capture (standard and partial voids are supported).
- Refund a capture (standard and partial refunds are supported).
- Void a refund (standard and partial voids are supported).
Order Status
Order status is triggered and updated when transactions are processed. The plugin supports custom and default status states for
orders.
Custom order status states:
- Cancel error
- Canceled
- Canceled Reversal
- Chargeback
- Complete
- Denied
- Expired
- Failed
- Order cancelled by merchant
- Partial Refunded
- Partial Voided
- Payment error
- Payment pending for review
- Pending
- Processed
- Processing
- Refund Error
- Refunded
- Reversal
- Shipped
- Void Error
- Voided
Default order status states:
- Processed
- Canceled
- Shipped
- Delivered
- Refunded
Only the shipped and delivered status states can be manually updated.
Order Management Workflows
This section describes the order of events that the merchant completes after a customer
submits an order.
After-Authorization Workflow
This workflow comprises the sequence of events that occur after a customer places a new
order using
OpenCart
Front Office. The workflow shows how the order
status is updated when the authorized transaction is captured or reversed (full
authorization reversal). - The new order displays inOpenCartBack Office and the order status isPending.
- The merchant chooses one of these actions:
- Standard capture.
- Partial capture.
- Cancel products. For a full authorization reversal, the merchant must also cancel the order, which requires that they select all the quantities and all the items included in the order.A partial authorization reversal is not supported.
- When the merchant initiates a full authorization reversal, the authorization is cancelled and the order status is set toOrder cancelled by merchant.
- When the merchant initiates a multiple partial capture, they choose how many quantities to capture and whether to include the shipping costs.After multiple partial captures are processed, the order status is set toProcessing.
- When the merchant initiates a full capture, the entire authorization amount is captured and the order status is set toProcessed.
After-Capture Workflow
This workflow comprises the sequence of events that occur after an authorization is
captured. The workflow shows how the order status is updated when the captured
transaction is refunded or voided.
- The merchant selects one of these actions:
- Standard refund
- Partial refund
- Void capture
- If the merchant voids the capture, the captured transactions are voided.When all quantities of the transaction are captured, the entire order is voided and the order status is set toPayment cancelled.If only a few quantities are captured, only the captured quantities are voided and the order status is set toPartial payment accepted.
- If the merchant initiates a standard refundbeforeupdating the order status toshipped, the order status is set toPartial refunded (before shipped)until the refunded amount becomes equal to the captured amount. When the refunded amount becomes equal to the captured amount, the order status is set toRefunded.
- When the merchant selects a refundafterupdating the order status toshipped, the order status is set toPartial refunded (after shipped)until the refunded amount becomes equal to the captured amount. When the refunded amount becomes equal to the captured amount, the order status is set toRefunded.To refund the amount of an order, merchants can either generate a voucher or a credit slip for the refund. Depending on the type of refund they select and whether they issue a voucher or a credit slip, one of these actions occurs:
- When the merchant choosesGenerate a voucherfor a partial refund, the sum of the items is not refunded. Instead, a voucher is generated that can be used for future transactions.
- When the merchant choosesGenerate a voucherand enters the amount in the shipping costs field for a partial refund, then a voucher equal to the sum of the items and the shipping amount is generated.
- When the merchant choosesGenerate a credit slipfor a standard refund, the sum of the items is refunded.
- When the merchant chooses bothGenerate a credit slipandRepay shipping costsfor a standard refund, the sum of the items and the shipping amount are both refunded.
- When the merchant chooses bothGenerate a voucherandRepay shipping costsfor a standard refund, a voucher equal to the sum of the items and shipping amount is generated.
- When the merchant chooses bothGenerate a voucherandGenerate credit slipfor a standard refund, a voucher is generated and a refund for the sum of the items is not generated.
After-Refund Workflow
This workflow comprises the sequence of events that occur when the merchant voids a
refund under specific conditions:
- When the refund is processedbeforethe order is shipped, the refund is cancelled and the order status is set toVoidedorPartially Voided.
- When the refund is processedafterthe order is shipped, the refund is cancelled and the order status is set toVoidedorPartially Voided.
- When the voided refund amount is equal to the refund amount, the refund is cancelled and the order status is set toVoidedorPartially Voided.
IMPORTANT
OpenCart
does not provide an option to return
Gift Certificates. For orders associated with Gift Certificates, the services mentioned
below are not available: - Front Office Cancel
- Back Office Cancel
- Void a Capture
Customer Tasks
Customers can use the
My Account
option on the merchant's OpenCart
website to manage orders and their payment information. The
following sections contain the steps to complete these tasks.Saving Credit/Debit Card Information
Saving card information enables customers to use that information for future transactions. Using
OpenCart
Front Office, customers can save their card
information during the checkout process, or they can add their card's information to
their registered OpenCart
accounts using the Visa Acceptance Solutions
My Cards feature.If a customer wants to save their card information during the checkout process, they can select
the
Save my card for future payment
option when entering
their credit/debit card payment during checkout.The card information can also be saved using the
Visa Acceptance Solutions
My Cards page in
OpenCart
:- OpenOpenCartFront Office.
- ClickMy Account > Managed Stored Credit Cards >.Visa Acceptance SolutionsMy Cards > Add New Card
- If no current address is associated with the customer account, the customer is prompted to add an address. The customer can enter the required address information and clickSave.
- If an address is already associated with the customer account, the customer can select and use the address or add a new address.
- When the address information is complete and selected, the customer can update the card expiration information, if needed, or delete the existing card from the account.
- To update the expiration information (expiration month/year) for the card, underSaved Cardsthe customer clicks the blue arrow beneathMore, then clicks eitherUpdate, orDeleteto remove the card from the account.
ADDITIONAL INFORMATION
Customers can only add the number of cards that the merchant specified in the account configuration. The updated card information is tokenized and securely saved. The customer can use the saved card information for future transactions without having to enter that card information during the checkout process.
Selecting a Default Credit/Debit Card
When a customer has multiple cards associated with their account, they can designate the default
card. By default, the first card added to the account will be set as the default
card. In the
Visa Acceptance Solutions
My Cards page, the default card is
identified using an asterisk (*) that appears to the right of the card number.To change the default card, the
customer follows these steps:
- OpenOpenCartFront Office.
- Open theVisa Acceptance SolutionsMy Cards page. The page displays the saved cards associated with the account.
- Choose the card to set as the default card and selectMore > SET AS DEFAULT. The card is set as the default card.
ADDITIONAL INFORMATION
The default card cannot be deleted unless all other saved cards from theVisa Acceptance SolutionsMy Cards section are deleted.
Cancelling an Order
This task describes the steps a customer takes to cancel an order. They cannot cancel
an order if the order is in review with the merchant. The Cancel option is also not
available in direct Settlement for Captured
and
orders.eCheck
- OpenOpenCartFront Office.
- SelectMy Account > Order History. The Order history page displays the customer's orders.
- Select the View icon for the order. The Order details page appears.
- Click theCancel Ordericon to cancel the order. A Cancel Order confirmation notice appears.
- ClickYeson the Cancel Order confirmation notice to cancel the order.
ADDITIONAL INFORMATION
Above the Order History, a notification appears statingSuccess: Entire order was successfully cancelled.The order is cancelled and the order status is set toCanceled.If the order was a sales transaction or was captured, the cancellation is sent to the merchant and the status is set toCanceled. After the customer cancels an order, the merchant can accept or reject the order cancellation (as instructed in Processing a Cancelled Order).If the merchant accepts the cancellation request, a refund for the order amount is initiated and the order status is set toRefunded. If the merchant rejects the cancellation request, the order status is set toDenied.
Merchant Tasks
Merchants use
OpenCart
Back Office to manage orders. This section
describes the steps to complete these tasks.Processing a Cancelled Order
When a customer cancels an order, a request is sent to the merchant and the order
status is set to
Cancelled
. Merchants can accept or reject an order that a
customer cancels.- OpenOpenCartBack Office and selectOrdersfrom the Dashboard.
- Click the box beside the order the customer cancelled.
- Click the View icon. Under Order Details, the information for that order displays.
- UnderAdd Order Status, choose the order status that describes your processing of the cancellation.
Processing a Merchandise Return
When a customer requests to return merchandise, the information appears on the
Merchandise Returns page in
OpenCart
Back Office. Follow these
steps to process the return.- OpenOpenCartBack Office and selectSales > Returns. The Product Returns page displays and identifies the order or orders for which customers have requested a return.
- Click the box beside the order that you want to process the return and then click the Edit icon. The Edit Product Return page displays.
- In the Product Information and Reason for Return pane, choose one of these options from theReturn Actiondrop-down menu:
- Credit issued
- Refunded
- Replacement Sent
The status is updated for the order on the Merchandise Returns page. Next, you can proceed with selecting a return or refund option for the order. - SelectOrdersfrom the Dashboard.
- Select the order for which you want to process a return, and select one of these options:
- Return products
- Partial refund
Fraud Management
The plugin provides fraud management functionality
for merchants who also use the
Business Center
. You can apply fraud management functionality to transactions
when:- Fraud management is enabled in the plugin.
- You have a fraud management profile in theBusiness Center.
Fraud screening includes these features:
- Fraud Management Essentials (FME):used to enforce the rules created byVisa Acceptance SolutionsMachine Learning System (MLS). Fraud management is used to define the merchant’s rules.
- Fraud Management Rules:
- When the decision status from theBusiness Centeris AUTHORIZED_PENDING_REVIEW or PENDING_REVIEW, the order is in review and the order status is set toPayment pending for review.
- When the decision status from theBusiness Centeris AUTHORIZED_RISK_DECLINED, the order is rejected and the order status is set toOrder cancelled by merchant.
The table below describes the possible decisions, outcomes, and timing Decision Manager
uses when an order is triggered for review.
IMPORTANT
When these transactions are in a Decision Manager review state,
certain settlement considerations apply:
- For authorizations:while accepting this transaction it is not recommended to settle it in theBusiness Center. When the transaction is settled in theBusiness Center, the follow-on services initiated from OpenCart Back Office are impacted.
- For sales:
- The entire authorized amount should be settled in theBusiness Centerwhen accepting the transaction. When the settlement is not performed in theBusiness Center, the follow-on services initiated from OpenCart Back Office fail.
- A follow-on void capture does not trigger from OpenCart Back Office. While accepting review transactions, merchants should not select the settle option.
Decision | Execution Timing | Outcome of Decision |
|---|---|---|
Monitor | Before authorization | Authorization will be successful and no
action from the Decision Manager is required. Use this decision to
understand the outcome of a rule. |
Accept | Before authorization | The order is processed normally and is
placed successfully. |
Review | Before authorization | The authorization is successful, and
follow-on services are put on hold until the merchant accepts or rejects
it. The order status will be set to Payment pending for review .
|
Reject | Before authorization | The order is rejected and the authorization
is not processed. The merchant is not able to view the order in OpenCart
Back Office. |
Monitor | After authorization | The authorization is successful and no
action from Decision Manager is required. Use this decision to
understand the outcome of a rule. |
Accept | After authorization | The order is processed normally and placed
successfully. |
Review | After authorization | The authorization is successful, and
follow-on services are put on hold until the merchant accepts or rejects
it. The order status is set to Payment pending for
review . |
Reject | After authorization | The original authorization is successful
and then is automatically reversed and the order status is set to
Order cancelled by merchant . |
Reporting
The plugin provides reporting functionality for merchants who also use the
Business Center
. You can import these reports from the Business Center
into OpenCart:- Transaction Request Report:includes details for individual transactions that are processed each day.
- Payment Batch Detail Report:includes transactions that are processed with the applications. This report is available shortly after captured transactions are batched.
- Conversion Detail Report:includes Case Management changes recorded in theBusiness Centerto ensure that updated orders are also included inOpenCart. This report is generated at regular intervals and includes the results of the converted orders for each reviewer. This information provides an overview of all orders that were not immediately accepted.
Scheduling
The Plugin reporting functionality works with a system scheduler to generate and
update reports for
OpenCart
. There are some Cron Job modules
available for OpenCart
, such as the Cron Tab, that support
reporting. Merchants can use any Cron Job module that OpenCart
supports, or any other online Cron service provider to generate reports. See Scheduling Report Generation for information about how to schedule
report generation.
Workflow
The reports are processed and orders are updated in
OpenCart
using this workflow: - Orders with anAUTHORIZED_PENDING_REVIEWorAUTHORIZED_RISK_DECLINEDstatus are included in theps_cybersourceofficial_ordertable in the OpenCart database.
- If a review is trigged for an order based on the profile rule in Decision Manager, aPayment pending for revieworder status displays for that order on theOpenCartBack Office Orders page.
- The merchant uses theBusiness Centerto accept the order that is in review, and, if not already enabled, enables the reports using the Report Settings on the Plugin Configuration page.
- The scheduler runs the report at regular intervals according to the intervals the merchant configured. The order is accepted or rejected by the merchant in theBusiness Center, is retrieved, and the new status is updated asAUTHORIZEDorDECLINED. The updated order status displays in theop_cybersourceofficial_ordertable in theOpenCartdatabase.
- The original decision and the new decision are updated and displayed in theop_cybersourceofficial_conversion_detail_reporttable in theOpenCartdatabase.
- The order is updated asAwaiting paymentstatus for the authorization and displayed on theOpenCartBack Office Orders page. The payment is accepted for the sale and any associated follow-on transactions (capture, void capture, refund, void refund, and full authorization reversal).
Testing
If you have not done so already, configure these settings using OpenCart Back
Office:
- General Settings:merchant ID, merchant key ID, and/or merchant secret key
- Payment Settings:applicable payment methods
After configuring the Plugin, complete this task to test the configuration using
OpenCart Front Office to place an order and OpenCart Back Office to manage the
order.
- Open OpenCart Front Office to place an order.
- At Checkout, enter any required personal information and select the payment method you want to use to place the order.
- Enter the card information you want to use to place the order and clickConfirm Order. If the order is successful, an order confirmation message displays.
- Open OpenCart Back Office to manage the order.
- SelectOrdersfrom the Dashboard. The Orders page displays and lists all active orders.
- Select the checkbox next to the order you processed in Step 1. Then click the View icon. The order status for the order should displayPending.
- ClickCaptureto capture the authorized amount, thenYes. The order status changes toProcessed.
- ClickPartial captureto capture part of the authorized amount. The order status changes toProcessing.
- ClickCancelto cancel the order. The order status changes toOrder Cancelled by Merchant.
ADDITIONAL INFORMATION
For more information about testing, including test cards, see
Upgrading
You can install a newer version of the plugin using
OpenCart
Back
Office.- To uninstallVisa Acceptance SolutionsPayment, navigate toExtensions > Extension Types > Paymentsand then uninstall all of theVisa Acceptance Solutionspayment modules.
- To uninstallVisa Acceptance SolutionsTax, under the same Extension dropdown, selectOrder Totalsand uninstallVisa Acceptance SolutionsTax.
- To uninstall theVisa Acceptance SolutionsPayment extension, under the Extension dropdown, selectModules, and uninstall theVisa Acceptance SolutionsPayment extension.
- Navigate to the Extensions tab and clickInstaller, then clickDeleteto remove theVisa Acceptance Solutionsextension.
- Navigate back to the Extensions tab and clickModification, then clickRefresh.
- To install the newVisa Acceptance SolutionsPayment extension, follow the steps mentioned in Installation.
Troubleshooting Assistance
For help with troubleshooting, contact and
provide this information:
- Summary of the issue
- Steps needed to reproduce the issue
- Platform version
- Plugin version
- Platform Merchant ID
- Configuration screenshots
- List of themes/additional extensions installed
- Log file and any other data or screenshots related to the issue
PrestaShop
PrestaShop
This is an overview of the
Cybersource Official Plugin
extension for PrestaShop,
which enables merchants to accept various payment methods.The
Visa Acceptance Solutions
extension for PrestaShop enables merchants to connect
their PrestaShop store to the Visa Acceptance Solutions
Platform to directly take
credit and debit cards, Apple Pay, Google Pay, Click to Pay
, ACH,
and eCheck
payments.Supported Features
This is a list of payment methods and features supported by the
Cybersource Official Plugin
Prestashop extension.- Credit and debit Cards
- Apple Pay
- Google Pay
- Click to Pay
- ACH andeCheck
- 3-D SecurePayer Authentication
- Tokenization including network tokens
- Visa Acceptance SolutionsDecision ManagerandFraud Management Essentials
Supported Versions
This PrestaShop integration works with PrestaShop 8.0.4 to 9.0.1.
Visa Acceptance Solutions Prerequisites
Visa Acceptance Solutions
PrerequisitesThese required and optional
Visa Acceptance Solutions
products and configurations
are needed for the PrestaShop extension.Mandatory
These
Visa Acceptance Solutions
products must be enabled and configured for your
Merchant ID:- Unified Checkout
You must also have a REST Shared Secret Key Pair.
Optional
These Visa Acceptance Solutions products are optional. If you choose to use any of
these products, they must be enabled and configured for your Merchant ID:
- Payer Authentication for3-D Secure
- Tokenization
- Apple Pay
- Google Pay
- Click to Pay
- eCheck
- Decision Manager
- Fraud Management Essentials
You can also enable Message-Level Encryption (MLE) for
additional security. MLE requires a REST Certificate.
Release Notes
This information is a version history and release notes for the
Cybersource Official Plugin
PrestaShop extension.Version 7.0.0
Enhancements:
- PrestaShop 9 support
- Hummingbird Theme compatibility
- Replaced Microform with Unified Checkout
- Apple Pay, Click to Pay, Google Pay, and ACH and eCheck were included in Unified Checkout, removing individual components
- Latin America processing logic was removed.
Version 6.3.1
Enhancements:
- PrestaShop 8.2.3 support
Bug Fixes:
- Installation error
Version 6.3.0
Enhancements:
- Message Level Encryption
- CVV capture for transactions with saved cards was removed.
- PrestaShop 8.2.1 support
- Support for PrestaShop 1.7.x was ended.
Earlier Versions
For a complete release history including versions 6.2.1, 6.2.0, 6.1.0, 5.1.0, 4.2.0,
4.1.0, 3.1.0, 2.10, and 1.x, refer to the complete release notes documentation.
Installation
Follow these steps to install the
Cybersource Official Plugin
extension for
PrestaShop.- Go to the PrestaShop Marketplace and download our extension.
- Log into your PrestaShop back office.
- Go to .
- Upload the module downloaded from the marketplace.
Configuration
This is the complete configuration guide for the
Cybersource Official Plugin
PrestaShop extension, including minimum and optional settings.To configure the
Cybersource Official Plugin
extension for PrestaShop, go to . Scroll down to Visa Acceptance Solutions
Official and click
Configure
.It is recommended to click
Save
after working on each
configuration tab.Minimum Configuration
As a minimum to accept payments with
Visa Acceptance Solutions
, configure these
settings.General Settings Tab
- Payment Option Label: This text is displayed on your checkout page to your customers.
- Sandbox Mode:
- Yes: Choose for testing yourVisa Acceptance Solutionstest account.
- NoChoose for live transactions.
- Merchant ID: The transacting Merchant ID (MID) thatVisa Acceptance Solutionsassigned to you.
- Merchant Key ID: The Key from your REST API Shared Secret Key.
- Merchant Secret Key: The Shared Secret from your REST API Shared Secret Key.
- Accepted Card Types: Choose the card brands to accept.
Payment Settings Tab
- Card Payments: To enable, set toYes.
- Payment Action:
- Authorize: Sends an authorization request and if approved, you must manually request a capture.
- Sale: Captures the transaction automatically if the authorization is approved.
In the Sale mode, if an authorization returns an
AVS Failed
error,
the merchant must manually review the transaction and decide whether to cancel or
accept the transaction. If the merchant accepts the transaction, the merchant must
manually capture the transaction.Message Level Encryption
Message Level Encryption (MLE) uses certificates that ensure each message is securely
encrypted and tied to the sender's verified identity, without needing to share
secret keys in advance. MLE provides stronger authentication, easier key management,
and better protection against fraud or tampering.
A shared secret uses the same key for both sending and receiving messages, meaning
both parties must securely exchange and protect that key in advance. While MLE can
be simpler, it offers less identity verification and can be more vulnerable if the
key is compromised.
Prerequisite
: Message Level Encryption requires a P12 certificate.- Message Level Encryption: To enable MLE, set toYes.
- Enter the path to the folder containing the certificate.
- Enter the key name.
- Enter the key password.
- Enter the key alias.
Digital Payment Methods
- Google Pay: To enable Google Pay, set toYes.
- Apple Pay: To enable Apple Pay, set toYes.
- : To enable Click to Pay, set toClick to PayYes.
You must enable these payment methods for your MID in the
Business Center
.
For more information, see this Unified Checkout
Developer Guide.Alternative Payment Methods
- : To enable alternative payment methods, set toeCheckYes.
Tokenization
- Tokenization: To enable customers to save their card for future purchase, set toYes.
- Network Token Updates: If your MID is enabled for network tokens, set this option toYesto subscribe to the lifecycle updates associated with the token.
- Limit Saved Card Rate: To limit the saved card rate, set toYes.
- Saved Card Limit Count: Specify the maximum number of cards a customer can save to their account.
- Saved Card Limit Time Frame: Specify the time frame (1 to 24 hours) when customers can save the specified number of cards to their account.
Payer Authentication/3-D Secure
3-D Secure
- Payer Authentication/: To enable payer authentication, set to3-D SecureYes.
- Enforce Strong Consumer Authentication: To enforce a3-D Securechallenge when a customer saves their card for future payments, set toYes.
Fraud Screening
Fraud Management Settings Tab
- Fraud Management: To configure the extension to look for fraud screening responses, set toYes.
- Google reCAPTCHA: Set toYesto enable.
- reCAPTCHA Site Key: Enter the public key that renders reCAPTCHA on your web page.
- reCAPTCHA Secret Key: Enter the private key that provides validation to the server.
Go to Google reCAPTCHA to sign up and create keys. The
Cybersource Official Plugin
extension supports v3.- Device Fingerprint: To collect information about your customers' device as part of fraud screening, set toYes.
Report Settings
Report Settings Tab
- Transaction Request Report: When enabled, the extension downloads a report fromVisa Acceptance Solutionscontaining details for transactions processed each day. Set toYesto enable.
- Payment Batch Detail Report: When enabled, the extension downloads a report fromVisa Acceptance Solutionscontaining details of all captures and refunds that were submitted to your payment processor. Set toYesto enable.
For all reports, it is strongly recommended that your PrestaShop store and the
Visa Acceptance Solutions
Business Center
user profile operate in the same time zone.Report download locations:
- In test mode:{PrestaShopModuleInstallationDirectory}/cybersourceofficial/Reports/Sandbox
- In production (live) mode: {PrestaShopModuleInstallationDirectory}/Visa Acceptance Solutionsofficial/Reports/Production
- Conversion Detail Report: When you are using fraud screening with REVIEW rules, this toggle polls theVisa Acceptance Solutionsplatform to check for updates to transactions and the associated orders in PrestaShop. Set toYesto enable.
A scheduled task is required for the updates. For details on how to set up a task,
see the Appendix.
Additional Options
General Settings Tab
- Enhanced Logs: To generate logs that can be accessed from , set toYes. This feature is not recommended for Production (live) mode.
- Developer ID:Visa Acceptance Solutionsgenerated ID string issued to development partners.
Order Management
This topic explains how to manage orders including captures, refunds, and voids in
the
Cybersource Official Plugin
Prestashop extension.Orders are marked differently depending on the Payment Action that is chosen.
- For Authorize, orders are marked asAwaiting Payment.
- For Sale, orders are marked asPayment accepted.
Fraud Screening
When fraud screening is enabled, transactions are marked as follows:
- Approved orders are marked asAwaiting PaymentorPayment Accepted, (depending on your Payment Action setting)
- Orders to review are marked asPayment pending for review.
- Rejected orders are marked asOrder cancelled by merchant.
Orders marked as
Payment pending for review
must be reviewed in the Business Center
. The Visa Acceptance Solutions
extension checks for transaction
status in the intervals as set by your scheduled tasks. Rejected transactions are
marked as Order cancelled by merchant
.Accepted transactions are marked according to your Payment Action settings.
Capture
Enter the order from the list of orders and choose one of these options:
- Partial Capture: Select the items to capture and then clickPartial Capture. The order is marked asPartial payment accepted.
- Standard Capture: Captures the entire order and marks the order asPayment accepted.
Refund
Orders can only be refunded if they are marked as
Payment accepted
or Partial payment accepted
.- To refund the entire order, clickStandard Refund.
- To refund part of the order, clickPartial Refund, choose the item(s) to refund, and then clickPartial Refund.
Void
- For an order that was not captured, clickCancel products, choose the item(s) to cancel, then clickCancel products. This reverses the authorization.
- For an order that was captured, clickVoid capture.
- For an order that was refunded, clickVoid refund.
Support & Troubleshooting
Information about getting support and troubleshooting common issues with the
Cybersource Official Plugin
PrestaShop extension.Support
If you require support with this extension, visit support.visaacceptance.com to
raise a support case. For resold accounts, contact your reseller.
For the support case, provide this information:
- Summary of issue
- Steps to reproduce the issue
- PrestaShop version
- Cybersource Official Pluginextension version
- Visa Acceptance SolutionsMerchant ID
- Configuration screenshots
- List of the additional themes and extensions installed
- Log file
- Any additional information related to the issue
FAQ
PrestaShop Language Pack Installation Error
When you get a
Cannot download language pack
error message while
installing the extension, follow these steps:- Go to/htdocs/PrestaShop root/Classesand opentools.php.
- Search forcurl_setopt($curl, CURLOPT_SSL_VERIFYPEER, false);.
- Changefalsetotrue.
- Save the file, reload your browser, and attempt installation again.
Upgrade
To upgrade to the latest version of the PrestaShop extension, go to . Scroll down to
Visa Acceptance Solutions
Official and click
Upgrade
.Appendix
This is additional information about report scheduling for the
Cybersource Official Plugin
Prestashop extension.Report Scheduling
Schedulers for Linux and Mac systems are set up using a Cron Tab. The scheduler for a
Windows system is configured using the Windows Task Scheduler app.
When configuring a schedule for generating a specific report, use this format:
Format:
<shop domain
name>/module/cybersourceofficial/paymentReport
Example:
https://www.prestashop_8.2.2.com/module/cybersourceofficial/paymentReport
Cron Tab Syntax for Mac and Linux Systems
When setting up the reporting schedule on Linux or Mac, use crontab commands to
determine how often and when the report is generated.
The syntax is:
* * * * * [command]
Each asterisk (*) represents one of the timing parameters:
- Minute (0-59)
- Hour (0-23)
- Day of Month (1-31)
- Month (1-12)
- Day of week (0-6) 0 = Sunday
Cron Scheduler Setup
- Open a Linux or Mac terminal.
- Entercrontab-eto enter editor mode.
- Enter the command to set the timing for the cron job.
- For example, for 15-minute intervals:15 * * * * curlhttps://www.prestashop_8.2.2.com/module/cybersourceofficial/paymentReport
- Close the editor.
- Entercrontab -lto check the scheduled cron job.
Windows Task Scheduler
- Open Task Scheduler and clickCreate Task.
- Select the General tab and enter a name.
- Select the Triggers tab and clickNew.
- Enter the desired timings and clickOK.
- Select the Actions tab in the Create Task pane and clickNew.
- Enter this information into these fields and then clickOK.
- Action:Start a program
- Program/script:curl
- Add arguments (optional): Enter the reporting URL.
Salesforce B2C Commerce
Salesforce
B2C CommerceThe
Visa Acceptance Solutions
cartridge for Salesforce
B2C
Commerce enables merchants to connect their Salesforce
B2C Commerce
store to the Visa Acceptance Platform to directly take credit/debit card, Apple Pay, Google
Pay, Click to Pay
, and eCheck
payments.Supported Features
The
Visa Acceptance Solutions
cartridge for Salesforce
B2C
Commerce supports multiple payment methods and features.Payment Methods
- Credit/debit cards
- Apple Pay
- Google Pay
- Click to Pay
- eCheck
Security and Fraud Management
- Payer Authentication/3-D Secure
- Tokenization
- Visa Acceptance SolutionsDecision ManagerandFraud Management Essentials
Additional Services
- Visa Acceptance SolutionsDelivery Address Verification
- Visa Acceptance SolutionsTax Calculation
Supported Versions
The
Visa Acceptance Solutions
extension is compatible with specific versions of
Salesforce
Store Front Reference Architecture (SFRA).Compatibility
Our
Visa Acceptance Solutions
extension is compatible with Salesforce
Store Front Reference Architecture (SFRA) version 7.0 and
below.Cybersource Prerequisites
Before implementing the
Visa Acceptance Solutions
cartridge, ensure that you have
the required and optional Visa Acceptance Solutions
products configured.Mandatory
You must have a REST Shared Secret Key
Optional
These
Visa Acceptance Solutions
products are optional, but if you choose to use
them, they must be enabled and configured for your Merchant ID:- Unified Checkout
- Payer Authenticationfor3-D Secure
- Tokenization
- Apple Pay (standalone or throughUnified Checkout)
- Google Pay (standalone or throughUnified Checkout)
- Click to Pay(throughUnified Checkoutonly)
- Visa Acceptance SolutionsDecision Manager
- Visa Acceptance SolutionsFraud Management Essentials
You can also enable Message-Level Encryption (MLE) for additional security. A REST
certificate is required for MLE.
Rules-based
Payer Authentication
is also supported and requires both Payer Authentication
and Decision Manager
to be enabled.Release Notes
Release history and updates for the
Visa Acceptance Solutions
Salesforce
B2C Commerce cartridge.Version 26.1.0 (January 2026)
- Added support for3-D SecureData Only transactions.
Version 25.4.0 (December 2025)
- Added support forUnified Checkoutv0.32 (Card Payments, Apple Pay, Google Pay,Click to Pay, andeCheck).
- End of support forClick to Paylegacy.
Version 25.3.0 (May 2025)
New Features:
- AddedPayer Authenticationsupport for Google Pay.
- Added multi-currency support for Google Pay.
Bug Fixes:
- Handled session variables in SCA flow.
- Removed encryption type from Microform v2 request.
Version 25.2.0 (March 2025)
New Feature:
- Message-Level Encryption (MLE).
Enhancement:
- Added support for Cartes Bancaires, Elo, China Union Pay, and JCrew.
Version 25.1.0 (January 2025)
New Feature:
- Replaced Microform v0.11 with v2.
Bug Fixes:
- Added webhook subscription deletion if the subscription is deleted atVisa Acceptance SolutionsorSalesforcecustom object.
- Handled undefined exception scenario for3-D Securetransactions.
Version 24.4.0 (September 2024)
New Feature:
- DMPA support.
Enhancement:
- Upgraded to jQuery v3.7.0.
Version 24.3.0 (August 2024)
Enhancements:
- Upgraded the cartridge to support SFRA v7.0.
- Added MOTO Commerce Indicator.
Version 24.2.1 (May 2024)
Bug Fixes:
- Checkmarx issues fixed.
- Device fingerprint bug fixed.
Version 24.2.0 (April 2024)
New Features:
- Network token support
Enhancements:
- Implemented Direct API integration forPayer Authentication, adding Payer Authentication Setup and Device Data Collection.
- Enhanced Strong Consumer Authentication (SCA).
Version 24.1.0 (February 2024)
New Features:
- Added Strong Customer Authentication retries for card payments.
Enhancements:
- SFRA v6.3 support.
- SalesforceB2C Commerce Release 22.7 support.
- Renamed Visa SRC toClick to Pay.
- Implemented Sale functionality for Credit Card, Google Pay,Click to Payand Apple Pay.
- Updated flex script referring from v0.11.0 to v0.11.
- Updated API header in Http Signature Authentication.
Version 21.1.0 (June 2021)
Enhancements:
- ImprovedPayer Authenticationscreen (modal).
Bug Fixes:
- Added descriptive error messages on certain fail cases and invalid inputs.
- Reloading on final confirmation page does not result on failed authorization.
Version 20.2.0 (Feb 2021)
New Features:
- Google Pay
- Visa Secure Remote Commerce payment method
- Improved the security on the My Account page by adding Microform to tokenize payment cards.
Bug Fixes:
- Improved the security of keys by changing data type of password fields fromStringtopassword.
- Added more security to the exposed parameters of device fingerprint.
Version 20.1.1 (Nov 2020)
Bug Fixes:
- Improved the security on accessing and modifying sensitive fulfilment-related actions on an order (for example, order acceptance, cancelling etc.).
Version 20.1.0 (Aug 2020)
Initial release supporting:
- Credit/debit cards
- Apple Pay
- Payer Authentication/3-D Secure
- Delivery Address Verification service
- Tax Calculation service
- Authorization, Capture, Authorization Reversal
Install Visa Acceptance Solutions for Salesforce B2C Commerce
Visa Acceptance Solutions
for Salesforce B2C CommerceDownload and install the
Visa Acceptance Solutions
cartridge for Salesforce
B2C Commerce.Before beginning installation, ensure that you have:
- Access to yourSalesforceB2C Commerce instance.
- Node.js installed on your development machine.
- Appropriate IDE (VSCode recommended with Prophet Debugger extension).
- Download theVisa Acceptance Solutionscartridge forSalesforceB2C Commerce from the ISV Integration Toolkits section on GitHub.
- Set up your workspace.
- Create a folder namedfolder in yourVisa Acceptance SolutionsSalesforceworkspace and copy the downloaded cartridges (int_cybs_sfraandint_cybs_sfra_base) to the workspace.
- If the project's base path is different from the one available in theVisa Acceptance Solutionspackage.json, open the file/package.jsonand modify thepaths.basevalue to point to yourapp_storefront_basecartridge. This path is used by the JS and SCSS build scripts.
- Configure IDE (VSCode).
ADDITIONAL INFORMATION
If you use VSCode, install the extension Prophet Debugger and include these lines indw.json():ADDITIONAL INFORMATION
{
    "hostname": "your-sandbox-hostname.demandware.net",
    "username": "yourlogin",
    "password": "yourpwd",
    "version": "version_to_upload_to",
    "cartridge": [
        "int_cybs_sfra",
        "int_cybs_sfra_base",
        "app_storefront_base",
        "modules"
    ]
}
ADDITIONAL INFORMATION
If you are using a different IDE, refer to the respective guide to set up your workspace. - Build and Upload Code
- Install the node in theVisa Acceptance Solutionsfolder
- Installsgmf-scriptsandcopy-webpack-pluginwith this command:
ADDITIONAL INFORMATION
npm install sgmf-scripts && npm install copy-webpack-plugin - Compile JS and SCSS with this command:
ADDITIONAL INFORMATION
npm run compile:js && npm run compile:scss - Upload the code to theSalesforceCommerce Cloud instance:
ADDITIONAL INFORMATION
npm run uploadCartridge
RESULT
The
Visa Acceptance Solutions
cartridge is now installed and ready for
configuration in your Salesforce
B2C Commerce environment.Configure Visa Acceptance Solutions for Salesforce B2C Commerce
Visa Acceptance Solutions
for Salesforce B2C CommerceConfigure the
Visa Acceptance Solutions
cartridge in Salesforce
B2C Commerce Salesforce
Business Manager.After installation, configure the cartridge through the
Salesforce
Business Manager to enable payment processing capabilities.- Base Configuration
- Set up the cartridge path.
ADDITIONAL INFORMATION
InSalesforceBusiness Manager, go to .Step Result
For Cartridges, enter int_cybs_sfra:int_cybs_sfra_base:app_storefront_base and clickApply. - Upload metadata
ADDITIONAL INFORMATION
Go to the folder.Visa Acceptance Solutions/metadata/payments_metadata/sites/ADDITIONAL INFORMATION
- Rename the folderyourSiteIDwith your site ID fromSalesforceBusiness Manager (this can be found by looking up ).
- Zip thepayments_metadatafolder.
- Go to and upload thepayments_metadata.zipfile.
- Import the uploaded zip file.
Step Result
Upon successful import, this metadata is created:- Site Preferences:Visa Acceptance Solutions_Core,Visa Acceptance Solutions_DeliveryAddressVerification,Visa Acceptance Solutions_DeviceFingerprint,Visa Acceptance Solutions_PayerAuthentication,Visa Acceptance Solutions_TaxConfiguration,Visa Acceptance Solutions_Tokenization,Visa Acceptance Solutions_DecisionManager,Visa Acceptance Solutions_MLE,Visa Acceptance Solutions_ApplePay,Visa Acceptance Solutions_GooglePay, VisaAcceptance_SecureIntegrationConfiguration
- Service: PaymentHttpService
- Payment Processor
- Payment Method
- Job: Payment :Decision Manager Order Update
- Minimum Configuration
- Visa Acceptance SolutionsCore
ADDITIONAL INFORMATION
Go to and set these configuration parameters:- EnableVisa Acceptance SolutionsCartridge: Enable the cartridge.
- Visa Acceptance SolutionsMerchant ID: The transacting Merchant ID (MID) assigned to you.
- Visa Acceptance SolutionsREST KeyId: The Key from your REST API Shared Secret Key.
- Visa Acceptance SolutionsREST Secret Key: The Shared Secret from your REST API Shared Secret Key.
- Commerce Indicator:
- Useinternetfor eCommerce transactions.
- UseMOTOif you are using the store for call center transactions only.
- Services
ADDITIONAL INFORMATION
The target endpoint must be set to send transactions to test or production (live).ADDITIONAL INFORMATION
Go to and enter the appropriate URL:- Test:https://apitest.visaacceptance.com
- Production (live):https://api.visaacceptance.com
- Accept Payment Cards
ADDITIONAL INFORMATION
Prerequisite: Go to , selectCREDIT_CARDand verify that the payment processor isPAYMENTS_CREDIT.- Select Card Capture Method
ADDITIONAL INFORMATION
Our cartridge supports these card capture methods:Unified Checkout, Microform, and Direct API.ADDITIONAL INFORMATION
If you enable Apple Pay, Google Pay, and/orClick to PayinUnified Checkout, these payment methods are displayed in a single widget.Unified Checkoutand Microform might qualify you for PCI-DSS SAQ:A as the card number is collected in secure fields and never resides on your server.If you need access to the card number, selectDirect API. This option increases your PCI burden.ADDITIONAL INFORMATION
To select the card capture method, go to .
RESULT
The
Visa Acceptance Solutions
cartridge is now configured with basic settings.
Additional optional configurations can be applied based on your specific
requirements.Digital Payment Methods
Apple Pay and Google Pay can be standalone options, or they can be offered as payment
options with
Click to Pay
within Unified Checkout
.You can configure digital payment methods in two ways:
Unified Checkout
or as standalone options.- To configureUnified Checkout, go to .
- In theDigital Payment Methods infield, select Apple Pay, Google Pay, orUnified CheckoutClick to Pay. You can choose any or all of the options.
ADDITIONAL INFORMATION
IMPORTANTIf you are usingUnified Checkoutfor digital payment methods, the payment methods must be enabled for your Merchant ID inBusiness Center. For more information about enabling digital payments, see Enable Digital Payments. - EnableUnified Checkoutfor Cart and Mini Cart: Enable this option to display digital payment methods for quick checkout on the cart and mini cart pages.
- Go to and confirm that these options are enabled for the methods you accept:
ADDITIONAL INFORMATION
- DW_APPLE_PAY: Verify that the Payment Processor isPAYMENTS_APPLEPAY.
- DW_GOOGLE_PAY: Verify that the Payment Processor isPAYMENTS_CREDIT.
- CLICK_TO_PAY: Verify that the Payment Processor isPAYMENTS_CLICK_TO_PAY.
Apple Pay Standalone Configuration
To offer Apple Pay outside of
Unified Checkout
, follow these steps to enable Apple Pay in your Salesforce
B2C Commerce store.Follow the steps documented here first, before you follow this
procedure to enable Apple Pay in your
Salesforce
B2C Commerce
store.- SalesforceBusiness Manager Configuration
- Go to: .
- CheckApple Pay Enabled?
- Complete the "Onboarding" form:
ADDITIONAL INFORMATION
- Ensure the Apple Merchant ID and the Apple Merchant Name values you enter match the settings in your Apple account.
- Ensure all other fields match your supportedVisa Acceptance Solutionssettings.
- Country Code: Enter the country code for the location of your site. The country code is a two letter ISO 3166 country code (for example,US).
- Merchant Capabilities: Check the box for 3-D Secure, leave the other fields unchecked.
- Supported Networks: Select the types of payment you support:Amex,Mastercard, andVisaare supported byVisa Acceptance Solutions.
- Required Shipping Address Fields: Select the fields that are required on the shipping form.Visa Acceptance SolutionsrecommendsEmail,Name,Phone, andPostal Address.
- Required Billing Address Fields: SelectNameandPostal Address.
- Fill in the Storefront Injection form:
ADDITIONAL INFORMATION
Select where to display Apple Pay buttons on your site. - Fill in the Payment Integration form:
ADDITIONAL INFORMATION
- Use Commerce Cloud Apple Pay Payment API?Checked
- Payment Provider URL:
- Test: https://apitest.cybersource.com/partner/demandware/payments/v1/authorizations
- Production: https://api.cybersource.com/partner/demandware/payments/v1/authorizations
- Payment Provider Merchant ID: Enter yourVisa Acceptance Solutionsmerchant ID.
- API Version: v1
- Use Basic Authorization?Unchecked
- Payment Provider User: Not Applicable
- Payment Provider Password: Not Applicable
- Use JWS?== Yes
- JWS Private Key Alias: Merchant.p12 Key Alias
Step Result
The private key alias is created when a merchant uploads their .p12 key file (fromVisa Acceptance Solutionsself-serve) to Commerce Cloud'sSalesforceBusiness Manager Module, Private Keys and Certificates () - ClickSubmit.
- Domain Registration inSalesforceBusiness Manager
- Go to .
- Under Domain Registration section
ADDITIONAL INFORMATION
- In the Apple Sandbox section, clickRegister Apple Sandboxto registerSalesforceB2C to the Apple Sandbox account.
- In the Apple Production section, click onRegister Apple Productionto registerSalesforceB2C to the Apple Production account.
- Transaction Type
ADDITIONAL INFORMATION
Go to and chooseAuthorizationorSale.
Google Pay Standalone Configuration
To offer Google Pay outside of
Unified Checkout
, follow these steps to enable Google Pay in your Salesforce
B2C Commerce store.- Go to .
- Configure Google Pay settings:
- Enable Google Pay: Enable.
- Enable Google Pay on Mini Cart: Enable to show Google Pay as a checkout option in the mini cart.
- Enable Google Pay on Cart: Enable to show Google Pay as a checkout option in the cart.
- Google Pay Merchant Id: Enter your Google Pay merchant ID (for live processing only).
- Google Pay Environment: ChooseTestfor testing andProductionfor live.
- Google Pay Transaction Type: ChooseAuthorizationorSale.
Alternative Payment Methods
Configure alternative payment methods such as
eCheck
for your
Salesforce
B2C Commerce store. Follow this procedure to enable
eCheck
as a payment option within Unified Checkout
.- Go to
- Set theEnableoption toeCheckYes.
- Go to and confirm that the payment processor is set toBANK_TRANSFER.
Payer Authentication and 3-D Secure
Payer Authentication
and 3-D Secure
Configure
Payer Authentication
and 3-D Secure
for enhanced
transaction security.- Go to .
- InMode, choose one of these options:Payer Authentication
ADDITIONAL INFORMATION
- Yes: All transactions will process with3-D Secure.
- No: No transactions will process with3-D Secure.
- Data Only + Yes: Data Only will be used for Visa and Mastercard/Maestro. All other card brands will process with3-D Secure.
- Data Only + No: Data Only will be used for Visa and Mastercard/Maestro. All other card brands will process without3-D Secure.
- IsSCAEnabled: Enable this option to enforce Strong Consumer Authentication (3-D SecureChallenge) when a customer is saving their payment card for future transactions.
Tokenization
Tokenization enables your customers to save their payment cards securely for future
payments.
- To enable tokenization, go to .
- Enable theEnable Tokenization Servicesoption to turn on Tokenization.
- Enable the option to set the limits associated to saving cards.
- In theSaved Cards Allowedoption, enter the number of cards a customer can save in the defined time limit.
- In theReset Intervaloption, specify the number of hours before the saved card limit resets.
- Enable theNetwork Token Updatesoption to prompt the cartridge to subscribe for Token Life Cycle Updates webhooks when yourVisa Acceptance SolutionsMID is configured for network tokens.
- Go to and verify that the custom object type Network Tokens Webhook exists.
Fraud Screening
Enabling Fraud Screening alerts the cartridge to look for fraud screening responses.
Fraud Screening profiles must be set up in the
Business Center
.- Go to and set these options:
- Enable theEnableoption.Decision ManagerServices
- Conversion Detail Report Lookback Time: If you are using REVIEW rules and configure theDecision ManagerUpdate Job, set the number of hours to look back for updates to transactions in REVIEW status. The maximum is 24 hours.
- To enable theDecision ManagerUpdate Job to poll for updates to the reviewed transactions, go to and selectPayment:and set these values:Decision ManagerOrder Update
ADDITIONAL INFORMATION
- ID: Enter a job ID.
- Description: Enter the job description.
- ExecuteScriptModule.Module: int_cybs_sfra_base/cartridge/scripts/jobs/DMOrderStatusUpdate.js
- ExecuteScriptModule.FunctionName: orderStatusUpdate
- ExecuteScriptModule.Transactional:
- True: All changes occur as a single atomic operation. If any error occurs during the job, the system rolls back all changes to maintain data consistency.
- False: No automatic rollback is applied. Merchants must handle transaction logic manually. This is often preferred for large batch jobs.
- ExecuteScriptModule.TimeoutInSeconds: Set the function timeout value.
Device FingerPrint
Device FingerPrinting collects information about the device used when paying for an order and can assist in fraud screening decisions.
- Go to .
- Enable theEnable DeviceFingerprint Serviceoption.
- In theOrganization IDfield, enter the Organization ID. Contact support if you do not know this value.
- In theThreatMetrix URLfield, enter the URL that points to the JavaScript that generates and retrieves the fingerprint of the device.
- In theTTL (Time to Live)field, enter how many milliseconds to wait before generating a new fingerprint for any given customer session.
Delivery Address Verification
To verify the customers shipping address during checkout, configure Delivery Address
Verification services.
- Go to .
- Enable theDelivery Address Verification Servicesoption.
Tax Calculation
To calculate local taxes once the customer enters their address at checkout,
configure the Tax Calculation services.
- Go to and set these options:
- Enable theEnable Tax Calculationfield.
- Configure these tax settings:
ADDITIONAL INFORMATION
- List of Nexus States: List the states to calculate tax for.
- List of Nexus States to Exclude: List the states to not calculate tax for.
- Merchants VAT Registration Number: Enter your VAT registration number if you have one.
- Default Product Tax Code: Enter the default tax code to use for products in the basket without a tax code.
- Purchase Order Acceptance City
- Purchase Order Acceptance State Code
- Purchase Order Acceptance Zip Code
- Purchase Order Acceptance Country Code
- Purchase Order Origin City
- Purchase Order Origin State Code
- Purchase Order Origin Zip Code
- Purchase Order Origin Country Code
- Ship From City
- Ship From State Code
- Ship From Zip Code
- Ship From Country Code
RESULT
IMPORTANT
If you enable Tax Calculation and do not specify any states in
List of Nexus States or List of Nexus States to Exclude, Tax Calculation assumes
every state or province is taxable. You can leave either the
List of
Nexus States
or the List of Nexus States to
Exclude
as empty, but both cannot be empty.Message Level Encryption
Message Level Encryption (MLE) uses certificates to ensure each message is securely
encrypted and tied to the sender's verified identity, without needing to share secret keys
in advance.
MLE provides stronger authentication, easier key management, and better protection
against fraud or tampering.
A shared secret uses the same key for both sending and receiving messages, meaning
both parties must securely exchange and protect that key in advance. While MLE can
be simpler, it offers less identity verification and can be more vulnerable if the
key is compromised.
IMPORTANT
Message Level Encryption requires that
a .p12 certificate to be created.
- Extract and convert the p12 certificate to the .pemformat using this command:openssl pkcs12 -in <key filename>.p12 -cacerts -nokeys -out <key filename>.crtIMPORTANTBe sure to note the serial number of theVisa Acceptance Solutions_SJC_US certificate.
- Import the certificate, by going to and importing the extracted.crt. Make a note of the alias.
- Enable Message Level Encryption, by going to .
- Enable theEnable Message-Level Encryptionoption.
- In theAlias of the Certificatefield, enter the Alias from when the certificate was imported.
- In theCertificate Serial Numberfield, enter the serial number from theVisa Acceptance Solutions_SJC_US certificate.
Order Management
Salesforce
B2C Commerce does not natively support order management functions. This cartridge has functions that can be utilized to process captures and authorization reversals.IMPORTANT
These functions must be customized before use in the
Salesforce
B2C Commerce user interface.Capture
The capture function can be found in the script
scripts/http/capture.js
. A
working example is available in the ServiceFrameworkTest-TestCaptureService
controller.Reference the capture.js object and make this request:
var captureObj = require("~/cartridge/scripts/http/capture.js");
var serviceResponse = captureObj.httpCapturePayment(requestID, merchantRefCode, paymentTotal, currency);
The resulting serviceResponse object contains the full response object generated by
the request. The contents of this object determine your logic in handling errors and
successes. These are the Capture request parameters:
Capture Request Parameters:
- requestID: TheVisa Acceptance SolutionsRequest ID from the initial authorization.
- merchantRefCode: TheSalesforceOrder Number.
- purchaseTotal: The capture amount.
- currency: Currency Code.
Function Signature:
httpCapturePayment(requestID, merchantRefCode, purchaseTotal, currency)
Authorization Reversal
The authorization reversal function can be found in the script called
scripts/http/authReversal.js
. A working example is in the
ServiceFrameworkTest-TestAuthReversal controller.Reference the AuthReversal.js object and make this request:
var reversalObj = require("~/cartridge/scripts/http/authReversal.js");
var serviceResponse = reversalObj.httpAuthReversal(requestID, merchantRefCode, paymentTotal, currency);
The resulting serviceResponse object contains the full response object generated by
the request. The contents of this object determine your logic in handling errors and
successes. These are the Authorization reversal request parameters:
Authorization Reversal Request Parameters:
- requestID: TheVisa Acceptance SolutionsRequest ID from the initial authorization.
- merchantRefCode: TheSalesforceOrder Number
- purchaseTotal: The reversal amount
- currency: Currency Code
Customization
The
Visa Acceptance Solutions
cartridge for Salesforce
B2C
Commerce has built-in custom hooks that can be utilized to customize the request data that
is sent to each service.These hooks can send additional custom data, such as, if you want to include Merchant
Defined Data in your authorization requests.
How Custom Hooks Work
After a request for a particular service is built, there is a check for any code
registering to the hook
app.payment.modifyrequest
. If present, the
hook is called for that specific request and the request object is passed into the
hook. The return value of the hook is sent to Visa Acceptance Solutions
as the
final request object. Through this process, you can inject your own data into the
request object from the custom code you write in a separate cartridge.Implementation
To customize request objects, register the hook
app.payment.modifyrequest
in your cartridge's hooks.json
file. An example would look like this, replacing the script path with your own
script:{ "name": "app.payment.modifyrequest", "script": "./cartridge/scripts/hooks/modifyRequestExample" }
You can copy the
scripts/hooks/modifyRequestExample
script from this cartridge
into your own to use as a template for extending and modifying service request
objects. Note that every hook must return a valid request object for the given
service. Refer to the Visa Acceptance Solutions
Developer Guide for information
about any field you want to customize or add.Support & Troubleshooting
Getting Support
If you require support with this extension, visit support.visaacceptance.com to
raise a support case.
Required Information for Support Cases
Provide this information for your support case:
- Summary of the issue.
- Steps to reproduce the issue.
- Visa Acceptance SolutionsB2C Commerce cartridge version.
- Visa Acceptance SolutionsMerchant ID.
- Configuration screenshots: Provide screenshots of custom preference configurations.
- Log file and other relevant data: Download the logs from .
Upgrade
To upgrade to a later version of our cartridge, follow these steps.
- Download the code from the ISV Integration Toolkits section on GitHub.
- Zippayments_metadatafolder.
- Go to and uploadpayments_metadata.zipfile.
- Import the uploaded zip file.
- Check release notes for any configuration parameters that might have changed.
RESULT
The cartridge is successfully upgraded to the latest version.
Shopify
Shopify
This section details the features, transaction types, and fraud solutions available
in
Shopify
.The Cybersource app on
Shopify
provides commerce tools to start,
grow, market, and manage retail businesses. You can accept payments in multiple
currencies and get paid in your local currency. The Cybersource app on Shopify
supports popular payment methods to meet your business needs. The Cybersource app on
Shopify
supports these features:- 3-D Secure
- Apple Pay
- Card payments
- Google Pay
- Fraud Management tools
- Shopify Subscriptions
Cybersource supports these transaction types on
Shopify
: - Authorization (authorize only)
- Sale (auth and capture)
- Capture (capture only)
- Payer Authentication(3-D Secure)
- Refund (credit)
- Void (reversal)
The Cybersource app on
Shopify
supports the following fraud
solutions:- Decision Manager(DM)
- Fraud Management Essentials(FME)
We recommend an accept/reject model only for fraud management.
Configuring Security Credentials
You must have a Cybersource
Business Center
account. If you do not have one,
you must create one before installing the Cybersource app on Shopify
. You also must retrieve details from that account to install
the plugin. Creating a Business Center Account
Business Center
AccountFollow these steps to create your
Business Center
account:- Go to the Business Center Registration website, and create an account.
- Follow the email instructions that you received to activate your merchant account.
- Log in to the Business Center to complete the registration process.
Installing the Cybersource App on Shopify
Shopify
You must enable the Cybersource app in your
Shopify
account
settings. You can install the Cybersource CAS app if you are using a sandbox
account, or the live app if you have completed the go live process.Installing the Cybersource CAS App
Follow these steps to install the Cybersource CAS app:
- Go to cybersource-cas
- Select the app and clickInstall.
- A page opens onShopify. Provide the required permissions to the payment app.
- After you set the permissions, theBusiness Centerlog in opens.
- Log in to theBusiness Centerwith your Cybersource credentials. This must be your transacting merchant ID. An agreement page opens.
- Check or clear the3-D Secure enrollmentbox based on your business needs. If you choose to enroll for 3-D Secure, ensure that thePayer Authenticationfeature is enabled and configured.
- Submit the form. TheShopifystore settings page re-opens so that you can configure and activate the Cybersource app.
- You must repeat these steps if you have more than oneShopifystore.
Installing the Cybersource Live App
Follow these steps to install the Cybersource live app:
- Select the app and clickInstall.
- A page opens onShopify. Provide the required permissions to the payment app.
- After you set the permissions, theBusiness Centerlog in opens.
- Log in to theBusiness Centerwith your Cybersource credentials. This must be your transacting merchant ID. An agreement page opens.
- Check or clear the3-D Secure enrollmentbox based on your business needs. If you choose to enroll for 3-D Secure, ensure that thePayer Authenticationfeature is enabled and configured.
- Submit the form. TheShopifystore settings page re-opens so that you can configure and activate the Cybersource app.
- You must repeat these steps if you have more than oneShopifystore.
Configuring Shopify
Shopify
This section details how to configure
Shopify
and set up 3-D Secure
.Configure the
Shopify
payment settings. Follow these steps to configure the Cybersource App in your
Shopify
store: - Log in to yourShopifyaccount.
- Go to yourShopifystore, and go toSettings > Payments > Manage.
- Select the card brands and payment methods that you want to accept.
- ClickSave.
ADDITIONAL INFORMATION
IMPORTANTIf you are using the test server, ensure that theTest Modetoggle is set toOn.
Using 3-D Secure
3-D Secure
If you are going to use
3-D Secure
, you must have Payer Authentication
enabled and have your Cardinal keys stored within the
Business Center
. To enable Payer Authentication
, contact
Visa Acceptance Solutions
support or your account manager. Request that
the Payer Authentication
enablement include support for the direct
integration method. After
Payer Authentication
is enabled, follow these steps to verify your
Payer Authentication
credentials:- Log in to yourBusiness Centeraccount.
- Go toPayment Configuration > Payer Authentication Configuration.
- View the Org Unit ID, API Identifier, and API Key to verify your credentials.
Because you verified the
Payer Authentication
credentials and enabled the
3-D Secure
feature when you installed the Cybersource app, the
transactions will support 3-D Secure
flows.Reference Information
This section contains reference information to help you use the
Visa Acceptance Solutions
app on Shopify
. Testing
You can test your integration before you start accepting payments. To test the
application before moving to the production environment, you must use the dedicated
the test app from
Visa Acceptance Solutions
. Go to cybersource-cas
to install the test app.Follow these steps to verify that the app is enabled and configured properly:
- Go to yourShopifyweb store.
- Add an item to the cart and proceed to checkout.
- Enter the shipping information.
- Enter the test card information.
- ClickPay Now.
- Log in to yourBusiness Centeraccount.
- Review the test transaction.
- If there is a problem with the transaction or it does not appear in theBusiness Center, contactVisa Acceptance Solutionssupport.
Troubleshooting and Support
If you require support, visit support.visaaceptance.com. If your account is provided by a reseller,
contact
Visa Acceptance Solutions
Include this information when you contact
Visa Acceptance Solutions
: - Visa Acceptance Solutionsmerchant ID
- Shopifystore name
- Shopifypayment ID
- Shopifyreason string and code
- Date and time
- Production environment
- Steps to recreate the error
WooCommerce
WooCommerce
The
Visa Acceptance Solutions
extension for WooCommerce
enables
merchants to connect their WooCommerce
store to the Visa Acceptance Solutions
platform to directly take credit/debit card, Google Pay, and
Click to Pay payments.Supported Features
- Credit/debit cards
- Apple Pay
- Google Pay
- Click to Pay
- Paze
- Payer Authentication/3-D Secure
- Tokenization
- Decision ManagerandFraud Management Essentials
- WooCommerceSubscriptions
- WooCommerceCheckout Blocks
Supported Versions
The
WooCommerce
extension requires these versions:- WooCommerce10.3.7+
- WordPress 6.9+
- PHP 8.2+
Visa Acceptance Solutions Prerequisites
Visa Acceptance Solutions
PrerequisitesThis section outlines the required and optional prerequisites for using the
Visa Acceptance Solutions
extension with WooCommerce
.Required Products
The Unified Checkout product must be enabled and configured for your merchant ID. See
the
Unified Checkout Developer Guide
. You must also have a REST Shared Secret Key. See the
Getting Started with the REST API
guide.
Optional Products
These products are optional, but need to be enabled and configured for your merchant
ID if you choose to use them:
- Payer Authentication for 3-D Secure
- Tokenization
- Apple Pay
- Google Pay
- Click to Pay
- Paze
- Decision Manager
- Fraud Management Essentials
You can also choose to enable Message-Level Encryption (MLE) for additional security.
A REST certificate is required for MLE. See the
Getting Started with the REST API
guide. Release Notes
Version 2.2.0: February 2026
This version provides these enhancements:
- Updated Unified Checkout to v0.33
- Added support for China UnionPay, Maestro, Jaywan, and Paze
- Added Payer Authentication/3-D Securefor Google Pay
- Added Express Pay for Product and Checkout pages
- ReplacedVisa Acceptance Solutionsendpoints with Visa Acceptance Solutions endpoints
- Added compatibility for Wordpress v6.9
The following bugs were addressed:
- IP address is now collected for all requests.
- CVV input field text was updated.
- Saved card tokens are now only accessible when tokenization is enabled.
- Administrative state field is now properly passed for non-US addresses in3-D Securetransactions.
Version 2.0.1: October 2025
This version provides these bug fixes:
- Removed the Customer ID for a guest user because it exceeded limits within the platform for some processors.
- Removed Commerce Indicator from the Payment Acceptance Request.
Version 2.0.0: August 2025
This version provides these enhancements:
- Unified Checkout Version 0.23
- Apple Pay
- Adoption of Visa Acceptance REST Client SDK
- Message-Level Encryption
- WooCommercesubscriptions and HPOS compatibility
This version is compatible with:
- WooCommerce7.6+
- WordPress 6.5.3+
- PHP 8.0+
Version 1.0.0: June 2025
This initial release supports these products:
- Unified Checkout
- Google Pay
- Click to Pay
- Token Management Service (TMS)
- Payer Authentication
- Decision ManagerandFraud Management Essentials
This version is compatible with:
- WooCommerce7.6+
- WordPress 6.5.3+
- PHP 7.4+
Install the Extension
Follow these steps to install the extension:
- Download our extension fromWordPress orWooCommerce.
- Log into yourWooCommerceadmin account.
- Go toExtensions > Add New > Upload.
- ClickInstall Now.
- After the extension is installed, clickActivate.
- ClickConfigureto start configuring the extension.
Alternatively, you can use the
Add to store
functionality in the WooCommerce
order confirmation page or the My Subscriptions section in your WooCommerce
account. Configure the Extension
Follow these steps to configure the extension:
- SelectExtensions > Installed Extensions, then selectVisa Acceptance SolutionsorPayments.
- ClickManageon the Visa Acceptance Solutions line.
Minimum Configuration Requirements
These extension settings must be configured to accept payments with
Visa Acceptance Solutions
:- Enable/Disable
- Set toenableto allow the extension to take payments from yourWooCommercestore. When the extension is enabled, card payments are enabled by default.
- Title
- Enter thetitletext that you want to display for your customers on the checkout and order received page.
- Description
- Enter thedescriptiontext that you want to display during the checkout process.
- Transaction Type
- Charge:When this option is selected, the transaction is automatically captured if the authorization is approved.
- Authorization: When this option is selected, the system only sends an authorization request and if approved. If the authorization is approved, you need to manually request a capture.
- Charge Virtual-Only Orders
- When this setting is selected, if the order is exclusively for digital or virtual items, this the transaction is automatically captured if the authorization is approved.
- Capture Paid Order
- When this setting is selected, if you mark an order asProcessingorCompleted, capture requests are automatically sent.
- Environment
- Set toTestfor testing to your test account.
- Set toProductionfor live transactions.
- Merchant ID/Test Merchant ID
- Enter the transacting merchant ID (MID) assigned to you when you set-up your account.
- API Key Detail/Test API Key Detail
- Enter the key from your REST API shared secret key.
- API Shared Secret Key/Test API Shared Secret Key
- Enter the shared secret from your REST API shared secret key.
- Accepted Card Types
- Select the card brands you want to accept.
Message Level Encryption
Message-Level Encryption (MLE) enables you to store information or communicate with
other parties while helping to prevent uninvolved parties from understanding the
stored information. MLE is optional and supported only for payments services. A REST
certificate is required for MLE.
Follow these steps to enable MLE,:
- CheckMessage Level Encryption.
- Enter theKey Directory Pathwhere you have stored the certificate in yourWooCommerce/WordPress environment.
- Enter theKey File Name.
- Enter theKey Passwordwhich you set when generating the REST certificate.
Digital Payment Methods
Digital Payment Methods
: Choose from Apple Pay, Google Pay,
Click to Pay, and Paze.IMPORTANT
You must enable these for your MID in the
Business Center
. See the
Unified Checkout Developer
Guide
for more information. Tokenization
Tokenization allows you to offer the ability for your customers to save their payment
cards securely for future payments.
- SelectTokenizationto enable this feature.
- SelectSaved Card Verificationto request customers to enter their card security code when paying with a saved card.
Payer Authentication/3-D Secure
- SelectPayer Authentication/3-D Secureto enable added payment security. Some countries/regions mandate this feature.
- SelectStrong Consumer Authenticationto force a 3-D Secure Challenge when a customer chooses to save their card for future transactions.
Fraud Screening
- SelectFraud Screeningto enableDecision ManagerorFraud Management Essentials.
- Configure your fraud screening profiles using theBusiness Center.
Debug Mode
- Select one of these debugging mode options:
- On:enables the creation of detailed logs for every transaction. This setting is recommended only for use in the test environment or when troubleshooting issues in the production (live) environment.
- Off:enables the creation of basic logs for transactions.
Order Management
Orders are marked differently, depending on the selected transaction type:
- Authorization:if this option is selected, successful transactions are marked asOn Hold.
- Charge: if this option is selected, successful transactions are marked asProcessing.
Fraud Screening
If fraud screening is enabled, transactions are marked as follows:
- Approved orders are marked asOn HoldorProcessing, depending on your transaction type setting.
- Orders to review are marked asOn Hold.
- Rejected orders are marked asFailedorCancelled.
Orders marked as
On Hold
need to be reviewed in the Business Center
.
The extension checks for transaction status updates every 15 minutes. Rejected
transactions are marked as Cancelled
.Accepted transactions are marked according to your transaction type settings.
If you need to manually trigger the transaction update, follow these steps using the
WooCommerce
Dashboard:- Select .
- Find and selectwc_payment_gateway_update_order.
- ClickApply.
Capture an Order
There are two ways to capture an order if you have the transaction type set to
Authorization
. Enter the order from the list of orders and choose one of
these actions:- Click theCapture Chargebutton.
- Change the order status toProcessing, then clickApply.
Refund an Order
To refund an order, enter the order from the list of orders and complete these
steps:
- Click theRefundbutton.
- Enter the refund amount.
- ClickRefund via.Visa Acceptance Solutions
Void an Order
Voids can only be performed for transactions when the transaction type is set to
Authorization
and the transaction has not yet been captured.To void an authorization, complete these steps:
- Click theRefundbutton.
- Enter the refund amount.
- ClickRefund via.Visa Acceptance Solutions
Upgrade the Extension
Follow these steps to upgrade to a later version of the
WooCommerce
extension.- Select .
- Locate the Visa Acceptance Solutions extension and clickUpdate Now.
Support and Troubleshooting
If you need support installing or using this extension, contact the Support Center to raise a case, and provide this information:
- Summary of the issue
- Steps needed to reproduce the issue
- Platform version
- Extension version
- Platform merchant ID
- Configuration screenshots
- List of themes and additional extensions installed
- Log file and any other data or screenshots related to the issue
Built by Our Partners
Explore solutions built by our industry-leading partners that offer real-time fraud
screening, account takeover protection, and comprehensive payment solutions. Our
partners provide potential use cases such as personalizing shopping experiences through
advanced analytic. Offer your customers a seamless omnichannel experience and improve
site performance for higher customer satisfaction. Benefit from the centralized
management of product information, automated order processing and fulfillment, and
real-time data synchronization between SAP Commerce Cloud and existing ERP systems.
Moreover, our partners' solutions offer scalable infrastructure, flexible integration
capabilities, advanced reporting tools, and enhanced visibility into supply chain and
inventory management.
This is built by our partner:
Visa Acceptance Solutions Payments for Adobe Commerce User Guide
Recent Revisions to This Document
25.01
Initial release.
About this Guide
This section describes how to use this guide and where to find further information.
- Audience and Purpose
- This document outlines the configuration details for the Visa Acceptance Solutions payment extension in the Adobe Commerce platform. The configuration steps are related to payment acceptance, payment security, fraud management, and order management services forUnified Checkout, including Payment Card, Google Pay, andClick to Pay. This guide also applies to Magento Open Source. Adobe Commerce will be referenced throughout for simplicity.
- Conventions
- These statements appear in this document:IMPORTANTAnImportantstatement contains information essential to successfully completing a task or learning a concept.
- Customer Support
- For support information about any service, visit the Support Center:
Installing the Visa Acceptance Solutions Extension
- Go toMy Profile > My Products > Access Keysand copy the keys.
 { "http-basic": { "repo.magento.com": { "username": "Your_Public_Key", "password": "Your_Private_Key" } } }
 - Rename theauth.json.samplefile toauth.jsonin your server's Magento root directory and enter your access keys.
- In your Magento root directory, run the commands listed below:composer require visaacceptance/module-payment php bin/magento module:enable VisaAcceptance_Payment php bin/magento setup:di:compile php bin/magento indexer:reindex php bin/magento setup:upgrade php bin/magento setup:static-content:deploy -f php bin/magento cache:clean php bin/magento cache:flush php bin/magento module:status
Prerequisites
Before using the extension, ensure that you have done these prerequisites:
- A Visa Acceptance Solutions account withUnified Checkoutenabled.
- Payer Authentication direct connection if3-D Secureis required.
- A Token Management Service if you allow customers to save their payment cards on your website.
Contact support or your reseller if any of these prerequisites
are not completed.
If you do not yet have a Visa Acceptance Solutions account, you can create one
here. Demo accounts are created with
United States dollars as the default currency.
Refer to this article on how to create REST API keys in
the
Business Center
.General Settings
This section provides General Settings Configuration details for the Visa
Acceptance Solutions extension in Adobe Commerce.
Serial Number | Settings | Description |
|---|---|---|
1 | Environment | Configure the sandbox or production environment by providing
the Merchant ID, API key detail, and API shared secret key. If
sandbox is chosen, the website is available for testing new
changes and experiments. |
2 | Merchant ID | Your Visa Acceptance Solutions Merchant ID |
3 | API Key | Refers to a specific key provided by a payment gateway to
authenticate and authorize the merchant's integration with the
gateway. |
4 | API Shared Secret | Refers to a confidential or private key used for secure
communication between the merchant's online store and a payment
gateway. |
5 | Debug Mode | Enabling debug mode provides an option to troubleshoot using
the Visa Acceptance Solutions logs, named visaacceptance.log.
The diagnostic information will be stored in log files in the
Adobe Commerce web server. |

Configuration Details
To configure the Visa Acceptance Solutions extension, a merchant needs to log in
to the administration section of their Adobe Commerce website.
The
configuration panel can be accessed by navigating to the Payment Methods
screen:
Stores > Configuration > Sales > Payment
Methods
.On this screen, you can see the settings to configure
the Visa Acceptance Solutions extension.

Secure Payment Methods
This section provides the configuration details of the services supported by Visa Acceptance Solutions extension in Adobe Commerce for
Unified Checkout
. Sl. No. | Settings | Description |
|---|---|---|
1 | Enable | Choose Yes to enable the Visa Acceptance
Solutions extension. |
2 | Title | Customers see the text saved here as the payment method
name. |
3 | Payment Action | Choose either Authorize or
Capture to decide the payment action during
customer checkout. |
4 | Payment Card Types | Choose accepted payment card brands. |
5 | Allowed Payment Method | Choose payment methods through which customer can complete their
order. |
6 | Select Layout | Choose Embedded or Side bar as
the layout to display the Unified Checkout payment
widget. |
7 | Payment from Applicable Countries | By choosing All Allowed Countries , the payment
method will use the Adobe Commerce global settings for the
customer’s country. By choosing Specific Countries ,
the merchant can manually choose the allowed countries for the
customer. |
8 | Payment from Specific Countries | Choosing countries in this setting allows the store owner to
specify which countries are allowed for our payment method. |
9 | Payer Authentication/ 3-D Secure | Enabling this option adds an additional layer of security to
payments by authenticating the customer’s identity before
authorization. |
10 | Tokenization | Enabling this option allows customers to save their payment cards
for future payments. |
11 | Tokenization Title | This text specifies the title of the saved card payment
method. |
12 | Saved Card Verification | This option allows the merchant to configure whether saved card
transactions are processed with CVV. |
13 | Enforce Strong Customer Authentication | If enabled, the card holder will be 3-D Secure
challenged when saving a card. |

Tokenization
This setting determines if registered customers can save cards securely to their
account.
IMPORTANT
To use this feature choose
Yes
in the tokenization setting in the admin configuration panel. If you want the
customer to enter CVV while using the saved card, choose Yes
for Saved
Card Verification as well.
Payer Authentication
Visa Acceptance Solutions supports
3-D Secure
2.x services. To
process with 3-D Secure
, choose Yes
in the Payer
Authentication/3-D Secure
setting in the admin configuration
panel.
Strong Customer Authentication
Payer Authentication (
3-D Secure
) is used for Strong Consumer
Authentication (SCA) in e-commerce payments. Some card issuers require cardholders
to authenticate with a 3-D Secure
challenge when saving their card with
a merchant. If you operate in a region where this is common, you can enable this
setting to require a challenge each time a customer saves a card. To enforce SCA,
choose Yes
in the Enforce Strong Customer
Authentication
setting in the admin configuration panel. If
SCA is not enforced and an issuer requires it, this extension replays the
transaction and requests the challenge.

Managing Orders
Merchants can manage follow-up order management services in Adobe Commerce Back
Office after placing an order from the Adobe Commerce Front Office.
The merchant side services in Adobe Commerce Back Office are:
- Full authorization reversal
- Authorization captureor multiple partial captures
- Standard refund and partial refund
Full Authorization Reversal
Merchants can perform a full authorization reversal after an authorization. To
cancel a completed order authorization, the merchant can click
Cancel
.
Capture an Authorization
While in authorize mode, the system will create an
order record, but not an invoice. Capturing funds for authorized transactions is
done implicitly when you prepare an invoice.
To create an invoice, navigate
to the below path in the administration section of Adobe Commerce:
Navigate
to
Sales > Orders >
choose an Order Pending
invoice > then click
Invoice
.
The merchant can perform a full capture or multiple partial captures using the invoice button.
When creating an invoice, the merchant can do multiple partial captures by choosing
specific quantities. Alternatively, the merchant can do complete capture by choosing
the entire order.

To complete invoice creation and capture funds, click
Submit Invoice
.

Refund a Captured Order
You must create a credit memo to refund a captured order.
To refund an order, navigate to the administration section of your Adobe Commerce
website:
Sales > Orders >
open an invoiced order >
click Invoices
from the left panel >
and click
View
.
Click
View
on an invoice to open
it. You can create a credit memo within the invoice record.
When creating a credit memo, you can refund all or part of an invoice. To issue a
partial refund, alter the numbers in the
Qty to Refund
column. Click the
Update Qty’s
button.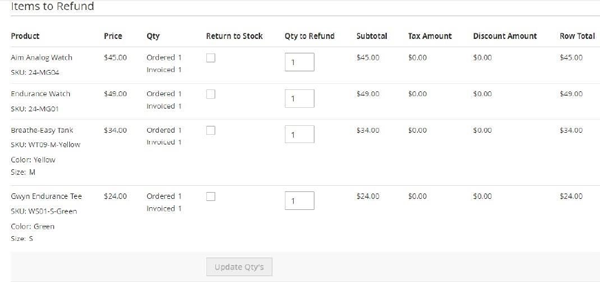
To complete the credit memo, click
Refund
.

Payment Methods and Services
This extension supports the following payment methods and services.
These
services can be enabled or disabled using the admin panel configuration:
- Payment Card
- Payment acceptance services
- Payment security services
- Fraud management services
- Order management services
- Google Pay
- Payment acceptance services
- Fraud management services
- Order management services
- Click to Pay
- Payment acceptance services
- Order management services
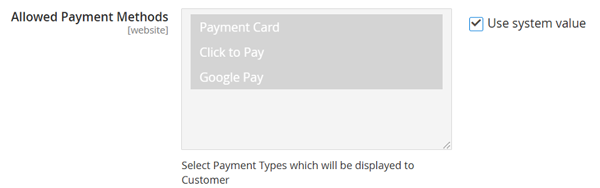
Appendix
Saving Card at Checkout
Customers can
choose
Save for later use
for payment cards only. Once the order is placed,
card information is securely stored in Visa Acceptance Platform
.
Payment With a Saved Card
Customers can
make payments using previously saved cards under
Stored Cards
by choosing a
card to proceed with.
Deleting a Card
Customers can view their
stored cards under
My Account
in Adobe Commerce by navigating to Stored
Payment Methods
. The customer has the option to delete their previously
saved cards by clicking Delete
.
Unsupported Adobe Commerce Features
The following features are not supported by this module:
- Multi-shipping
- Multiple node implementation
- Google reCAPTCHA
BigCommerce
BigCommerce
BigCommerce
provides a software-as-a-service (SaaS) payment
platform where you can manage your online business. BigCommerce
provides customizable functionality ready for you to build and integrate with
Visa Acceptance Solutions
. This section describes the payment methods and
services that the platform provides. These payment features and methods are
supported: - Card Payments
- Apple Pay
- Google Pay
- 3-D Secure
- Token Management Service
- Decision ManagerandFraud Management Essentials
- OAuth for connecting yourBigCommerceaccount withVisa Acceptance Solutions
Release Information
This section provides information about the releases for
BigCommerce
.Version 2 includes the following features:
- Global availability in more than 190 countries
- Transaction currency support in all available countries
- Support for the these card brands:
- American Express
- Diners Club
- Discover
- JCB
- Maestro
- Mastercard
- Visa
For more information, see New Features Available in
Visa Acceptance Solutions
.Requirements and Prerequisites
Before installing and configuring the
Visa Acceptance Solutions
Extension ensure
that you meet these requirements:- Have aBigCommercemerchant account.
- Have Optimize One Page Checkout. For more information, see Optimize One Page Checkout.
- Have aBusiness Centeraccount. To create an account, go to the website.
- Can accept payments in one of the supported currencies.
- Have cardinal credentials saved within yourBusiness Centeraccount for3-D Securetransactions.
Supported Features
This section describes payment, services, and features provided by
BigCommerce
through Visa Acceptance Solutions
.These are the supported payment methods:
- Credit and debit card payments
- Card types:
- American Express
- Diners Club
- Discover
- JCB
- Maestro
- Mastercard
- Visa
These are the supported services:
- Authorization only
- Authorization and capture
- Captures
- Partial Refunds
- Refunds
These are the supported features:
- Token Management Service (TMS): Removes your customer's stored card information from your environment and exchanges sensitive payment data for tokens that cannot be reversed. Contact to request that TMS be enabled to use the Stored credit cards feature on yourVisa Acceptance Solutionsmerchant account.
- OAuth is an industry-standard authorization protocol that enables you to use yourBusiness Centeraccount credentials to connect toBigCommercefor transaction processing. For more information about OAuth, see the .
Configuring BigCommerce
BigCommerce
This section describes how to set up your
BigCommerce
account to
Visa Acceptance Solutions
. Before you begin, make sure that you have a
Business Center
account. Create an Evaluation Account
If you do not have an
Business Center
account, go to the website Registration website to create one. To complete the registration process, follow the email instructions that you received to
activate your merchant account, and log in to the
Business Center
.Enabling the Extension
Follow these steps to enable the
Visa Acceptance Solutions
extension.- Login to the Big Commerce website and navigate toStore Setup > Payments.
- From the list of Online Payment Methods, choose.Visa Acceptance Solutions
- From theSettings tab, clickVisa Acceptance SolutionsSign upto create an account.

Connecting to Visa Acceptance Solutions
Visa Acceptance Solutions
Follow these steps to connect
BigCommerce
on the Visa Acceptance Solutions
Settings page. - FromVisa Acceptance SolutionsSettings page, choose the environment you want to connect to yourBigCommerceaccount, and chooseConnect with. You are redirected to theVisa Acceptance Solutionslogin page.

- Enter your credentials and clickAllowto giveBigCommercepermission to connect to your account. If you used OAuth to log in, your account automatically connects toVisa Acceptance Solutionswith the appropriate permissions.
Configuration Settings
This section describes the configuration settings for the
Visa Acceptance Solutions
Extension.In the
Visa Acceptance Solutions
Settings page, configure your preferences based on
the services you use. Display Name
: Manages how the payment gateway appears at
checkout. Visa Acceptance Solutions
recommends something like
Credit/Debit
.
Merchant ID
: Enter the merchant ID (such as 87654321
)
that you received when you signed up with Visa Acceptance Solutions
.

Transaction
Type
: Choose Authorize and Capture
or
Authorize Only
. Authorize Only
enables you to capture the funds manually. See Manually Capturing Transactions (Authorize
Only) to learn more.

Test Mode
: Determines whether your store is in Test Mode.
When you are ready to take payments, set to No
(Recommended)
.

Require CVV
(credit card security codes): Using this option
requires users to enter the CVV/CVV2/CVD code for their credit card during checkout.
Enabling this option adds extra security on credit card transactions.

Enable
: This option enables an additional security layer that helps to
prevent unauthorized transactions. For more information, see 3-D Secure
3-D Secure
.
Enable Google Pay
: This option enables shoppers to use Google
Pay on your storefront. For more information, see Connecting with Google Pay .
Set up Apple Pay
: This option enables shoppers to use Apple
Pay on your storefront. To configure this feature, see Connecting with Apple Pay for more
information. Show the Card Element
: This option displays or hides the
credit card field at checkout. For more information on this feature, see Show Card Element .

Save
. Upgrade
If you already have an account, you can upgrade to V2 from the
Visa Acceptance Solutions
Settings page. For more details, see Upgrading from Visa Acceptance Solutions
to
Visa Acceptance Solutions
V2.