VISA Platform Connect: Specifications and Conditions for
Resellers/Partners
The following are specifications and conditions that apply to a Reseller/Partner enabling
its merchants through
Visa Acceptance platform
. Failure to meet any of the specifications and conditions
below is subject to the liability provisions and indemnification obligations under
Reseller/Partner’s contract with Visa/Cybersource.
Before boarding merchants for payment processing on a VPC acquirer’s connection,
Reseller/Partner and the VPC acquirer must have a contract or other legal agreement
that permits Reseller/Partner to enable its merchants to process payments with the
acquirer through the dedicated VPC connection and/or traditional connection with
such VPC acquirer.
Reseller/Partner is responsible for boarding and enabling its merchants in
accordance with the terms of the contract or other legal agreement with the relevant
VPC acquirer.
Reseller/Partner acknowledges and agrees that all considerations and fees associated
with chargebacks, interchange downgrades, settlement issues, funding delays, and
other processing related activities are strictly between Reseller and the relevant
VPC acquirer.
Reseller/Partner acknowledges and agrees that the relevant VPC acquirer is
responsible for payment processing issues, including but not limited to, transaction
declines by network/issuer, decline rates, and interchange qualification, as may be
agreed to or outlined in the contract or other legal agreement between
Reseller/Partner and such VPC acquirer.
DISCLAIMER: NEITHER VISA NOR CYBERSOURCE WILL BE RESPONSIBLE OR LIABLE FOR ANY ERRORS OR
OMISSIONS BY THE VISA PLATFORM CONNECT ACQUIRER IN PROCESSING TRANSACTIONS. NEITHER VISA
NOR CYBERSOURCE WILL BE RESPONSIBLE OR LIABLE FOR RESELLER/PARTNER BOARDING MERCHANTS OR
ENABLING MERCHANT PROCESSING IN VIOLATION OF THE TERMS AND CONDITIONS IMPOSED BY THE
RELEVANT VISA PLATFORM CONNECT ACQUIRER.
Introduction to the Boarding Registration Service
Boarding Registration streamlines and automates the boarding of merchant accounts using the
Visa Acceptance Solutions
Business Center
. You can create a simple or complex hierarchy of accounts that
represents merchant business units, and configure payment products for those accounts.
To understand accounts, organizations, their hierarchy, and status, see these
topics:
Before boarding organizations, you must complete these requirements:
You must have a portfolio account on our platform. Contact your representative to have a
portfolio account set up for you.
Set up users, roles, and permissions. You must have at least one administrator
account.
Understanding Accounts and Organizations
You are assigned a
portfolio
account when you sign up. All merchant accounts are
subordinate to the portfolio account. A merchant account consists of a
merchant
organization and its subordinate organizations, which always includes at least one
transacting
organization. You can use
structural
organizations to extend the
hierarchy of merchant accounts.
The
portfolio
account is always the top node in the hierarchy.
A
merchant
organization represents a business entity. For example, a brand or
company. There can only be one merchant in any branch of the hierarchy.
A
transacting
organization represents an entity that processes payment
transactions. For example, a physical store or a payment form on a web page or app. No other
organization can be directly subordinate to a transacting organization.
A
structural
organization represents a conceptual entity that enables you to build
an expansive hierarchy between merchant and transacting nodes. For more information on using
structural organizations to extend the hierarchy, see Extend the Hierarchy.
The image below shows a simple merchant
account. The merchant organization is directly beneath the portfolio organization, and
contains one transacting organization.
Figure:
Simple Merchant Account
Understanding Organization IDs
Organizations relate to each other using IDs. Every organization is assigned an organization
ID. When an organization has a subordinate, it is assigned a child ID that identifies the
subordinate. The subordinate is assigned a parent ID that identifies the parent organization.
Organization IDs must be unique, not just within the portfolio or account, but across the
system.
In the illustration below, merchant's ID is
Merchant Account 1
. The merchant's
child IDs are
Transacting MID1
and
Transacting MID2
.
The merchant's parent ID is
Portfolio
.
Figure:
Understanding Organization IDs
Configure a Single Merchant
Figure:
Merchant Boarding with a Single MID
Follow these steps to configure a merchant hierarchy with a single merchant:
Contact your representative to have a portfolio account set up for you.
A product template enables and configures a product and is applied to more transacting
organizations. Product templates are created in the
Business Center
by an
administrator user. Before you board a transacting organization, you must create a
product template for each product that you will assign to it. Not every product support
templates.
You will apply product templates to a transacting organization when you create it. You
can also create multiple templates for a product, configured differently, and decide
which one to apply to a transacting organization, depending on the organization's needs.
Templates can be modified at any time; however, organizations that already have the
template applied do not inherit the modifications. Modifying a template only affects new
organizations that you apply to it.
Partners can use various boarding templates to customize merchant onboarding and meet the
business needs of each merchant.
A boarding template is a collection of predefined attributes and rules that an acquirer
(bank), technical partner, or merchant uses to board merchants onto their platform.
Boarding templates help automate the entire boarding process by packaging all of the
required information needed to board merchants. You can use templates to reduce the
manual steps and time it takes for merchant accounts to start processing payments.
Templates also allow an acquirer or partner to make configuration changes to individual
and multiple merchants in the portfolio.
You can use a boarding template to initialize or make changes to any of the
following:
Accounts
Transacting nodes
Structural nodes
Template Components
The boarding template combines these essential components:
Products and Product Bundles
Partners can offer a list of products and
product bundles to merchants. All products and bundles are available in a
partner's catalog.
Billing Template
A combination of BUY and SELL rates that is associated with a product (or
product bundle). A billing template is required for products sold by OBO
partners. Non-OBO partners can choose to set a value on billing templates for
tracking purposes.
Product Configuration Templates
A collection of pre-configured product settings that partners can use for
boarding activities. When applied along with a merchant-specific configuration,
the product is fully enabled for the merchant.
Boarding Workflow
A boarding workflow is a sequence of steps controlled by partner-specific business rules to
board merchants.
Additional Metadata
These include mandatory, optional, and self-provisioned products, token IDs, and other
attributes.
IMPORTANT
You can see templates only for enabled products on your
account.
Products
You can use boarding templates to configure these products in merchant accounts.
Account Updater
Card Processing
Echeck/ACH
Fraud Management Essentials
Gift Cards
Payer Authentication
Secure Acceptance
Token Management Service
Virtual Terminal
Using Templates
This section describes the template tasks you can perform.
Retrieving Templates
You can retrieve merchant boarding templates for a specified product. The default
template is the first template listed when you retrieve a template.
Next to the template you want to modify, click the
Make Default (...)
icon.
Product Boarding Template Reference
Use this information as a guide to configure the boarding templates. We update this
reference as existing templates are updated and new templates are added.
Account Updater Templates
Select configuration options for these fields:
Account Updater Template Configuration Options
Field
Option 1
Option 2
Option 3
Option 4
Option 5
Option 6
Visa/Mastercard Mode
Pan Upload
Token API
Monthly Harvest
AMEX Mode
Token API
Monthly Harvest
Request Updates from AMEX
Yes
No
AMEX SE Number
INPUT SE #
AMEX Subscriber ID
INPUT ID #
Request Updates from Mastercard
Yes
No
Mastercard ICA Number
10426
10427
1835
1836
4845
8773
Mastercard Merchant ID
INPUT MID #
Request Updates from Visa
Yes
No
VISA Segment ID
0040
0043
0044
0048
0057
0088
VISA Merchant ID
INPUT Visa MID #
Card Processing Templates
Create a card-processing template for each payment processor you use. Each card-processing template is specific to a single payment
processor. Apply the appropriate template when you are boarding new merchants.
Configuring a Card Processing Template
Follow these steps to configure a template for card processing:
Enter a unique name for the new card-processing template, and then click
Next
.
Select the type of card processing: Card Present, Card Not Present, or
Both.
Click the
Processor
field, and then choose the payment processor
name.
If an Acceptance Type field appears, click the field, and then choose the
acceptance type.
In the processor tab (labeled with the name of the processor you selected),
configure the required and optional fields available for the selected payment
processor.
In the Common Settings tab, you can configure fields that are common for the
merchant but that could potentially be used across multiple payment processors.
Processor-Specific Fields
These processor-specific fields are frequently
configured in a card-processing template.
Accepted Currencies
Select all of the currencies that the merchant accepts. The currencies listed in
this field depend on the payment processor selected.
As an example, if you are creating a card-processing template for the
TSYS/Vital processor, the list of accepted currencies is as follows:
CAD (Canadian Dollar)
USD (US Dollar)
Accepted Payment Types
Select all of the card types that the merchant accepts. The card types listed
in this field depend on the payment processor selected.
Depending on your payment processor, these are some of the card types you
can expect to see listed:
Visa
Mastercard
American Express
Diners Club
For more information about the specific card types that your processor
supports, log in to the
Business Center
and go to
Template
Management for Card Processing
.
Batch Group
The Batch Group groups all of the capture (bill and credit) requests into a batch bound for your payment processor.
Choose the batch group for processing capture requests.
The name of a batch group identifies the time of day that capture requests
are grouped into a batch and sent to your payment processor. The last two
digits of the batch group name identify the hour (in 24-hour time) of the
processor cutoff time for that batch group.
As an example, if you are creating a card processing template for the
American Express Direct processor, the list of batch group names you can
select includes the following:
amexdirect_2 (processor cutoff time is 2:00 a.m. PST daily)
amexdirect_17 (processor cutoff time is 5:00 p.m. PST daily)
amexdirect_21 (processor cutoff time is 9:00 p.m. PST daily)
IMPORTANT
Processor cutoff times identified in the batch group
names are in Pacific Standard Time (PST).
Merchant ID
Enter the merchant's acquirer processing ID assigned by the acquiring bank.
Note that it is unlikely that you would specify this field in a card-processing
template. Typically, the merchant ID is merchant specific. Also, many merchants
have more than one merchant ID to support processing in multiple currencies or
to process both card present (in store) transactions and card-not-present
(e-commerce) transactions.
Terminal ID
Enter the terminal ID assigned by the acquirer or the processor. This value
should not be overridden by any other party.
Enter the merchant's processing terminal ID assigned by the acquiring bank or
payment processor.
Note that it is unlikely that you would specify this field in a card-processing
template. Typically, the terminal ID is merchant specific. Also, many merchants
have more than one terminal ID to support processing in multiple currencies or
to process both card-present (in store) transactions and card-not-present
(e-commerce) transactions.
Customer Invoicing
Customer Invoicing allows merchants to create and manage invoices, send customers links to invoices, securely collect payments for
invoices.
Prerequisites
Unified Checkout Integration
must be enabled for the merchant. Before
Unified Checkout Integration
can be enabled for a merchant, it must be enabled at the
portfolio level.
To enable
Unified Checkout Integration
at the portfolio level, talk to your sales
representative.
Customer Invoicing must be enabled at the portfolio level before in can be added to merchant
accounts. To enable at Customer Invoicing at the portfolio level, contact your sales
representative.
Enabling Customer Invoicing on the Business Center
Before you can add Customer Invoicing, Unified Checkout must be added to the merchant account. To add Unified Checkout, see: Unified Checkout Integration.
Navigate to the Merchant Details Page within Portfolio Management.
Click the
Add products
button.
Select
Customer Invoicing
, and click the
Add
button.
Customer Invoicing should appear on the Merchant's product list.
ACH Templates
Select configuration options for these fields:
ACH Template Configuration Options
Field
Value or Option
echeck Processor
Bofa ACH
Batch Group
Select a batch group. Batch time is identified by the last two digits in military time.
Example:
<processor>_16
means the cut-off time is 4:00 p.m. PST. Convert the time to your local time as
needed.
Auto Set to Completed State
Select
Yes
to automatically update transactions to "Completed" status a number of days
after the transaction is processed.
Company ID
Merchant's ID assigned by the acquiring bank.
ACH Entry Description
Merchant-defined description. Example: Payroll, Gas Bill, Insurance Premium.
Fraud Management Essentials
Templates
On the General Settings page, select options for each of the following:
Fraud Management Essentials
Template General Settings Options
Section Name
Field Name
Available Options / Details
Payment Processing
Settlement
Disable Settlement
Enable Settlement
Enable with settlement selected by default
Decision Reject
Authorization Reversal
Disable authorization reversal option
Enable authorization reversal option
Enable with authorization reversal option selected by default
Local Currency
Local Currency
Select the local currency from the list.
On the Rule Configuration page, configure the options for each of the following:
Fraud Management Essentials
Template Rule Configuration Options
Tab Name
Field Name
Available Options / Details
Score Threshold
Score Threshold
Score between 50-69
Score between 70-94
Score between 95-100
Each threshold has an enable/disable check box. Each score can be adjusted to user specifications.
Standard Rules
AVS Mismatch
Monitor, Review, Reject, Disable
Standard Rules
AVS Partial Match
Monitor, Review, Reject, Disable
Standard Rules
AVS Not Verifiable
Monitor, Review, Reject, Disable
Standard Rules
CVV Mismatch
Monitor, Review, Reject, Disable
Standard Rules
CVV Not Verifiable
Monitor, Review, Reject, Disable
Standard Rules
Invalid Address
Monitor, Review, Reject, Disable
Standard Rules
Billing-Shipping Mismatch
Monitor, Review, Reject, Disable
Standard Rules
Billing-IP Mismatch
Monitor, Review, Reject, Disable
Standard Rules
Shipping-IP Country Mismatch
Monitor, Review, Reject, Disable
Regional & Country IP Address Rules
Decision
Review, Reject, Monitor
Regional & Country IP Address Rules
Region
Regions include: Asia, Europe, Africa, Oceania, Central America/Caribbean,
Arctic/Antarctica, South America, North America, Middle East
Regional & Country IP Address Rules
Countries
Check the
All
box for all countries in a region or select individually listed
countries.
Velocity Rules
Decision
Monitor, Review, Reject
Velocity Rules
Field
Email, Total count, Device, Shipping Address, Account Number, IP Address
Velocity Rules
Value
Input Value for Transactions in Field
Velocity Rules
Time Range
Range of time the rule is valid for.
Threshold Rules
Decision
Monitor, Review, Reject, Disable
Threshold Rules
Rule - Min Order Amount
Order Amount minimum amount
Threshold Rules
Value
Input order dollar amount
Threshold Rules
Decision
Monitor, Review, Reject, Disable
Threshold Rules
Rule - Max Order Amount
Order Amount Maximum amount
Threshold Rules
Value
Input order dollar amount
Gift Card Templates
Select configuration options for these fields:
Gift Card Template Configuration Options
Field
Value or Option
Gift Card MID
The Valuelink Gift card assigned merchant number which includes the plan, root, merchant
location, and check digit.
Merchant SIC Code
Merchant Category Code.
Merchant Store ID
Store ID number.
Enable PIN encryption?
Select
Yes
to encrypt the PIN before sending it to the processor.
Enable Merchant defined Transaction Reference Number?
Select
Yes
to allow the merchant to define the transaction reference number.
Otherwise, it is auto-generated.
Payer Authentication Templates
Payer Authentication
templates specify the payer authentication services that a merchant account will accept. To
specify a payer authentication service, enter the acquirer ID in the associated field.
This template supports the following payer authentication services:
Visa Secure with EMV
The Visa card type uses Visa Secure with EMV as the authentication service. The acquirer ID is a text string that consists of 6 to
20 digits and starts with the number 4.
Mastercard/Meeza Identity Check
The Mastercard card type uses Mastercard Identity Check as the authentication service. The acquirer ID is a text string that
consists of 6 to 20 digits and starts with the number 5 or 2.
American Express SafeKey
The American Express card type uses American Express SafeKey as the authentication service. The acquirer ID is a text string that
consists of 11 to 20 digits and starts with the number 1.
Cartes Bancaires Fast'R
The Cartes Bancaires card type uses Fast’R as the authentication service. The acquirer ID is a text string that consists of 6 to
20 digits and starts with the number 4, 5, or 2.
Discover / Diners Club ProtectBuy
The Discover / Diners Club card type uses ProtectBuy as the authentication service. The acquirer ID is a text string that consists
of 6 to 20 digits and starts with the number 3 or 6.
Elo Compra Segura
The Elo card type uses Elo Compra Segura as the authentication service. The acquirer ID is a text string that consists of 4
digits. The acquirer ID is a text string that consists of 8 digits and starts with the number 1.
JCB J/Secure
The JCB card type uses J/Secure as the authentication service.
UnionPay 3D Secure
3D Secure is a protocol designed to be an additional security layer for online credit and debit card transactions. The acquirer ID
is a text string that consists of 6 to 20 digits and begins with the number 4, 5, 2, or 6.
Pay By Link
Pay by Link
provides merchants an easy and fast way to sell products or accept donations without any coding.
Prerequisites
Unified Checkout Integration
must be enabled for the merchant. Before
Unified Checkout Integration
can be enabled for a merchant, it must be enabled at the
portfolio level.
To enable
Unified Checkout Integration
at the portfolio level, talk to your sales
representative.
Pay by Link
must be enabled at the portfolio level before in can be added to
merchant accounts. To enable at
Pay by Link
the portfolio level,
contact your sales representative.
Enabling
Pay by Link
on the Business Center
Before you can add
Pay by Link
, Unified Checkout must be added to the merchant account. To add Unified Checkout, see: Unified Checkout Integration.
Navigate to the Merchant Details Page within Portfolio Management.
Click the
Add products
button.
Select
Pay by Link
, and click the
Add
button.
Pay by Link
should appear on the Merchant's product list.
Secure Acceptance
Templates
Complete the Template Details Page. This information is populated in the
Secure Acceptance
- General Settings tab:
Secure Acceptance
Template General Settings Options
Fields
Option 1
Option 2
Option 3
Integration Methods
Select
Hosted Checkout Integration
or Checkout API
Input the Company Name, Contact Information (Name, Email, Phone).
This procedure explains how to create a simple merchant account consisting of merchant
organization and a transacting organization. Follow these steps to create a merchant
account:
Click
+ Add Merchant
.
Select
Board a new merchant account
and click
Next
.
If you have more than one boarding package, choose a boarding package from the
drop-down menu, or enter text in the search field to find one. Click
Next
. If you have only one boarding package, the Boarding Package section
does not display.
Click
Start
in the Merchant Account Information section to enter account
information. For more information, see Add Merchant Account Information.
Optional: click
Skip
in the Hierarchy Details section to skip
the hierarchy step.
The image below shows the steps of the Add Merchant page.
Figure:
Add Merchant
Add Merchant Account Information
Follow these steps to add merchant account information:
In Basic Information, enter the merchant account name and the organization ID in the
provided text fields.
ADDITIONAL INFORMATION
The merchant account name is the name of the business.
The organization ID is the name or identifier of the account that you are creating.
It must be unique, not just in the portfolio or account, but in the system.
Enter the merchant information in the provided text fields. Required fields are noted
with an asterisk (*).
Click
Save
. You are returned to the Add Merchant page. You can
skip the optional hierarchy step by clicking
Skip
.
Set Up the Transacting Organization and Products
The transacting organization is the entity that processes transactions. Follow these
steps to create a transacting organization and configure products for it:
Click
Start
in the Transacting Organization and Products
section. The Transacting Organization and Products page is displayed.
Optional: modify the name and ID of the organization by using the text fields in the
Transacting Organization Details section. The ID must be unique, not just in the portfolio
or account, but across the system. By default, the name is the merchant name with 001
added to the end of the name. If you accept this default, additional transacting
organizations will have default names that iterate the numbers at the end of their names,
beginning with 002.
Optional: By default, the organization information is inherited from the parent
organization. To edit the organization information, click
Edit
in
the Transacting Organization Information section. After editing, click
Apply
.
To enable a product in the Product Enablement section, click the Enablement drop-down
menu and select
Enabled
.
To modify the configuration, click the
Edit
or
Configure
button (depending on the product). Some products are
not configurable.
To confirm the configuration, click
Apply
.
To save all product configurations, click
Save
. You are returned
to the Add Merchant page.
To continue working with this organization, click
Continue working with this
merchant
. To finish and return to Merchant Management or to add another
merchant, click
Return to merchant management
.
ADDITIONAL INFORMATION
The image below shows the Transacting Organization and Products page.
Figure:
Transacting Organization and Products
Add
an Additional Transacting Organization to an Existing Merchant Organization
Follow these steps to add an additional transacting organization to an existing merchant
account:
Under Merchants, click
Manage Merchants
. The Manage Merchants page
appears.
In the left navigation panel, click
Portfolio Management
.
age Merchants page appears.
Click
+ Add Merchant
.
Select
Add to an existing account
and then click
Next
.
If you have more than one boarding package, the Boarding Presets section is displayed.
Enter the name of the merchant organization to add the new transacting organization to.
Then choose a boarding package from the drop-down menu, or enter text in the search field
to find one. Then click
Next
. If you have only one boarding
package, the Boarding Presets section does not display.
Optional: add additional organizations by clicking
Start
in the
Hierarchy Details section. Or skip this step by clicking
Configure the Transacting Organization and Products
Follow these steps to modify the transacting organization details, or to enable and
configure products for the transacting organization:
Click
Start
in the Transacting Organization and Products
section. The Transacting Organization and Products page is displayed.
Optional: modify the name and ID of the organization by using the text fields in the
Transacting Organization Details section. By default, the name is the merchant name with
001 added to the end of the name. If you accept this default, additional transacting
organizations will have default names that iterate the numbers at the end of their names,
beginning with 002.
Optional: to edit the organization information, Click
Edit
in
the Transacting Organization Information section. After editing, click
Apply
.
To enable a product in the Product Enablement section, click the Enablement drop-down
menu and select
Enabled
.
To modify the configuration, click the
Edit
or
configure
button (depending on the product). Some products are
not configurable.
To confirm the configuration, click
Apply
.
To save all product configurations, click
Save
. You are returned
to the Add Merchant page.
To continue working with this organization, click
Continue working with this
merchant
. To finish and return to Merchant Management, click
Return to merchant management
.
Search
for Organizations
The Manage Merchants page enables you to search for and view the details of any
organization connected to the account to which you are logged in. Follow these steps to
search for organizations:
In the left navigation panel, click the
Portfolio Management
icon.
Under Merchants, click
Manage Merchants
. The Manage Merchants
page appears.
Click
Search
to search for all merchants or use the search
filters. There are three default search filters:
ADDITIONAL INFORMATION
Organization ID
Organization Name
Organization Type
To add a filter, click
+ Add Filter
. Select a filter using the
drop-down menu, or search for a filter by entering text into the New Filter field.
Click
Search
when you finish adding filters.
To reset the search filters and start over, click
Reset Search
.
To understand how to use the search results, see Search Results.
Search Results
After you search for organizations, a list of organizations returned by the search are
displayed in the table below the search options. If there are more organizations than the
screen can display in one page, you can navigate to additional search results by clicking the
arrow or page numbers at the bottom of the table.
There are a variety of things you can do with search results. See these topics:
When you search for an organization, you might find that the list of results is large and you
must sort or filter the results to find what you are looking for. There are a number of
ways to sort search results:
Click the column headings for Name, ID, Type, and Creation Date to sort them in ascending
or descending order.
Enter text in the text field of the Name and ID columns to filter the results for
organizations that correspond to the text you entered.
Filter results according to organization type by selecting
Type
from the drop-down menu in the Type column, or enter text to pick a type.
View an Organization's Hierarchy
Follow these steps to see an organization's place in the hierarchy of
organizations:
Find the merchant in search results and click the three dots (...) in the More
column.
Select
View Organization Hierarchy
. The organizations immediately above and below the organization are displayed. You can
view the hierarchy of these organizations by repeating the steps above.
Manage Organization Information
There are three types of information that you can view and edit. See these topics:
Follow these steps to edit an organization's business details:
Find the organization in the Search Results table and click the eyeball icon.
The Merchant Details page appears. For more information on searching for an
organization, see Search for Organizations.
Click
Edit
in the Merchant Information section.
Use the text fields to change information. For technical and emergency contact
information, click
Edit
in those sections.
When you finish, click
Save
.
View and Edit an Organization's Processor Details
Not every organization has processor details to edit. Details vary depending on the
processor. Follow these steps to edit an organization's processor details:
Find the organization in the Search Results table and click the eyeball icon.
The Merchant Details page appears. For more information on searching for an
organization, see Search for Organizations.
Click
Edit
in the Processor section.
Make the changes and click
Save
.
Update an Organization's Products
There are three ways to modify an organization's products:
Follow these steps to remove a product from an organization:
Search for the organization in the Manage Merchant page. For more information on
searching for an organization, see Search for Organizations.
Find the organization in the Search Results table and click the eyeball icon.
The Merchant Details page appears.
Find the product you want to remove in the Remove column and click the
icon.
Click
Confirm
.
Change
an Organization's Status
Follow these steps to change an organization's status:
Find the merchant in the search results and click the eyeball icon in the More
column.
Click the
Status
drop-down menu in the upper-right side of the
page and select a status.
Click
Confirm
.
Product Enablement and Configuration
You can enable and configure different products for merchants in the
Business Center
and the Product Enablement and Configuration Service (PECS) API.
You can use the PECS API to enable, subscribe, and configure products for a merchant. The
PECS API is used during merchant onboading and after merchant onboarding:
Merchant onboarding
: PECS is invoked by the Boarding Registration Service
(BRS) API.
Post-merchant onboarding
: PECS is called to update the merchant's product
subscriptions or configurations.
During merchant onboarding, products can be enabled and configured. PECS supports
multiple products that can be assigned to a merchant. Some products are available only
for enablement and there is no capability to update configurations for these products.
Enablement-only products:
Acceptance Devices
Card Present Connect
Checkout API
Customer Invoicing
Digital Payment Suite
Installments
Pay by Link
Receivables Manager
Recurring Billing
Reporting
Tax Calculation
Transaction Search
Unified Checkout Integration
Enablement and configuration products:
Account Updater
Advanced Billing
Alternative Payment Methods
Card Processing
Decision Manager
eCheck
Fraud Management Essentials
Gift Cards
Payer Authentication
Service Orchestration
Payouts
Secure Acceptance
Token Management Service
Virtual Terminal
Enablement-Only Products
Add an Enablement-Only Product to an Organization
Follow these steps to add Advanced Billing to an organization:
Search for the organization on the Manage Merchant page. For more information
on searching for an organization, see Searching for Organizations.
Find the organization in the Search Results table, and click the eyeball icon.
The Merchant Details page appears.
In the Products section, click
+ Add Products
. The Add a
Product page appears.
Select the product you want to enable. Click
Add
.
These products are available as enablement-only:
Acceptance Devices
Card Present Connect
Checkout API
Customer Invoicing
Installments
Pay by Link
Service Orchestration
Receivables Manager
Recurring Billing
Reporting
Tax
Transaction Search
Unified Checkout Integration
Alternative Payments
This section contains the required information for configuring Alternative Payment
Methods using the
Business Center
.
Add Alternative Payments to a Merchant Account
Follow these steps to add Alternative Payment Methods to a new merchant
account:
IMPORTANT
Alternative payment method approval is provided by
the service provider and not
Visa Acceptance Solutions
. Refer to your contract to
determine which payment methods are available to you.
In the left navigation panel, click
Portfolio Management
.
Under Merchants, click
Manage Merchants
. The Manage Merchants page
appears.
Click
+ Add Merchant
.
Select where you want to board your merchant:
Select
Board a new merchant account
to create a
new merchant account.
Select
Add to an existing account
to add a
transacting merchant to an existing merchant organization.
Click
Next
.
If you are adding a transacting organization to an existing merchant account,
search for the merchant account in the Boarding Presets section.
If you have more than one boarding package, choose a boarding package from the
drop-down menu, or enter text in the search field to find one. Click
Next
. If you have only one boarding package, the Boarding Package section
does not display.
Click
Start
in the Merchant Account Information section to enter account
information. For more information, see Add Merchant Account Information.
Optional: click
Skip
in the Hierarchy Details section to skip
the hierarchy step.
Click
Start
in the Transacting Organization and Products
section to set up a transacting organization and configure products for it. The
Transacting Organization and Products page appears.
Under Transacting Organization Details, enter the transacting organization name
and the organization ID.
Under Product Enablement, find Alternative Payments and select
Enabled
under the Enablement drop-down menu.
Click
Configure
. The Configure Alternative Payment
Methods page appears.
Check the box next to each alternative payment method you want to enable and
configure. You can choose alternative payment methods from these
categories:
Bank Transfer
Buy Now Pay Later (BNPL)
Card Payment
Direct Debit
eWallet
Gift Card
Local Card
Post Pay Reference
QR
Click
Continue
. The Product Configuration page
appears.
Enter the required details for each alternative payment method you want to
configure.
Click
Copy to other sections
to populate the
information to any other alternative payment methods that you selected.
IMPORTANT
You must select
I have read and agree to
the Terms and Conditions
for each alternative payment
method you want to enable.
Click
Continue
to return to the Merchant Details
page.
Add Alternative Payments with Self-Enablement to an Organization
Follow these steps to add Alternative Payment Methods to an organization:
IMPORTANT
Alternative payment method approval is provided by the service
provider and not
Visa Acceptance Solutions
. Refer to your contract to determine
which payment methods are available to you.
In the left navigation pane, click the
Portfolio
Management
icon.
Under Merchants, click
Manage Merchants
. The Manage
Merchants page appears.
Click
+ Add Merchant
.
Select where you want to board your merchant:
Select
Board a new merchant account
to create a
new merchant account.
Select
Add to an existing account
to add a
transacting merchant to an existing merchant organization.
Click
Next
.
If you are adding a transacting organization to an existing merchant account,
search for the merchant account in the Boarding Presets section.
If you have more than one boarding package, choose a boarding package from the
drop-down menu, or enter text in the search field to find one. Click
Next
. If you have only one boarding package, the Boarding Package section
does not display.
Click
Start
in the Merchant Account Information section to enter account
information. For more information, see Add Merchant Account Information.
Optional: click
Skip
in the Hierarchy Details section to skip
the hierarchy step.
Click
Start
in the Transacting Organization and Products
section to set up a transacting organization and configure products for it. The
Transacting Organization and Products page appears.
Under Transacting Organization Details, enter the transacting organization name
and the organization ID.
Under Product Enablement, find Alternative Payments and select
Allow
Self Enablement
under the Enablement drop-down menu.
Click
Save
. Alternative Payments is now available for
self-enablement for the merchant.
Add Alternative Payments to an Existing Organization
Follow these steps to add Alternative Payment Methods to an organization:
In the left navigation pane, click the
Portfolio
Management
icon.
Under Merchants, click
Manage Merchants
. The Manage
Merchants page appears.
Search for the organization on the Manage Merchant page. For more information
on searching for an organization, see Searching for Organizations.
Find the organization in the Search Results table, and click the eyeball icon.
The Merchant Details page appears.
In the Products section, click
+ Add Products
. The Add a
Product page appears.
Under Payments, select
Alternative Payments
and click
Add
.
Check the box next to each alternative payment method you want to enable and
configure. You can choose alternative payment methods from these
categories:
Bank Transfer
Buy Now Pay Later (BNPL)
Card Payment
Direct Debit
eWallet
Gift Card
Local Card
Post Pay Reference
QR
Click
Continue
. The Product Configuration page
appears.
Enter the required details for each alternative payment method you want to
configure.
Click
Copy to other sections
to populate the
information to any other alternative payment methods that you selected.
IMPORTANT
You must select
I have read and agree to
the Terms and Conditions
for each alternative payment
method you want to enable.
Click
Continue
to return to the Merchant Details
page.
Modify an Alternative Payment Methods Configuration for an Organization
Follow these steps to modify Alternative Payment Methods for an
organization:
In the left navigation pane, click the
Portfolio
Management
icon.
Under Merchants, click
Manage Merchants
. The Manage
Merchants page appears.
Search for the organization in the Manage Merchant page. For more information
on searching for an organization, see Searching for Organizations.
Find the organization in the Search Results table and click the eyeball icon.
The Merchant Details page appears.
Under Products, click
Edit
next to Alternative Payments.
The Alternative Payment Methods page appears.
If you want to add an available alternative payment method, click
Add Services
. The Configure Alternative Payment
Methods page appears.
If you want to configure an enabled alternative payment method, click
Edit
. The Configure Alternative Payment Methods page
appears.
Check the box next to each alternative payment method you want to enable and
configure. You can choose alternative payment methods from these
categories:
Bank Transfer
Buy Now Pay Later (BNPL)
Card Payment
Direct Debit
eWallet
Gift Card
Local Card
Post Pay Reference
QR
Click
Continue
. The Product Configuration page
appears.
Enter the required details for each alternative payment method you want to
configure.
Click
Copy to other sections
to populate the
information to any other alternative payment methods that you selected.
IMPORTANT
You must select
I have read and agree to
the Terms and Conditions
for each alternative payment
method you want to enable.
Click
Continue
to return to the Merchant Details
page.
Payer Authentication
Payer Authentication
uses the 3-D Secure protocol in
online transactions to verify that payment is coming from the legitimate cardholder.
Authenticating the payer before the transaction is authorized benefits the merchant by
shifting chargeback liability from the merchant to the card issuer.
Prerequisites
You must meet these requirements to enable and configure
Payer Authentication
for your merchants:
You must include a merchant website URL. 3-D Secure protocol requires that
the website URL is in the format
You must include a merchant category code for your merchant. For information
on adding a merchant category code to your merchant account information, see
Add Merchant Account Information.
At least one 3-D Secure template must be available. For information on
creating product templates, see Product Templates.
Status
When you add Payer Authentication to a merchant account, one of these statuses is
assigned:
Boarded: The Payer Authentication configuration was successfully saved and
the merchant can proceed to transact the card network using the specified
currency.
Pending: The Payer Authentication configuration is partially saved or
incomplete. Raise a ticket with customer support.
Add
Payer Authentication
to a Merchant Account
Follow these steps to add
Payer Authentication
to a merchant
account:
In the left navigation pane, click the
Portfolio
Management
icon.
Under Merchants, click
Manage Merchants
. The Manage
Merchants page appears.
Click
+ Add Merchant
.
Choose a location to board your merchant:
Board a new merchant account
to create a new
merchant account.
Add to an existing account
to add a transacting
merchant to an existing merchant organization.
Click
Next
.
If you are adding a transacting organization to an existing merchant account,
search for the merchant account in the Boarding Presets section.
If you have more than one boarding package, choose a boarding package from the
drop-down menu, or enter text in the search field to find one. Click
Next
. If you have only one boarding package, the Boarding Package section
does not display.
Click
Start
in the Merchant Account Information section to enter account
information. For more information, see Add Merchant Account Information.
Optional: click
Skip
in the Hierarchy Details section to skip
the hierarchy step.
Click
Start
in the Transacting Organization and Products
section to set up a transacting organization and configure products for it. The
Transacting Organization and Products page appears.
Under Transacting Organization Details, enter the transacting organization name
and the organization ID.
Under Product Enablement, find
Payer Authentication
and select
Enabled
from the Enablement drop-down menu.
Click
Configure
to configure
Payer Authentication
.
In the Payer Authentication Set Up drop-down menu, choose a template.
Click
Configure
for each
Payer Authentication
card service that you want to configure.
Your card processing settings and the accepted card types determine which
of these services are available to you:
Visa Secure
Mastercard/Meeza Identity Check
American Express SafeKey
JCB J/Secure
Discover/Diners Club ProtectBuy
ELO
UnionPay 3-D Secure
Cartes Bancaires
Click
Enable
on the Enable/Disable slider to configure acquirer
currencies.
Optional: Click
Disable
to disable acquirer
currency configurations. Your existing configurations remain but are
unavailable.
Enter the acquirer merchant ID and acquirer ID. The acquirer merchant ID must
be from 1 to 35 alphanumeric characters. The acquirer ID must be from 4 to 20
alphanumeric characters or a hyphen, and include
-1000
. For
example,
acquirerID-1000
. An error message appears if the
acquirer merchant ID or acquirer ID do not meet these specifications.
ADDITIONAL INFORMATION
For testing purposes, use Merchant ID:
123456789
and Acquirer
ID:
cybersource
.
For Cartes Bancaires, you must also enter the SIRET number.
From the Currency drop-down menu, select the currency to enable for each
acquirer. A
Duplicate Currency
warning appears when you have already
configured a currency for an acquirer.
IMPORTANT
The default currency configuration includes all
currencies. If you do not configure a currency for an acquirer, the default
is used.
Click
Add more currency
to configure another currency for an
acquirer.
Check the box next to
Copy last Acquirer Merchant ID and Acquirer ID
for new item
to populate the acquirer merchant ID and acquirer
ID fields.
Click the trash can icon to delete a configuration.
Click
View all currencies
to collapse or expand all currencies that
are configured.
Click
Save
to save your configuration and return to the Payer
Authentication Set Up and Enablement page.
If you do not want to save your changes, click
Cancel
to
return to the Payer Authentication Set Up and Enablement page.
A warning box appears and states that you have unsaved changes. Click
Yes, cancel
to return to the Payer
Authentication Set Up and Enablement page without saving your
configuration changes. Click
Wait
to stay on the
card service configuration page.
Add
Payer Authentication
to an Existing Organization
Follow these steps to add
Payer Authentication
to an
organization:
In the left navigation pane, click the
Portfolio
Management
icon.
Under Merchants, click
Manage Merchants
. The Manage
Merchants page appears.
Search for the organization on the Manage Merchant page. For more information
on searching for an organization, see Searching for Organizations.
Find the organization in the Search Results table, and click the eyeball icon.
The Merchant Details page appears.
In the Products section, click
+ Add Products
. The Add a
Product page appears.
Select Payer Authentication and click
Add
.
In the Payer Authentication Set Up drop-down menu, choose a template.
Click
Configure
for each
Payer Authentication
card service that you want to configure.
Your card processing settings and the accepted card types determine which
of these services are available to you:
Visa Secure
Mastercard/Meeza Identity Check
American Express SafeKey
JCB J/Secure
Discover/Diners Club ProtectBuy
ELO
UnionPay 3-D Secure
Cartes Bancaires
Click
Enable
on the Enable/Disable slider to configure acquirer
currencies.
Optional: Click
Disable
to disable acquirer
currency configurations. Your existing configurations remain but are
unavailable.
Enter the acquirer merchant ID and acquirer ID. The acquirer merchant ID must
be from 1 to 35 alphanumeric characters. The acquirer ID must be from 4 to 20
alphanumeric characters or a hyphen, and include
-1000
. For
example,
acquirerID-1000
. An error message appears if the
acquirer merchant ID or acquirer ID do not meet these specifications.
ADDITIONAL INFORMATION
For testing purposes, use Merchant ID:
123456789
and Acquirer
ID:
cybersource
.
For Cartes Bancaires, you must also enter the SIRET number.
From the Currency drop-down menu, select the currency to enable for each
acquirer. A
Duplicate Currency
warning appears when you have already
configured a currency for an acquirer.
IMPORTANT
The default currency configuration includes all
currencies. If you do not configure a currency for an acquirer, the default
is used.
Click
Add more currency
to configure another currency for an
acquirer.
Check the box next to
Copy last Acquirer Merchant ID and Acquirer ID
for new item
to populate the acquirer merchant ID and acquirer
ID fields.
Click the trash can icon to delete a configuration.
Click
View all currencies
to collapse or expand all currencies that
are configured.
Click
Save
to save your configuration and return to the Payer
Authentication Set Up and Enablement page.
If you do not want to save your changes, click
Cancel
to
return to the Payer Authentication Set Up and Enablement page.
A warning box appears and states that you have unsaved changes. Click
Yes, cancel
to return to the Payer
Authentication Set Up and Enablement page without saving your
configuration changes. Click
Wait
to stay on the
card service configuration page.
Modify a
Payer Authentication
Configuration for an Organization
Follow these steps to modify
Payer Authentication
for an
organization:
In the left navigation pane, click the
Portfolio
Management
icon.
Under Merchants, click
Manage Merchants
. The Manage
Merchants page appears.
Search for the organization in the Manage Merchant page. For more information
on searching for an organization, see Searching for Organizations.
Find the organization in the Search Results table and click the eyeball icon.
The Merchant Details page appears.
Under Products, click
Modify
next to Payer
Authentication.
In the Payer Authentication Set Up drop-down menu, choose a template.
Click
Configure
for each
Payer Authentication
card service that you want to configure.
Your card processing settings and the accepted card types determine which
of these services are available to you:
Visa Secure
Mastercard/Meeza Identity Check
American Express SafeKey
JCB J/Secure
Discover/Diners Club ProtectBuy
ELO
UnionPay 3-D Secure
Cartes Bancaires
Click
Enable
on the Enable/Disable slider to configure acquirer
currencies.
Optional: Click
Disable
to disable acquirer
currency configurations. Your existing configurations remain but are
unavailable.
Enter the acquirer merchant ID and acquirer ID. The acquirer merchant ID must
be from 1 to 35 alphanumeric characters. The acquirer ID must be from 4 to 20
alphanumeric characters or a hyphen, and include
-1000
. For
example,
acquirerID-1000
. An error message appears if the
acquirer merchant ID or acquirer ID do not meet these specifications.
ADDITIONAL INFORMATION
For testing purposes, use Merchant ID:
123456789
and Acquirer
ID:
cybersource
.
For Cartes Bancaires, you must also enter the SIRET number.
From the Currency drop-down menu, select the currency to enable for each
acquirer. A
Duplicate Currency
warning appears when you have already
configured a currency for an acquirer.
IMPORTANT
The default currency configuration includes all
currencies. If you do not configure a currency for an acquirer, the default
is used.
Click
Add more currency
to configure another currency for an
acquirer.
Check the box next to
Copy last Acquirer Merchant ID and Acquirer ID
for new item
to populate the acquirer merchant ID and acquirer
ID fields.
Click the trash can icon to delete a configuration.
Click
View all currencies
to collapse or expand all currencies that
are configured.
Click
Save
to save your configuration and return to the Payer
Authentication Set Up and Enablement page.
If you do not want to save your changes, click
Cancel
to
return to the Payer Authentication Set Up and Enablement page.
A warning box appears and states that you have unsaved changes. Click
Yes, cancel
to return to the Payer
Authentication Set Up and Enablement page without saving your
configuration changes. Click
Wait
to stay on the
card service configuration page.
Token Management Service
The
Token Management Service
(
TMS
) links
tokens across service providers, payment types, and channels for sellers, acquirers, and
technology partners.
TMS
tokenizes, securely stores, and
manages the primary account number (PAN), the payment card expiration date, electronic
check details, and customer data.
TMS
also enables merchants to
create a network token of a customer's payment card.
IMPORTANT
When you board a merchant and enable
TMS
and
network tokenization, the token requestor ID is enrolled at the merchant account
organization level where the token vault is configured. You must include the merchant
business information during token requestor ID enrollment and when you create the
TMS
token vault. This ensures that the network tokens that
are provisioned are assigned to the merchant that owns the tokens.
Token Vault Management
Token vaults are where merchants store their customer and payment data. A
Business Center
internal user can enable the
TMS
vault.
Vaults are assigned to an owner, and all data within the vault belongs to the owner. You
can grant permission to individual MIDs to create, retrieve, update, and delete tokens
within a vault. Created tokens belong to the owner of the vault, not the creator of the
token. If you remove a MID from a vault, it can no longer access any tokens within that
vault, including tokens created under that MID.
IMPORTANT
It is not currently possible to merge vaults, so ensure that
merchants are set up with the correct vault by creating a new vault or granting access
to an existing vault.
Token Requestor IDs
A token requestor ID (TRID) is a unique identifier that entities such as merchants use to
request network tokens from token providers. Having a TRID is a prerequisite for
enabling network tokenization.
Each entity must register with the token provider to get a TRID. Contact a
Visa Acceptance Solutions
representative to enroll a merchant as a token requestor.
Visa and Mastercard TRIDs
An internal user can enroll a merchant as a VISA or Mastercard token requestor
through the
Business Center
.
Follow these steps to enroll a merchant as a token requestor in the
Business Center
:
Navigate to
Token Management
.
Click
Vault Management
.
Use the Vault Owner filter to search for the merchant account that has
TMS
enabled.
Choose the merchant account to view the
TMS
vaults
that are configured for the merchant.
Click
Network Tokenization
.
Click
Enroll to VISA/Mastercard token services
.
Enter the required information for each card type:
Mastercard
Business entity name
Visa
Merchant name
Merchant website URL
Merchant country code
Click
Onboard with Acquirer ID
.
Enter the required information:
Acquirer ID
Set the value to
40010052242
. It is a static
acquirer ID that is used for
TMS
.
Acquirer Merchant ID
Enter your organization ID.
Click
Enroll to Network Token Services
to complete
enrollment.
When the enrollment is submitted, the relationship ID and token requestor ID
appear on the page for Visa Token Service (VTS) and the token requestor ID appears
for Mastercard.
In order to request a TRID from the token provider,
Visa Acceptance Solutions
uses
merchant business details already stored. If any of the details are not present, a
dialog form should appear prompting you to complete the missing information.
American Express TRIDs
Enrollment as a token requestor for American Express is a manual process. Contact
your
Visa Acceptance Solutions
representative to request the TRID for American
Express.
Allow 2 to 3 days for the completion of your request.
IMPORTANT
Service establishment (SE) Numbers
are required in order
to process American Express card transactions.
Configure the Token Vault Settings Using the
Business Center
Follow these steps to configure your merchant token vault settings:
Log in to the
Business Center
test environment or production
environment.
Test:
https://businesscentertest.visaacceptance.com
Production:
https://businesscenter.visaacceptance.com
In the left navigation panel, click the
Token Management
icon (
).
Click
Vault Management New
. The Vault Management page
appears.
From the Vault Owner drop-down list, select the vault owner..
In the Details column, click
Vault Settings
. The Edit
Vault page appears.
Click
Edit
.
A dialog box appears with a message to warn you that changing your vault
settings could result in your merchants being unable to access tokens, which
could result in failing transactions. Click
Yes
if you
want to continue.
Enter the vault name, supported payment methods, supported token types and
formats, card number masking format, payment instrument storing configuration,
and the webhook URL.
For each token type, you can choose from these token formats:
32 Character Hex
22 Digits
19 Digits Luhn Check Passing
16 Digits Luhn Check Passing
IMPORTANT
Account Updater is incompatible with instrument
identifier tokens in the 22-digit format.
Click
SAVE
.
To return to the vault management page, click
VAULT
MANAGEMENT
.
Configure the Token Vault Access Using the
Business Center
Follow these steps to configure your merchant token vault access settings:
Log in to the
Business Center
test environment or production
environment.
Test:
https://businesscentertest.visaacceptance.com
Production:
https://businesscenter.visaacceptance.com
In the left navigation panel, click the
Token Management
icon (
).
Click
Vault Management New
. The Vault Management page
appears.
Select the vault owner that you want to configure from the Vault Owner
drop-down list.
In the Details column, click
Access Settings
. The MID
Access page appears.
Check the box for the vault settings you want to enable for each merchant you
want to configure:
Visa Token
Mastercard Token
Card Unmasked
Create
Update
Retrieve
Click
Submit
to save your settings.
Add
TMS
to a Merchant Account
Follow these steps to add
Token Management Service
to an
organization:
In the left navigation pane, click the
Portfolio
Management
icon.
Under Merchants, click
Manage Merchants
. The Manage
Merchants page appears.
Click
+ Add Merchant
.
Select where you want to board your merchant:
Select
Board a new merchant account
to create a
new merchant account.
Select
Add to an existing account
to add a
transacting merchant to an existing merchant organization.
Click
Next
.
If you are adding a transacting organization to an existing merchant account,
search for the merchant account in the Boarding Presets section.
If you have more than one boarding package, choose a boarding package from the
drop-down menu, or enter text in the search field to find one. Click
Next
. If you have only one boarding package, the Boarding Package section
does not display.
Click
Start
in the Merchant Account Information section to enter account
information. For more information, see Add Merchant Account Information.
Optional: click
Skip
in the Hierarchy Details section to skip
the hierarchy step.
Click
Start
in the Transacting Organization and
Products section to set up a transacting organization and configure products for
it. The Transacting Organization and Products page appears.
Under Transacting Organization Details, enter the transacting organization
name and the organization ID.
Under Product Enablement, find
Token Management Service
and select
Enabled
under the Enablement drop-down
menu.
Click
Configure
to configure
Token Management Service
.
In the Product Configuration Template drop-down menu, select your
template.
Click
Apply
to save your configuration.
Add
TMS
to an Existing Organization
Follow these steps to add
Token Management Service
to an organization:
In the left navigation pane, click the
Portfolio
Management
icon.
Under Merchants, click
Manage Merchants
. The Manage
Merchants page appears.
Search for the organization on the Manage Merchant page. For more information
on searching for an organization, see Searching for Organizations.
Find the organization in the Search Results table, and click the eyeball icon.
The Merchant Details page appears.
In the Products section, click
+ Add Products
. The Add a
Product page appears.
Under Commerce Solutions, select Token Management Service. Click
Add
. The Token Management Service page appears.
In the Product Configuration Template drop-down menu, select your
template.
Click
Apply
to save your configuration.
Switch Merchants
Switching merchants enables you to perform actions on behalf of any merchant account that
you have access to. For example, if you are acting in a support capacity, you might receive
a call from someone in an organization asking how to perform an action. By switching
merchants, you can do it for them during that call and explain how to do it in the future
from their view.
When you switch merchants, only the features enabled for that merchant account are visible.
Only the information allowed by the permissions assigned to that account or user are
visible. To limit the dataset for a quicker search, using the smaller set of
information accessible for that account can be helpful.
Follow these steps to switch merchants:
Select the merchant account to which you want to switch. See Search for Organizations for information about selecting a merchant
account. The Merchant Details page appears.
At the top of the screen, click the Switch View drop-down menu and select
Choose Organization
. The Switch View sidebar displays.
Click
Quick
to simply enter the name of the organization and
then click
Switch view
, or click
Custom
to
search for an organization.
If you chose a custom search, begin by selecting the organization type from the
Organization Type drop-down menu.
If you know the exact organization ID or name, enter them into the Organization ID and
Organization Name text fields.
If you do not know the exact name or organization ID of the organization, enter partial
text and click
Show organization
. Then select the organization from
the Organization drop-down menu.
Send a Registration Email
The registration email enables the merchant to create a username and password for a
transacting organization. The email is valid for 24 hours. After that, you have to send
another. You only can send a registration email to new merchants if your portfolio was
configured when it was created. For more information, see your
Visa Acceptance Solutions
representative. Follow these steps to send a registration email:
Click the eyeball icon for the merchant to view organizational details.
Click the
Send email
drop-down menu. Select either
Test Email
to send a registration email for the organization in
the testing environment, or
Production Email
to send a registration
for the organization in the production environment.
Extend the Hierarchy
The Boarding service enables you to build a hierarchy to model your actual business structure
or the business structures of your merchants if you are a reseller. You can board a small
hierarchy of organizations using only merchant and transacting organizations. You can also use
structural organizations to extend the hierarchy. Extending the hierarchy is optional.
Structural organizations can be placed under merchant organizations to represent things like
different types of payment systems, different geographical regions, or any other distinction
that your business needs. Transacting organizations are then placed under the structural
organizations.
Hierarchy Example
In this diagram of a relatively simple hierarchy, a merchant organization has two structural
organizations: one for eCommerce, and one for physical store locations. Transacting
organizations are added under the structural organizations. This is an example of using
structural organizations to represent card-not-present transactions (online transactions) and
card-present transactions (physical store locations). The Stores node has two physical
locations that process payments. The eCommerce node has one transacting organization, which
represents a payment form on a website.
Figure:
Hierarchy Example
Add
a Structural Organization to an Existing Merchant
Follow these steps to add a structural organization that can be used to extend the
hierarchy:
Click
+ Add Merchant
.
Select
Add to an existing account
and then click
Next
.
If you have more than one boarding package, choose a boarding package from the
drop-down menu, or enter text in the search field to find one. Then click
Next
.
ADDITIONAL INFORMATION
If you have only one boarding package, the Boarding Package section does not
display.
Follow these steps to add a structural organization to a merchant account:
In the Hierarchy Details page, select the organization to which you are adding the
structural node.
Click the
+ Add
button. The Add Organization pop-up window
appears.
Select
Structural Organization
from the Organization Type
drop-down menu.
To choose the placement of the structural organization in the hierarchy, select
Add Child
or
Add Parent
in the Placement
drop-down menu.
Optional: edit the name and organization ID of the organization.
Optional: Click the
Add optional details
button to edit the
address of the organization, then click
Save
to return to the Hierarchy
Details page.
Click
Close
to return to the Add Merchant page.
Create a Transacting Organization and Products
Follow these steps to create a transacting organization and configure products for
it:
Click
Start
in the Transacting Organization and Products
section. The Transacting Organization and Products page is displayed.
Optional: modify the name and ID of the organization by using the text fields in the
Transacting Organization Details section. By default, the name is the merchant name with
001 added to the end of the name. If you accept this default, additional transacting
organizations will have default names that iterate the numbers at the end of their names,
beginning with 002.
Optional: to edit the organization information, Click
Edit
in
the Transacting Organization Information section. After editing, click
Apply
.
To enable a product in the Product Enablement section, click the Enablement drop-down
menu and select
Enabled
.
To modify the configuration, click the
Edit
or
configure
button (depending on the product). Some products are
not configurable.
To confirm the configuration, click
Apply
.
To save all product configurations, click
Save
. You are returned
to the Add Merchant page.
To continue working with this organization, click
Continue working with this
merchant
. To finish and return to Merchant Management, click
Return to merchant management
.
ISO Standard Currency Codes
Not all currencies are supported for all processors.
Currency Code
Numerical Currency Code
Currency Name
Decimal Places
AED
784
United Arab Emirates dirham
2
AFN
971
Afghanistan afghani
2
ALL
008
Albanian lek
2
AMD
051
Armenian dram
2
ANG
532
Netherlands Antillean
guilder
2
AOA
973
Angola kwanza
2
ARS
032
Argentine peso
2
AUD
036
Australian dollar
2
AWG
533
Aruban guilder
2
AZN
944
Azerbaijanian manat
2
BAM
977
Bosnia and Herzegovina convertible
mark
2
BBD
052
Barbados dollar
2
BDT
050
Bangladeshi taka
2
BGN
975
Bulgarian lev
2
BHD
048
Bahraini dinar
3
BIF
108
Burundian franc
0
BMD
060
Bermuda dollar
2
BND
096
Brunei dollar
2
BOB
068
Bolivian boliviano
2
BOV
984
Bolivian mvdol
2
BRL
986
Brazilian real
2
BSD
044
Bahamian dollar
2
BTN
064
Bhutani ngultrum
2
BWP
072
Botswana pula
2
BYR
933
Belarussian ruble
BYR has been
replaced by BYN as the Belarussian ruble currency.
0
BYN
933
Belarussian ruble
2
BZD
084
Belize dollar
2
CAD
124
Canadian dollar
2
CDF
976
Congolese franc
2
CHF
756
Swiss franc
2
CLF
990
Chilean unidad de fomento
4
CLP
152
Chilean peso
0
CNY
156
Chinese yuan renminbi
2
COP
170
Columbian peso
2
COU
970
Columbian unidad de valor
real
2
CRC
188
Costa Rican colon
2
CSK
203
Czech koruna
2
CUC
931
Cuban peso, convertible
2
CUP
192
Cuban peso
2
CVE
132
Cape Verde escudo
2
CZK
203
Czech koruna
2
DJF
262
Djiboutian franc
0
DKK
208
Danish krone
2
DOP
214
Dominican peso
2
DZD
012
Algerian dinar
2
EGP
818
Egyptian pound
2
ERN
232
Eritrean nakfa
2
ETB
230
Ethiopian birr
2
EUR
978
Euro
2
FJD
242
Fiji dollar
2
FKP
238
Falkland Islands pound
2
GBP
826
British pound sterling
2
GEL
981
Georgian lari
2
GHS
936
Ghana cedi
2
GIP
292
Gibraltar pound
2
GMD
270
Gambian dalasi
2
GNF
324
Guinean franc
0
GTQ
320
Guatemalan quetzal
2
GWP
Guinea-Bissau peso
0
GYD
328
Guyanese dollar
2
HKD
344
Hong Kong dollar
2
HNL
340
Hunduran Lempira
2
HTG
332
Haitian gourde
2
HUF
348
Hungarian forint
2
IDR
360
Indonesian rupiah
2
ILS
376
Israeli sheqel
2
INR
356
Indian rupee
2
IQD
368
Iraqi dinar
3
IRR
364
Iranian rial
2
ISK
352
Icelandic krona
0
JMD
388
Jamaican dollar
2
JOD
400
Jordanian dinar
3
JPY
392
Japanese yen
0
KES
404
Kenyan shilling
2
KGS
417
Kyrgyzstani som
2
KHR
116
Cambodian riel
2
KMF
174
Comoro franc
0
KPW
408
North Korean won
2
KRW
410
South Korean won
0
KWD
414
Kuwaiti dinar
3
KYD
136
Cayman Islands dollar
2
KZT
398
Kazakhstani tenge
2
LAK
418
Lao kip
2
LBP
422
Lebanese pound
2
LKR
144
Sri Lanka rupee
2
LRD
430
Liberian dollar
2
LSL
426
Lesotho loti
2
LTL
Lithuanian litas
2
LVL
Latvian lats
2
LYD
434
Libyan dinar
3
MAD
504
Moroccan dirham
2
MDL
498
Moldovan leu
2
MGA
969
Malagasy ariary
2
MKD
807
Macedonian denar
2
MMK
104
Myanmar kyat
2
MNT
496
Mongolian tugrik
2
MOP
446
Macanese pataca
2
MRO
Mauritanian ouguiya
2
MUR
480
Mauritius rupee
2
MVR
462
Maldivian rufiyaa
2
MWK
454
Malawian kwacha
2
MXN
484
Mexican peso
2
MYR
458
Malaysian ringgit
2
MZN
943
Mozambican metical
2
NAD
516
Namibian dollar
2
NGN
566
Nigerian naira
2
NIO
558
Cordoba oro
2
NOK
578
Norwegian krone
2
NPR
524
Nepalese rupee
2
NZD
554
New Zealand dollar
2
OMR
512
Omani rial
3
PAB
590
Panamanian balboa
2
PEN
604
Peruvian nuevo sol
2
PGK
598
Papua New Guinean kina
2
PHP
608
Philippine peso
2
PKR
586
Pakistan rupee
2
PLN
985
Polish zloty
2
PYG
600
Paraguayan guarani
0
QAR
634
Qatari rial
2
RON
946
Romanian leu
2
RSD
941
Serbian dinar
2
RUB
643
Russian ruble
2
RWF
646
Rwanda franc
0
SAR
682
Saudi Arabian riyal
2
SBD
090
Solomon Islands dollar
2
SCR
690
Seychelles rupee
2
SDG
938
Sudanese pound
2
SEK
752
Swedish krona
2
SGD
702
Singapore dollar
2
SHP
654
Saint Helena pound
2
SLE
925
Sierra Leonean leone
IMPORTANT
Effective
October 1, 2022
, the
SLL
currency code is valid only for
exemption processing.
2
SOS
706
Somali shilling
2
SRD
968
Surinamese dollar
2
SSP
728
South Sudanese pound
2
STD
Sao Tome and Principe dobra
2
SVC
222
El Salvadorean colon
2
SYP
760
Syrian pound
2
SZL
784
Swaziland lilangeni
2
THB
764
Thai baht
2
TJS
972
Tajikistani somoni
2
TMT
934
Turkmenistan new manat
2
TND
788
Tunisian dinar
3
TOP
776
Tongan pa’anga
2
TRY
949
Turkish lira
2
TTD
780
Trinidad and Tobago dollar
2
TWD
901
Taiwan dollar
2
TZS
834
Tanzanian shilling
2
UAH
980
Ukrainian hryvnia
2
UGX
800
Ugandan shilling
2
USD
840
United States dollar
2
UYU
858
Uruguayan peso
2
UZS
860
Uzbekistan som
2
VEF
937
Venezuelan bolivar fuerte
2
VND
704
Vietnamese dong
0
VUV
548
Vanuatu vatu
0
WST
882
Samoan tala
2
XAF
950
CFA franc BEAC (Central African CFA
franc)
0
XCD
951
East Caribbean dollar
2
XOF
952
CFA Franc BCEAO (West African CFA franc)
0
XPF
953
CFP franc
0
YER
886
Yemeni rial
2
ZAR
710
South African rand
2
ZMK
Zambian kwacha
2
ZMW
967
Zambian kwacha
2
ZWD
Zimbabwean dollar
2
ZWL
932
Zimbabwean dollar
2
Reason Codes
These tables list the reason codes and the possible status and reason
values that are returned with the response from the Boarding Registration Service
(BRS) API and the Product Enablement and Configuration Service (PECS) API.
Visa Acceptance Solutions
reserves the right to add new reason codes at any time. If
your error handler receives a reason code that it does not recognize, it should use
the decision field to determine the result.
BRS API Reason Codes
Reason Codes
Reason Code
Description
200
Successful.
Possible
status
values:
PROCESSING
: The registration is still
in progress. You can get the latest status by calling
the
GET
endpoint using the registration
ID.
SUCCESS
: The request was
successful.
FAILURE
: The registration failed before
the organization was created. Refer to the details
section in the response for more information.
PARTIAL
: The registration created the
organization successfully but failed in at least on step
while configuring it. Refer to the details section in
the response for more information.
400
Bad request.
Possible
reason
values:
INVALID_DATA
SYSTEM_ERROR
RESOURCE_NOT_FOUND
422
Business validations failed.
Possible
reason
values:
INVALID_DATA
500
Internal server error.
Possible
reason
values:
SYSTEM_ERROR
Example: Partial Processed Response from the BRS API
Search for the organization in the Manage Merchant page. For more information on
searching for an organization, see Searching for Organizations.
Find the organization in the Search Results table and click the eyeball icon. The
Merchant Details page displays.
Click
+ Add Products
. The Add a Product screen displays.
Select a product and click
Add
.
If there are configuration steps for the product that you chose, a configuration screen
displays. Choose your configurations and click
Save
.
Search Results
After you search for organizations, a list of organizations returned by the search are
displayed in the table below the search options. If there are more organizations than the
screen can display in one page, you can navigate to additional search results by clicking the
arrow or page numbers at the bottom of the table.
There are a variety of things you can do with search results. See these topics:
Viewing and Editing an Organization's Processor Details
Not every organization has processor details to edit. Details vary depending on the
processor. To edit an organization's processor details:
Find the organization in the Search Results table and click the eyeball icon. The
Merchant Details page displays. For more information on searching for an organization, see
Searching for Organizations.
Click
Edit
in the Processor section.
Make the changes and click
Save
.
Changing
an Organization's Status
To change an organization's status:
Find the merchant in the search results and click the eyeball icon in the More
column.
Click the
Status
drop-down menu in the upper-right side of the
page and select a status.
Click
Confirm
.
Viewing an Organization's Hierarchy
To see an organization's place in the hierarchy of organizations:
Find the merchant in search results and click the three dots (...) in the More
column.
Select
View Organization Hierarchy
. The organizations immediately above and below the organization are displayed. You can
view the hierarchy of these organizations by repeating the steps above.
Set Up the Transacting Organization and Products
The transacting organization is the entity that processes transactions. Follow these
steps to create a transacting organization and configure products for it:
Click
Start
in the Transacting Organization and Products
section. The Transacting Organization and Products page is displayed.
Optional: modify the name and ID of the organization by using the text fields in the
Transacting Organization Details section. The ID must be unique, not just in the portfolio
or account, but across the system. By default, the name is the merchant name with 001
added to the end of the name. If you accept this default, additional transacting
organizations will have default names that iterate the numbers at the end of their names,
beginning with 002.
Optional: By default, the organization information is inherited from the parent
organization. To edit the organization information, click
Edit
in
the Transacting Organization Information section. After editing, click
Apply
.
To enable a product in the Product Enablement section, click the Enablement drop-down
menu and select
Enabled
.
To modify the configuration, click the
Edit
or
Configure
button (depending on the product). Some products are
not configurable.
To confirm the configuration, click
Apply
.
To save all product configurations, click
Save
. You are returned
to the Add Merchant page.
To continue working with this organization, click
Continue working with this
merchant
. To finish and return to Merchant Management or to add another
merchant, click
Return to merchant management
.
ADDITIONAL INFORMATION
The image below shows the Transacting Organization and Products page.
Figure:
Transacting Organization and Products
Managing Organization Information
There are three types of information that you can view and edit. See these topics:
Configure the Transacting Organization and Products
Follow these steps to modify the transacting organization details, or to enable and
configure products for the transacting organization:
Click
Start
in the Transacting Organization and Products
section. The Transacting Organization and Products page is displayed.
Optional: modify the name and ID of the organization by using the text fields in the
Transacting Organization Details section. By default, the name is the merchant name with
001 added to the end of the name. If you accept this default, additional transacting
organizations will have default names that iterate the numbers at the end of their names,
beginning with 002.
Optional: to edit the organization information, Click
Edit
in
the Transacting Organization Information section. After editing, click
Apply
.
To enable a product in the Product Enablement section, click the Enablement drop-down
menu and select
Enabled
.
To modify the configuration, click the
Edit
or
configure
button (depending on the product). Some products are
not configurable.
To confirm the configuration, click
Apply
.
To save all product configurations, click
Save
. You are returned
to the Add Merchant page.
To continue working with this organization, click
Continue working with this
merchant
. To finish and return to Merchant Management, click
Return to merchant management
.
Updating
an Organization's Products
There are three ways to modify an organization's products:
When you search for an organization, you might find that the list of results is large and you
must sort or filter the results to find what you are looking for. There are a number of ways
to sort search results.
Click the column headings for Name, ID, Type, and Creation Date to sort them in ascending
or descending order.
Enter text in the text field of the Name and ID columns to filter the results for
organizations that correspond to the text you entered.
Filter results according to organization type by selecting
Type
from the drop-down menu in the Type column, or enter text to pick a type.
Viewing and Editing an Organization's Business Details
To edit an organization's business details:
Find the organization in the Search Results table and click the eyeball icon. The
Merchant Details page displays. For more information on searching for an organization, see
Searching for Organizations.
Click
Edit
in the Merchant Information section.
Use the text fields to change information. For technical and emergency contact
information, click
Edit
in those sections.
When you finish, click
Save
.
Searching
for Organizations
The Manage Merchants page enables you to search for and view the details of any
organization connected to the account to which you are logged in.
In the left navigation panel, click the
Portfolio Management
icon.
Under Merchants, click
Manage Merchants
. The Manage Merchants
page appears.
Click
Search
to search for all merchants or use the search
filters. There are three default search filters:
ADDITIONAL INFORMATION
Organization ID
Organization Name
Organization Type
To add a filter, click
+ Add Filter
. Select a filter using the
drop-down menu, or search for a filter by entering text into the New Filter field.
Click
Search
when you finish adding filters.
To reset the search filters and start over, click
Reset Search
.
To understand how to use the search results, see Search Results.


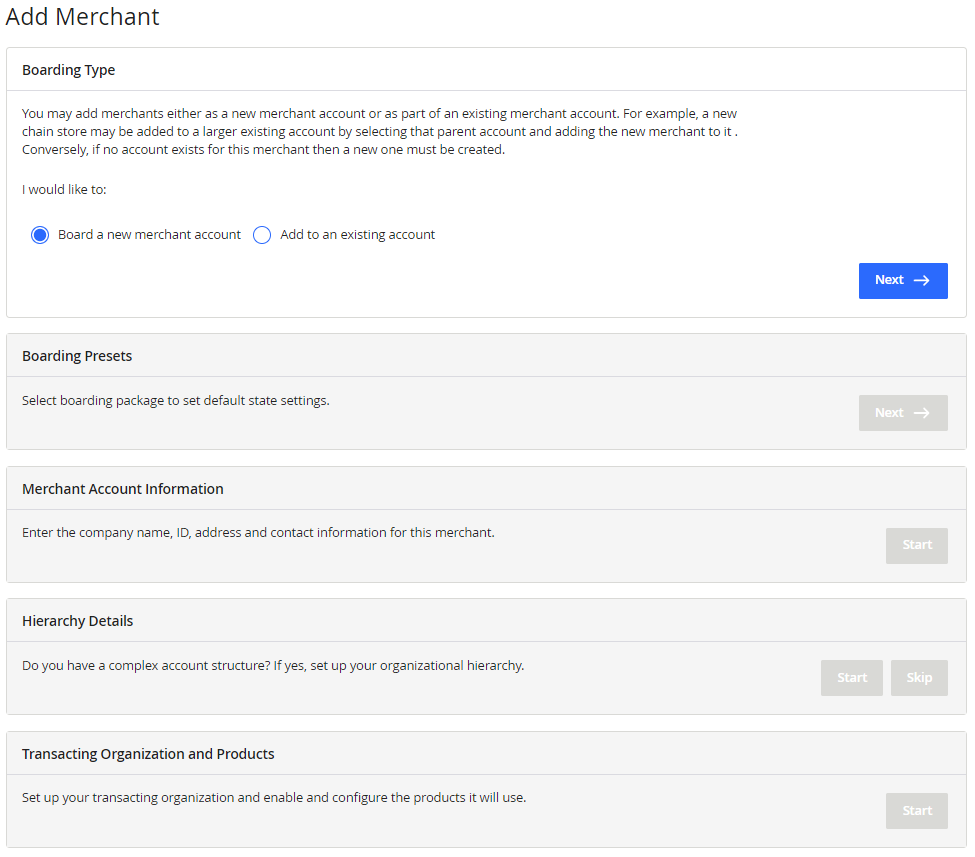
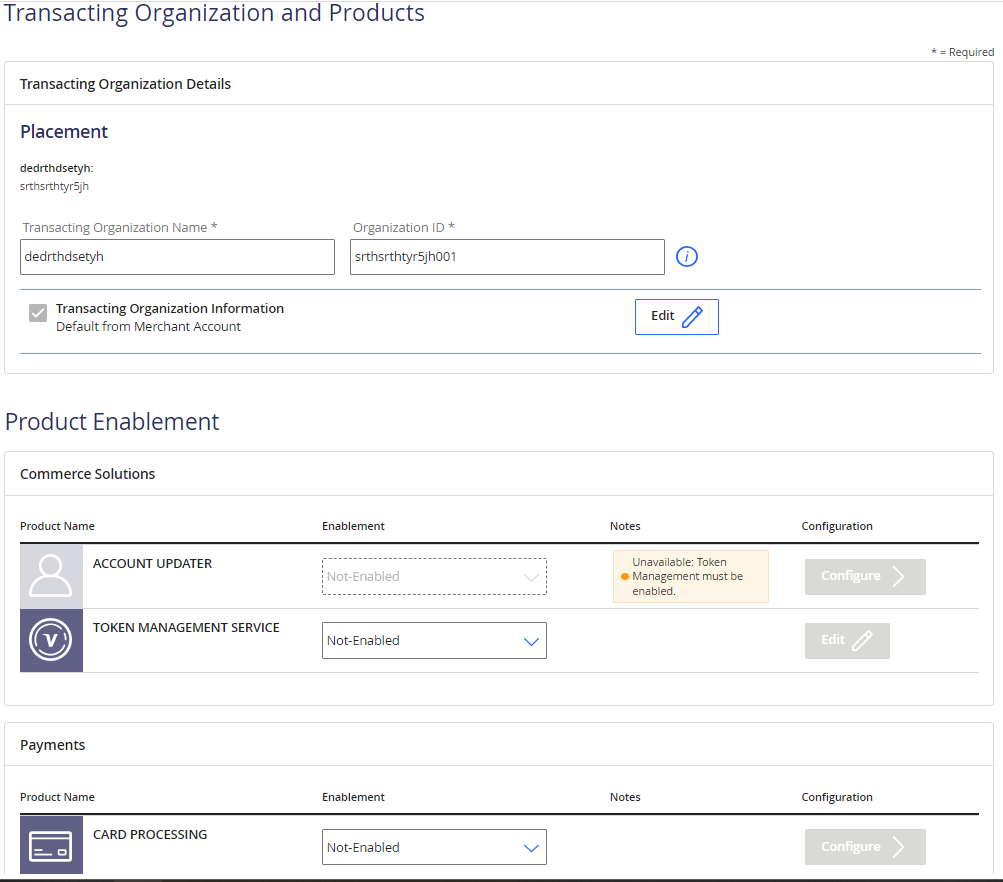
 icon.
icon. ).
).
 icon.
icon.