On This Page
Introduction to the Visa Acceptance Agent
Toolkit
Visa Acceptance Agent
Toolkit
Use the
Visa Acceptance Agent Toolkit
to simplify
the process of integrating the Visa Acceptance
Solutions
APIs into your agentic workflows. The specialized tools in the
toolkit are designed to enable your AI agents to utilize the Pay by Link
and Invoicing APIs. This allows your agents to create and
manage payment links and invoices. The toolkit is built in TypeScript, and you can
integrate it with the Vercel AI SDK or use it to access a Model Context Protocol (MCP)
server. This guide provides step-by-step instructions that explain how to begin using the toolkit
with IDE tools or applications, such as the Claude Desktop, for development and testing
purposes.
This toolkit is in the pilot phase. AI applications do not always
produce the same results. Users are responsible for evaluating their own AI
applications, and it is recommended that users evaluate such applications in a
controlled test environment.

- Quick Start Options
Requirements
These are the prerequisite requirements for using the
Visa
Acceptance Agent Toolkit
:- Node.js version 18 or later.
- Visa Acceptance Solutionsmerchant ID (MID) or organization ID. To sign up for a sandbox account, see the Sandbox Account Sign Up page.
- REST API shared secret key. To create a key with an existing organization or merchant account, see theCreating and Using Security Keys User Guide. If you need to sign up for a sandbox account, the sign up process creates a test key.
- Invoicing orPay by LinkAPIs enabled. To enable these APIs, contact your account manager. For additional information, see theInvoicing Developer Guide for the REST APIand the.Pay by LinkDeveloper Guide for the REST API
GitHub Additional Resources
To access the most up to date
Visa Acceptance Agent
Toolkit
files in GitHub, see:MCP Additional Information
For additional information about MCP, see:
Quick Start Options
This section describes the two quick start options for adding the
Visa Acceptance Platform
APIs to your agentic workflows:Visa Acceptance Agent Toolkit Quick Start
Visa Acceptance Agent Toolkit
Quick StartFollow these steps to install and configure the
Visa Acceptance Agent Toolkit
.- Run this command to install theVisa Acceptance Agent Toolkit:npm install @visaacceptance/agent-toolkit
- To enable environment variables, create a new.envfile and insert this code snippet in the file. Replace the sample values with your merchant credentials. To create a REST API shared secret key, see theCreating and Using Security Keys User Guide.VISA_ACCEPTANCE_MERCHANT_ID=your_merchant_id_here VISA_ACCEPTANCE_API_KEY_ID=your_api_key_id_here VISA_ACCEPTANCE_SECRET_KEY=your_secret_key_here
- Use this sample code for your AI agents. In this sample, the toolkit is configured to use the test environment and has all of the Invoicing andPay by Linktools enabled.import { VisaAcceptanceAgentToolkit } from "@visaacceptance/agent-toolkit/ai-sdk"; const toolkit = new VisaAcceptanceAgentToolkit({ merchantId: process.env.VISA_ACCEPTANCE_MERCHANT_ID, apiKeyId: process.env.VISA_ACCEPTANCE_API_KEY_ID, secretKey: process.env.VISA_ACCEPTANCE_SECRET_KEY, configuration: { context: { environment: "SANDBOX", }, actions: { invoices: { create: true, update: true, list: true, get: true, send: true, cancel: true }, paymentLinks: { create: true, update: true, list: true, get: true, }, }, }, });
Example: Creating a Chatbot with the Visa Acceptance Agent Toolkit
Visa Acceptance Agent Toolkit
This example shows the toolkit being used to create an AI
chatbot.
require('dotenv').config();
import { VisaAcceptanceAgentToolkit } from '@visaacceptance/agent-toolkit/ai-sdk';
import { openai } from '@ai-sdk/openai';
import { generateText } from 'ai';


const configuration = {
  actions: {
    paymentLinks: {
      create: true
    }
  },
};

const visaAcceptanceAgentToolkit = new VisaAcceptanceAgentToolkit(
  process.env.VISA_ACCEPTANCE_MERCHANT_ID,
  process.env.VISA_ACCEPTANCE_API_KEY_ID,
  process.env.VISA_ACCEPTANCE_SECRET_KEY,
  "SANDBOX",
  configuration
);


async function aiGeneratedPaymentLink() {
  console.log("Attempting to generate a payment link...");
  const userPrompt = `Create a payment link for a Ski trip to Whistler Canada with a compelling selling point in the description. The total amount is $1000.00.`;
  const result = await generateText({
    model: openai('gpt-4o'),
    tools: {
      ...visaAcceptanceAgentToolkit.getTools(),
    },
    maxSteps: 5,
    prompt: userPrompt,
  });
  console.log(result);
}

aiGeneratedPaymentLink();
MCP Server Quick Start
The MCP server enables you to integrate the Visa Acceptance APIs using tool calling. This
process supports multiple tools that can access the
Visa Acceptance Platform
APIs,
such as Pay by Link
and Invoicing. This is a local MCP
server.Follow these steps to create a MCP server using npx with your merchant credentials and
preferred tools.
- Run one of these commands to access the Visa Acceptance MCP server. These commands use the test environment.
- Enable all tools:
- npx -y @visaacceptance/mcp --tools=all --merchant-id=MERCHANT_ID --api-key-id=API_KEY_ID --secret-key=SECRET_KEY
- Enable specific tools:
- npx -y @visaacceptance/mcp --tools=tool.values --merchant-id=YOUR_MERCHANT_ID --api-key-id=YOUR_API_KEY_ID --secret-key=YOUR_SECRET_KEY
toolsparameter using the comma character (,):Visa Acceptance SolutionsToolsVisa Acceptance PlatformToolsAPI ServiceFieldInvoicingCreateinvoices.createUpdateinvoices.updateListinvoices.listRetrieveinvoices.getSendinvoices.sendCancelinvoices.cancelPay by LinkCreatepaymentLinks.createUpdatepaymentLinks.updateListpaymentLinks.listRetrievepaymentLinks.get- Example of concatenated tool values
- --tools=invoices.create,invoices.update,paymentLinks.create,paymentLinks.update
Support for Claude Desktop
If you use the Claude Desktop, add this to your
claude_desktop_config.json
file:{ "mcpServers": { "visa-acceptance": { "command": "npx", "args": [ "-y", "@visaacceptance/mcp", "--tools=all", "--merchant-id=YOUR_MERCHANT_ID", "--api-key-id=YOUR_API_KEY_ID", "--secret-key=YOUR_SECRET_KEY" ] } } }
Test Prompts
Enter these prompts in your test environment to verify that the
Visa Acceptance Platform
APIs are successfully integrated into your agentic workflows.
Edit the prompts as needed to meet your organization's needs.- Prompts for Your AI Agents
- Create a payment link for $450 in EUR for ACME Corp, due in 15 days.
- Create an invoice for $450 in EUR for ACME Corp, due in 15 days.
- Find all unpaid invoices over $500.
- Update invoice #5 to change due date to June 1st.
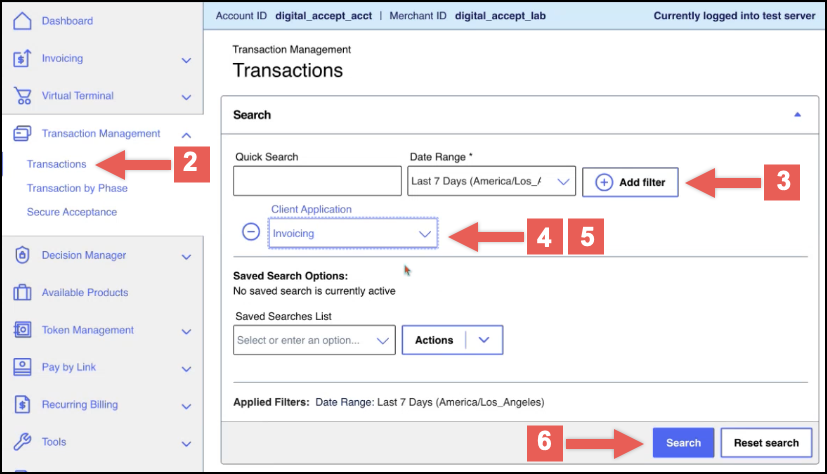
Validate Your Agents' Output
To verify that your agents used the APIs to create transactions, follow these steps
to search for the transactions in the
Business Center
.- Log in to theBusiness Center:
- On the left navigation panel, click
 Transaction Management>Transactions.The Transaction page appears.
 - ChooseAdd filter.TheNew Filterfield appears.
- Click theNew Filterfield and enterClient Applicationor chooseClient Applicationfrom the drop-down menu.
- Click theNew Filterfield again and enter the product type you want to verify or choose it from the drop-down menu.
- When done, clickSearch.The Search Results table displays only the transactions that belong to the product you chose.
Customer Support
For additional help, contact the
Visa Acceptance Agent
Toolkit
team at this email address:You can also contact
Visa Acceptance Platform
customer support here:Recent Revisions to This Pilot Document
25.08.01
Pilot release.